Autumnal deer embroidery pattern

Get stitching and appliquéing Kirsty Neale’s folksy, autumnal deer embroidery pattern.

Try 6 issues of your choice of craft magazine from just £9.99

Published: October 16, 2020 at 7:36 am

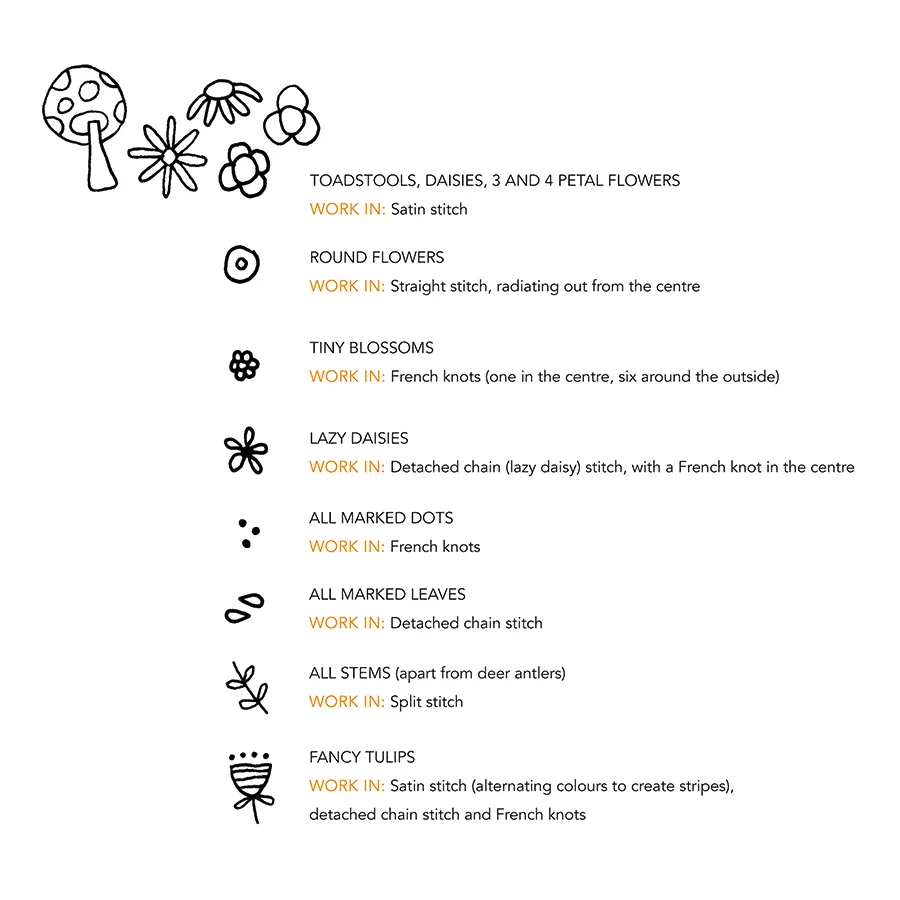
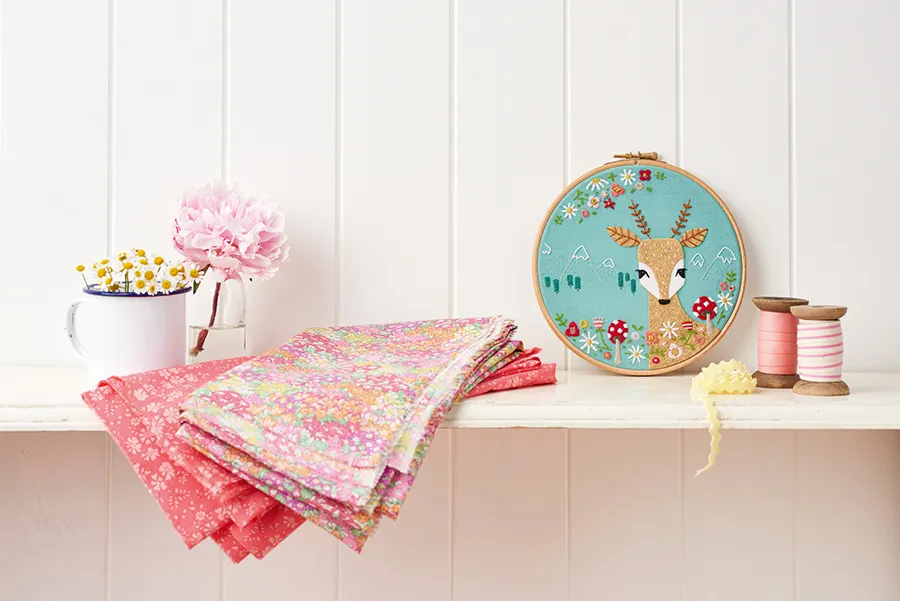
Introduce a little Scandi-style folk art into your space – or gift it as a birth or wedding sampler – with this super-cute fawn design by Kirsty Neale. The seven stitches used here – satin, straight, French knot, split, whipped backstitch, lazy daisy and backstitch – are all classics that you can use in projects again and again. Practise them first on a spare piece of fabric, using our easy-to-follow diagrams on page 26, and you’ll soon have all of them mastered.

To personalise your work, add a name and date in backstitch in the space next to the fawn’s head. You could also take a couple of the flower and leaf motifs and stitch them onto a gift tag, or maybe a child’s pocket.

Use two strands of thread for all of the stitching, and make sure you work in a large embroidery hoop to keep your work neat and even.

This project was created by Kirsty for Mollie Makes magazine – for more easy-make craft projects and creative inspiration, take a look at all the free embroidery projects here on Gathered or click here to find more Mollie projects.

Materials

  • Download the deer embroidery pattern template
  • Fusible webbing (such as Bondaweb)
  • Fawn-coloured felt, approx. 12cm (43⁄4") square
  • White or cream- coloured felt, approx. 30cm (12") square
  • Mid-weight cotton or linen fabric, approx. 30cm (12") square
  • Water-soluble fabric marker
  • Embroidery hoops, 18cm (7") for framing plus one larger for working
  • Embroidery thread in black, white, green, ecru, dark fawn, red and brown, plus shades of your choice for the flower border and mountain background
  • Acrylic or craft paint (optional)
  • Fine-grade sandpaper (optional)
  • PVA glue

To learn all the stitches for your deer embroidery check out our library of embroidery stitches.

Autumnal deer embroidery pattern

You will need:

  • Felt
  • Needle
  • Thread

Step 1

Trace the three deer templates (body, head and face) on page 100 onto fusible webbing. Roughly cut out, leaving a narrow border around the edge of each piece. Iron the body and face pieces onto fawn-coloured felt, and the head onto white.

Step 2

Cut out the three felt pieces, trimming neatly all around the drawn outlines.

Step 3

deer embroidery pattern step3
Peel off the paper backing, leaving you with felt pieces ready to assemble.

Step 4

deer embroidery pattern step4
Iron into place on your background fabric – the body section first, then the head and finally the face.

Step 5

deer embroidery pattern step5
Using the template as a guide, draw on facial details using a water-soluble marker. Fill in the eyes and nose with black satin stitch, adding a tiny white stitch in the centre of each one to create a ‘catchlight’ effect. Use whipped backstitch for the ear details, and random straight stitches to add texture to the centre of the face.

Step 6

deer embroidery pattern step6
Photocopy the flower border and background template over the page (or tear it out of your magazine if you can bear to) and position your fabric on top. Tape it to a window or use a light box, and trace the antlers, mountain background and flower border onto the fabric with a water-soluble marker. You may have to freehand draw the parts that cross over the deer, if the felt is too thick.

Step 7

deer embroidery pattern step7

Stretch your fabric into a hoop, ready to add the stitched details. It’s a good idea to work in a larger 20cm (8") or 23cm (9") hoop for this, as the flower border would sit too close to the edges of an 18cm (7") hoop (which is the size you’ll eventually use for framing). Stitch the leaf-like antlers into place to finish off the deer. Make a row of backstitches along the centre of each one, and then add a lazy daisy stitch to make each leaf.

Step 8

deer embroidery pattern step8
Begin sewing the flower and toadstool borders into place, using the stitch guide to help, or working your own favourite embroidery stitches instead.

Step 9

deer embroidery pattern step9
When the flowers are complete, stitch the trees and mountains using a mixture of straight stitch, backstitch and whipped backstitch. Pick thread colours that blend with your background and are a little more muted than those in the flower border.

Step 10

deer embroidery pattern step10
If you’d like a colourful frame, brush a layer of acrylic paint onto the 18cm (7") embroidery hoop. Leave to dry, then rub gently with sandpaper to smooth the surface. Repeat twice more.

Step 11

deer embroidery pattern step11
Dampen your fabric to remove any soluble marker lines that are still visible, then iron it flat. Carefully stretch into the painted hoop and tighten the screw.

Trim away excess fabric to leave a border 2-3cm (1-11⁄2") wide all the way around. Sew a line of large running stitches around the edge, pull tight to gather and then knot to secure.

Step 12

deer embroidery pattern step12
Cut out a 17cm (63⁄4") circle of white felt. Brush a strip of PVA glue, 1-2cm (1⁄4-1⁄2") wide, around the outer edges. Press down over the back of the hoop to hide your stitching and the gathered edges.

We hope you enjoyed making Kirsty’s project. Share a picture of your deer embroidery hoops with us on Instagram using #molliemakers, and don’t forget to subscribe to Mollie Makes to get creative inspiration delivered to your door every month!

kirtsynealeKirsty Neale

Freelance writer, designer and illustrator Kirsty loves colour, pattern and typography. She’s also the author of two craft books, Paperie (100 Creative Papercraft Ideas) and Hoop-La: 100 Things To Do With Embroidery Hoops.