How to chain stitch and split stitch tutorial

Our series of basic guides to embroidery stitches continues with this look at two nifty little stitches that you can have a lot of fun with…

Try 6 issues of Love Embroidery magazine for just £9.99| SAVE 77%

Published: September 15, 2019 at 7:26 pm

Hand embroidery is a wonderful skill to learn and master as it is so versatile. It’s as simple as drawing on a piece of fabric then stitching over it. You can use this skill to stitch pictures, embellish items or really personalise a garment. For this latest instalment in our Embroidery Stitch Library series, we’re going to talk you through two essential stitches to try if you’re starting out today.

Split stitch has a more delicate look than chain stitch – you can use it to create thicker lines or arrows. We’ll show you how and share a few tips to try before you start embroidering your design.

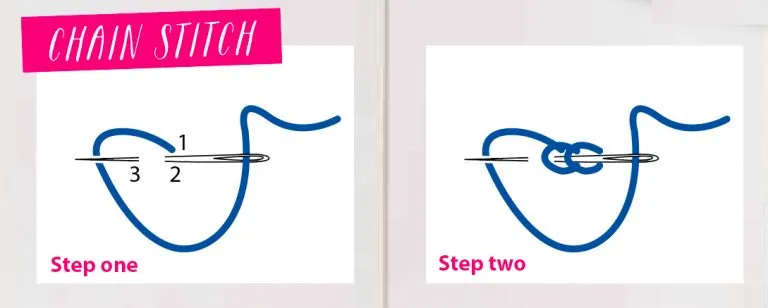
Before you begin, Free arrow embroidery pattern onto your fabric lightly with pencil and stitch over the lines. Now stitch the pattern using our stitch guides for chain and split stitch below!

New to embroidery? Start here

If you're reading this post with no previous experience of embroidery, have a read of our Beginner's Guide for all sorts of handy tips for starting your very first embroidery project!

How to chain stitch

You will need:

  • Sewing needle
  • Embroidery Thread

Step 1

Bring your needle out just above the traced line at 1. Push the needle back in again at 2 just below the line. Make it as close to where it emerged as possible without going into the same hole. Bring the needle up again at  3, making sure that the thread is lying under the needle.

Step 2

Pull the needle through the fabric slowly to form a neat loop – don’t pull too tightly or the chain effect will be lost. Continue stitching from right to left in this way, making sure all the chains are the same size. Vary the number of strands you use for thinner or  thicker lines of chain stitch.

How to split stitch

How to split stitch

Step one

Make a small straight stitch on the traced line by bringing your needle up at 1 and down at 2. Bring the needle up again at 3 the same distance away from the first stitch as the length of the stitch. This will ensure your stitches are all the same length for a neat and even look .

Step two

Push the point of the needle into the first stitch you made about one quarter of the way from the end. If your thread has just one strand then pierce the centre, but if you have two strands or more than you can push the needle between the strands themselves.

How to sew chain stitch embroidery pattern