How to make a starburst card

Find inspiration for making starburst cards - they're easy to make and a great way of using up paper scraps!

Try 6 issues of any craft magazine for just £9.99

Published: April 16, 2021 at 9:10 am

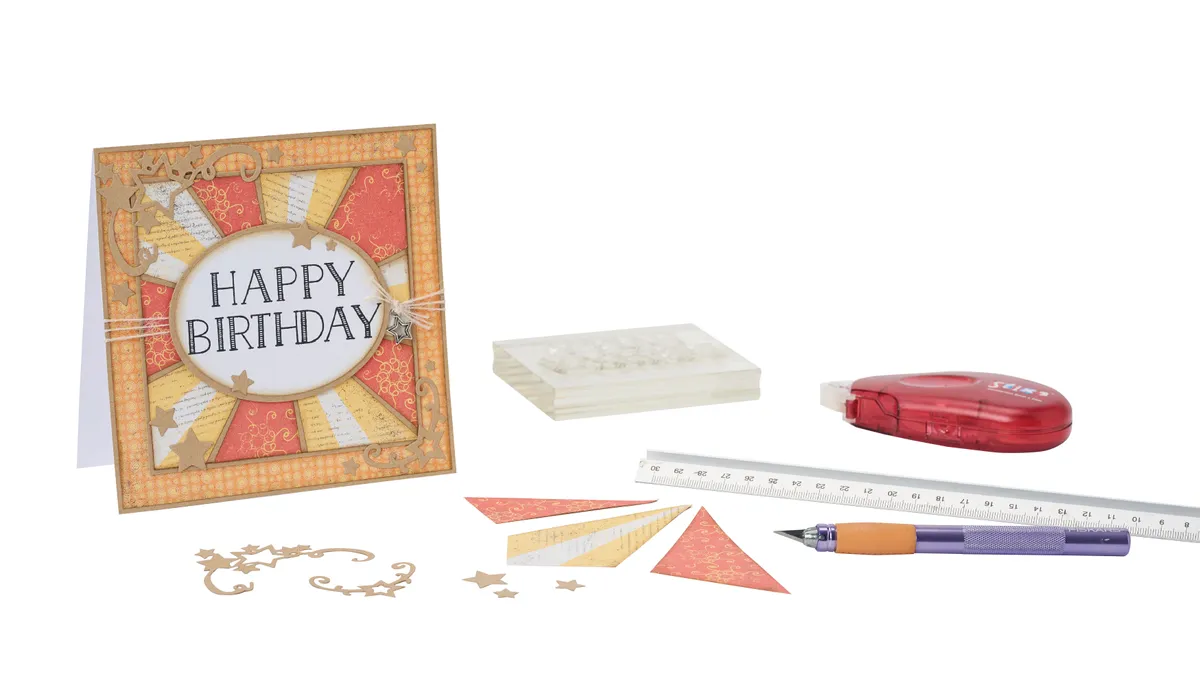
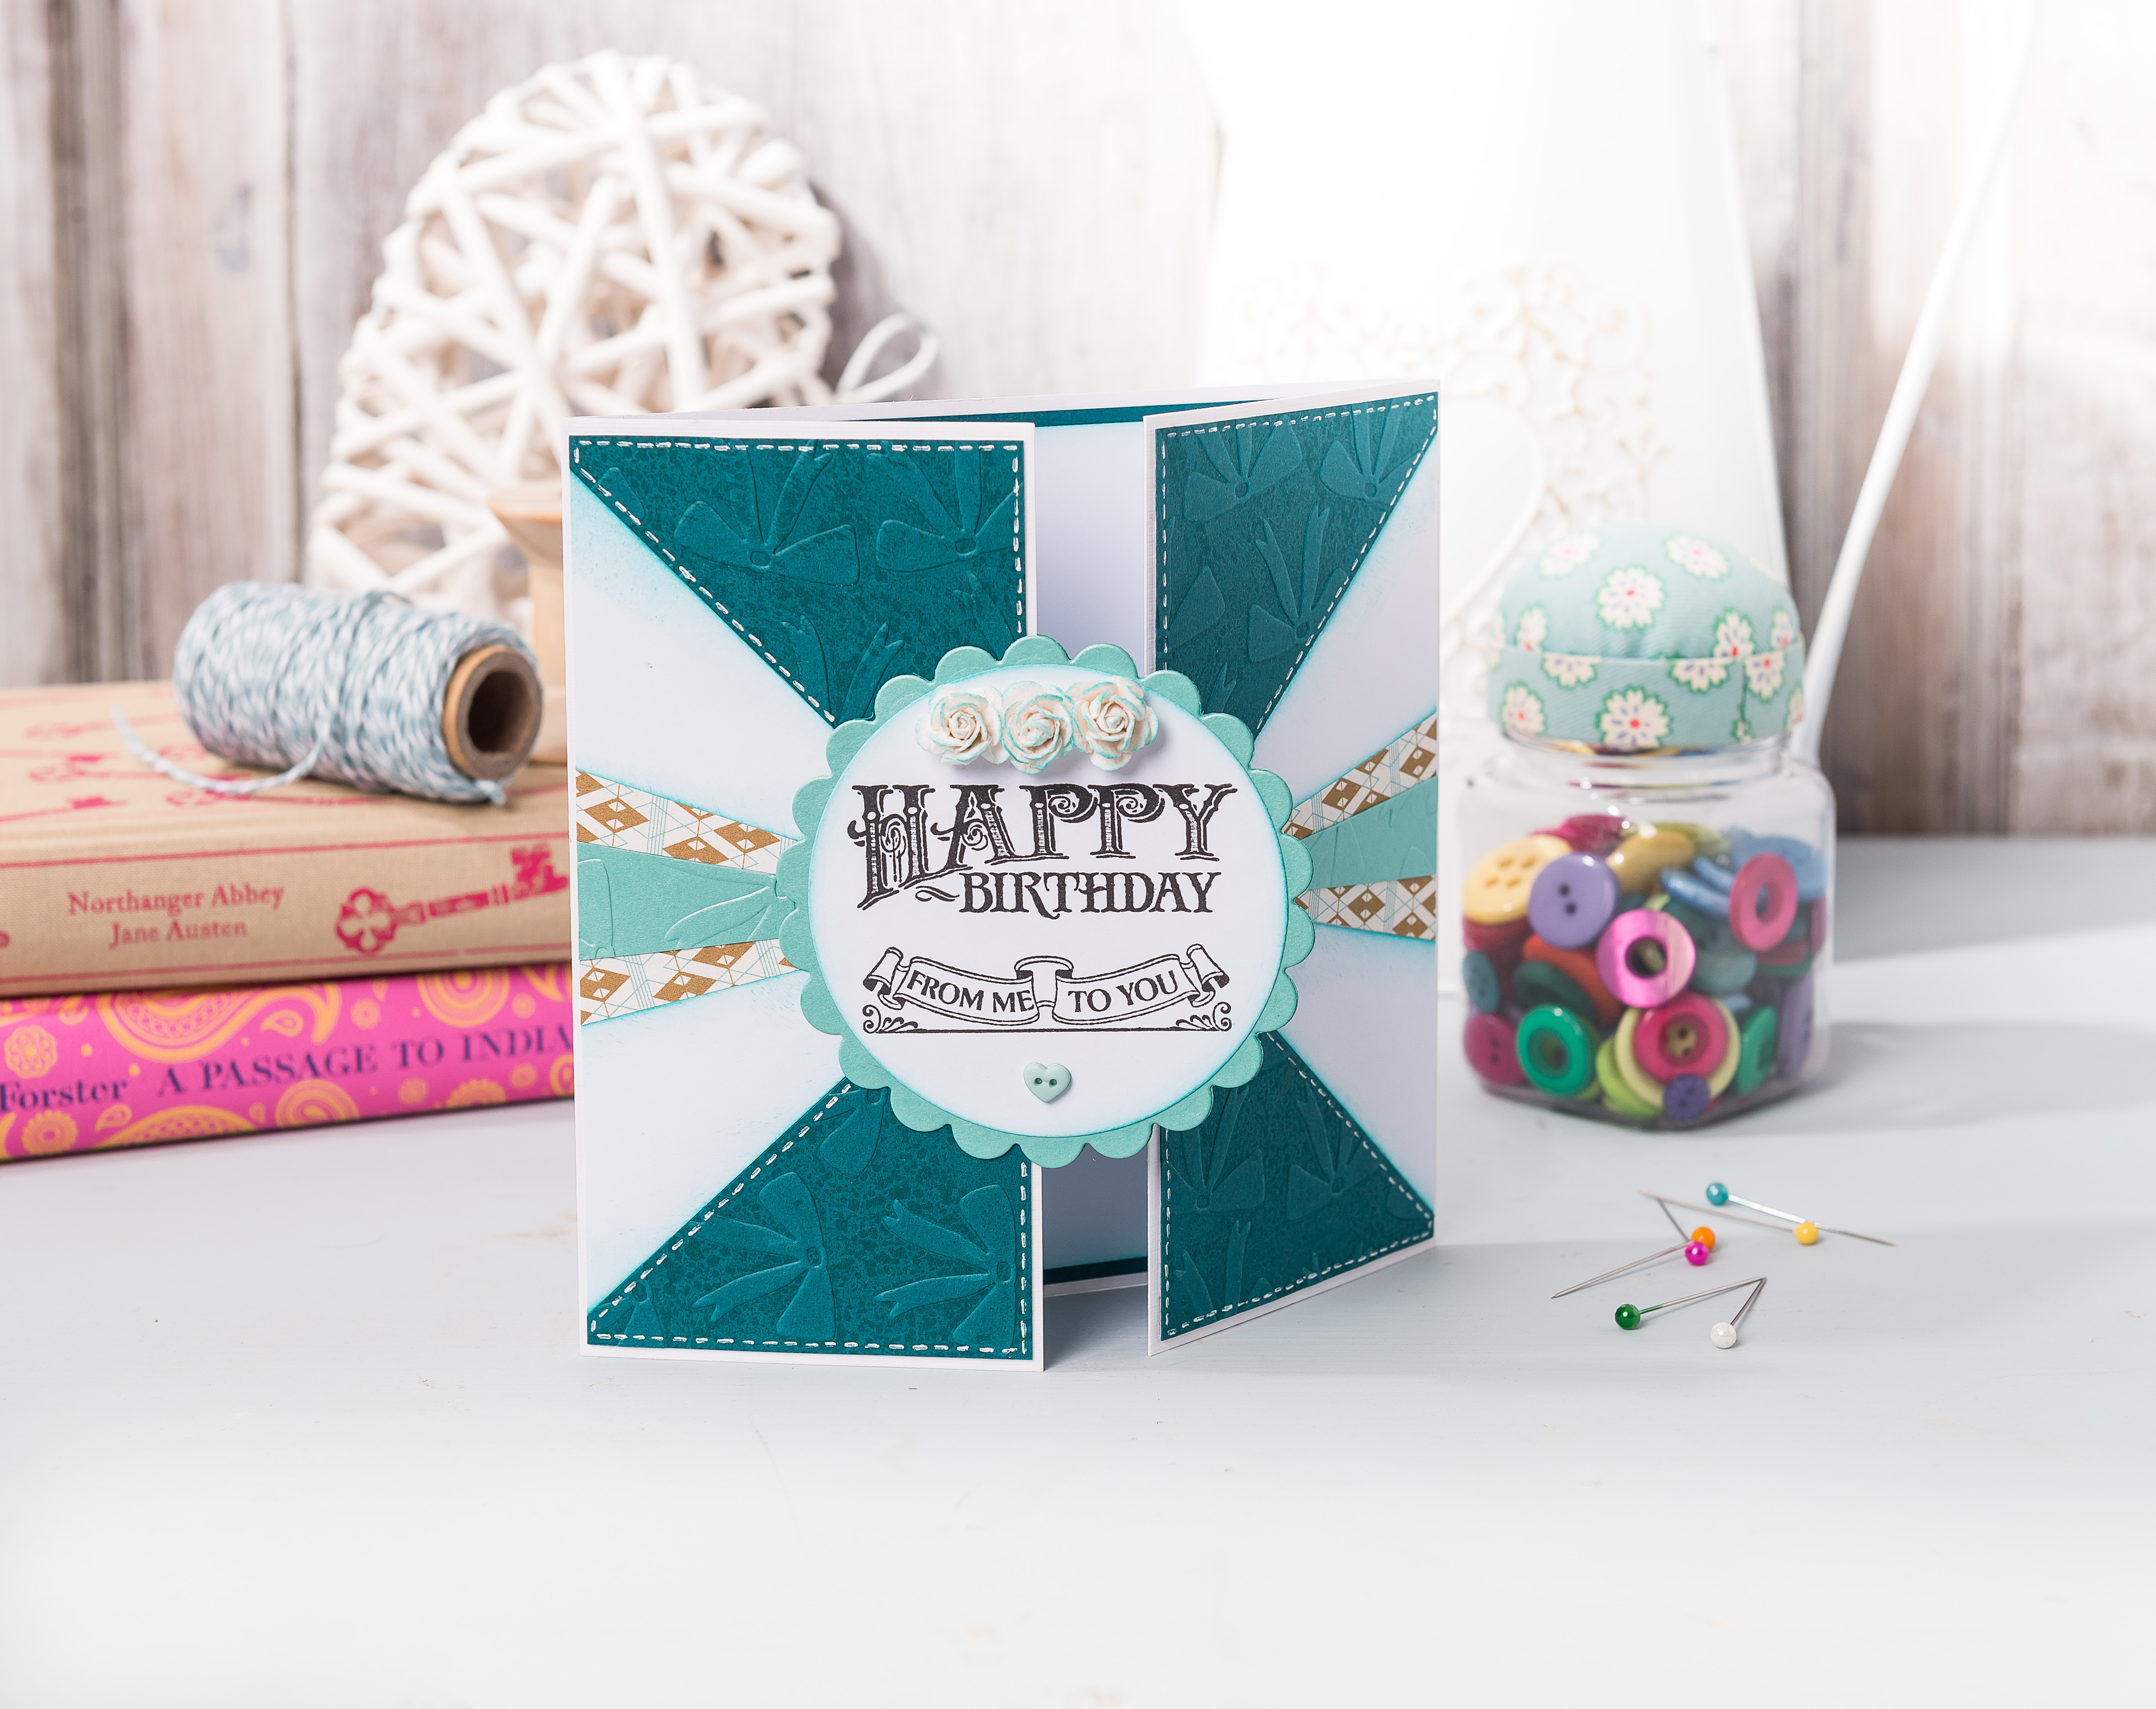
The starburst technique uses triangular sections of paper, radiating out from a singular point, to create beautiful backgrounds for cards - or as a focal point in itself. You can have great fun mixing and matching lots of different patterns and colours to create these bright and cheerful designs.

This clever technique is a creative way to use up all those scraps of card and paper you have tucked away, and so easy to get to grips with. Also known as sunburst cards, these designs are surprisingly easy to make. Simply cut scraps into random-sized squares or rectangles and slice them in half diagonally, then stick them onto a panel of thin card. The triangular shapes need to overhang the edges of your card panel – you then trim the excess away when finished.

Once you’ve completed your starburst panel you can use it as it is or die-cut different shapes from it. The end result is wonderfully eye-catching and we have six different designs, all with step-by-step tutorials to whet your appetite.

Want some free patterned paper for this project? Take a look at our ever-growing collection of free patterned papers, there are lots to choose from and there are lots of different themes – we love these summer picnic papers or these beautiful summer meadow papers!

We love seeing what you make, so don’t forget to share your card making projects with us on Instagram, Facebook or Twitter, too!


Happy Birthday design #1

To make this starburst card you will need:

  • Patterned papers
  • Sentiment stamps
  • Star dies
  • Distress Ink
  • Kraft card
  • Oval dies
  • Baker's twine
  • Star charm

Step 1

How-to-make-a-starburst-card-step-1

Cut a 14.5 × 14.5cm white top-fold card base and cover the front with kraft card. Add brown ink to the edges of a slightly smaller piece of orange paper and layer it on top.

Step 2

How-to-make-a-starburst-card-step-2

Take some yellow-and-white patterned paper and cut along the lines of the pattern to create eight sections with three rays each, and two sections with two rays each.

Step 3

How-to-make-a-starburst-card-step-3

Cut a piece of kraft card to 11.5 × 11.5cm then carefully measure and mark the centre point, which is where all your patterned paper strips will radiate out from.

Step 4

How-to-make-a-starburst-card-step-4

Lay out the patterned pieces of paper with the tips at the marked centre point. Arrange the pieces until you’re happy with the design.

Step 5

How-to-make-a-starburst-card-step-5

Glue each of the pieces down in turn, leaving a small gap between them, so the kraft card shows through. Leave the largest piece until the end and, if needed, trim it to fit the gap.

Step 6

How-to-make-a-starburst-card-step-6

Trim all the sunburst sections that are overhanging the edge of the kraft square then ink the outer edges of the rays. Mount onto a slightly larger piece of kraft card.

Step 7

How to make a starburst card step 7

Stamp the sentiment in black ink, cut into an oval shape and add Frayed Burlap Distress Ink to the edges. Layer this onto a slightly larger kraft oval and add sticky foam pads on the back.

Step 8

How to make a starburst card step 8

Affix the starburst panel centrally onto the card, using sticky foam pads. Wrap with three lengths of twine and add the sentiment on top. Add die-cut stars in kraft card and finish with a star charm.


More starburst card ideas

Just a note

Starburst card idea 1

Step 1

Emboss a 14 x 14cm square of white card with the bow folder. Mount onto some turquoise pearlescent card and wrap with ribbon.

Starburst card idea 1 – step 1

Step 2

Cut rectangles from the Aurora paper pad in varying patterns and sizes. Cut diagonally across the rectangles to create your rays.

Starburst card idea 1 – step 2

Step 3

Arrange the rays onto a 10x10cm piece of thin white card, positioning so the points meet slightly off centre. Trim the edges.

Starburst card idea 1 – step 3

Step 4

Mount the starburst panel onto white then black cardstock, then stick to your card base at an angle, as shown.

Starburst card idea 1 – step 4

Step 5

Stamp a sentiment onto white card and die cut into a scalloped circle. Mount onto a circle of turquoise card and stick in place.

Starburst card idea 1 – step 5

Step 6

Stick a pencil button underneath your stamped sentiment. Finish your card with a ribbon bow and a small heart-shaped button.

Starburst card idea 1 – step 6


Happy Birthday design #2

Turn a simple gatefold card into a starburst card in just a few easy steps!

Step 1

Mark the centre point of a 14 x 14cm piece of white card. Cut pieces of embossed card and arrange to produce a mirror image.

Starburst card idea 2 – step 1

Step 2

Continue your design with sections of patterned paper and white card edged with Distress Ink. Trim the overhanging edges.

Starburst card idea 2 – step 2

Step 3

Cut the panel in half. Add faux stitched borders. Cut a 29 x 14.5cm piece of white card. Score at 7cm and 21.5cm. Fold back.

Starburst card idea 2 – step 3

Step 4

Stick your panels to the front of the base card. Edge a 14 x 14cm piece of card with ink, mount onto some teal card and stick inside.

Starburst card idea 2 – step 4

Step 5

Stamp your sentiment and cut into a circle. Edge with Distress Ink. Cut two slightly larger turquoise scalloped circles.

Starburst card idea 2 – step 5

Step 6

Mount your sentiment onto a circle and stick in place. Cut the second in half and stick as shown. Finish with inked paper flowers.

Starburst card idea 2 – step 6


Happy birthday design #3

Starburst card idea 3

  1. Take a 14.5 x 14.5cm card blank and position with the fold at the top. Using the largest scalloped circle die, cut an aperture into the centre of the card front.     
  2. Cut rectangles from patterned papers and trim in half diagonally. Stick to a 14.5 x 14.5cm square of thin card, arranging so the points meet in the centre. Once covered, trim away all the excess that overhangs the edges and stick inside the card blank.
  3. Stamp a sentiment onto white card and die cut into a 7cm-wide circle. Add to the starburst panel with foam pads, working through the scalloped circle to make sure it is central. Cut a small heart from a square of card covered in mini starburst rays. Attach with a foam pad.
  4. Add eyelets to all four corners of your card front and the bottom two corners of the card back. Knot ribbon through the bottom eyelets from front to back. Finish by adding strips of patterned paper mounted onto coloured card between the eyelets.

Congratulations card (left)

Starburst card idea 4 and 5

  1. Cut rectangles from a selection of papers from the Aurora paper pad, then cut in half diagonally to form the starburst rays. Also cut one ray from plain pink backing paper, and stamp with a sentiment.
  2. Starting with the pink triangle, stick the pieces onto the right side of a 14.5×14.5cm square of teal paper. Arrange the papers in a triangle shape, as shown, ensuring there are no gaps between the sections.
  3. Once all of the sections are in place, cover the joins with thin silver peel-off strips. Carefully trim the pieces to fit the square. Stick the whole panel to the front of a 14.5 x 14.5cm white card base.
  4. Cut a 7cm diameter circle of white card and emboss with the bows embossing folder. Layer onto a scalloped circle, cut from teal pearlescent card. Stick to your card and trim off the excess at the left edge.
  5. Add a silver peel-off around the edge of the circle and top with a flair button badge. Finish with die-cut stars attached with foam pads.

Thinking of You (right)

Starburst card idea 4 and 5

  1. Cut a 14.5 x 10cm piece of white card. Draw a faint pencil line across the card 5cm up from the bottom edge and mark the centre.     
  2. In the bottom section of the panel, stamp a sentiment – we’ve gone for ‘Thinking of You’ using in Versafine Onyx Black ink.
  3. Cut some rectangles of pink and patterned paper and cut in half diagonally. Stick to the panel so all the points meet at the centre point. Trim the edges to fit the piece of card.
  4. Use a fine liner to add black faux stitching to the edges of each pink triangle, and wrap the panel with a strip of ribbon to cover the pencil line. 
  5. Cut a 3.5cm-wide circle of white card and mount onto a scalloped circle cut from turquoise pearlescent card. Top with a brad, then add a small heart-shaped button next to your stamped sentiment.
  6. Make a 10.5 x 15cm card base from some turquoise pearlescent card. Mount your starburst panel onto it to finish your card design.