How to make paper

Learn how to make paper with our easy to follow step-by-step tutorial with photos, then shop the essential supplies for making paper.

Try 6 issues of any craft magazine from just £9.99

Published: June 4, 2021 at 5:24 am

How is paper made? Well - it's easier than you might think, and you can make your own paper at home! Making your own handmade paper is a great way to recycle all your scrap paper, including receipts, junk mail and scraps from cardmaking. Natural fibres such as jute or watercolour paper have the strongest fibres, but experiment with different types of paper; even toilet paper is quick to break down for moulding! You will need a frame and deckle when making paper – buy one ready-made, or make your own using small picture frames with insect mesh stapled on top.

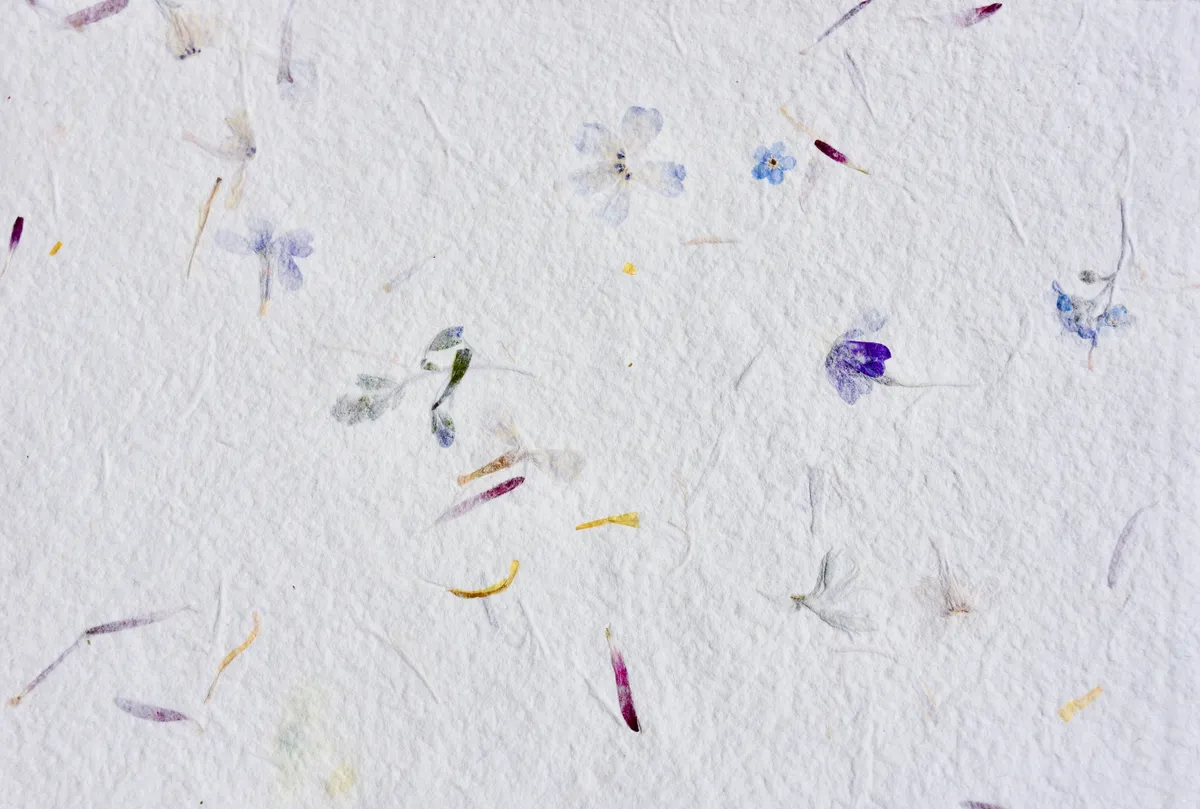
To break down the paper for your handmade paper you will need a liquidizer/ blender (make sure it is thoroughly cleaned after use). You can add seeds, flowers, glitter or even tiny bits of contrasting paper to add interest. It’s also easy to arrange pressed flowers onto the drained paper before removing it from the frame. Paper pulp also makes ‘paper clay’. Paper clay can be moulded quite easily on a rubber stamp or inside a resin mould to create a 3D paper shape that dries hard. This paper clay can then be used to make 3D card toppers or in lots of other arts & crafts projects!

Handmade paper with dried flowers - image credit Loretta Rosa

Designer Dorothy Wood has put together her top tips for this project, how to make paper:

  • Drawing, natural fibres and watercolour papers are best for making handmade paper as the fibres are stronger.
  • Recycle receipts, junk mail and scrap paper, adding small quantities to the basic handmade paper mix.
  • Put the J-cloth/paper stack on a clean flat surface outdoors. Put a board on top and stand on it to remove as much excess water as possible from your handmade paper.
  • Your handmade papers can be hung on a washing line once they have been pressed between two J-cloths or left flat to dry.
  • Leave the J-cloths in place until the handmade paper is completely dry – this can take a day or two. Peel off the J-cloths very carefully.

We love seeing what you make, so if you've made your own paper, or have followed any of our other craft tutorials, don’t forget to share your craft projects with us on Facebook and Twitter, too!

To make handmade paper you will need

  • Papermaking frames & deckles (A4 size)
  • White toilet paper
  • Kitchen blender
  • J-cloth
  • Hand towel
  • Dried, pressed flowers

How to make paper

Step 1

Select the papers you want to recycle for your handmade paper. We used inexpensive jute A4 paper and toilet paper. Tear five A4 sheets of paper and 20 pieces of toilet paper into small pieces. Soak in water for a couple of hours. If you want to make a bigger batch of handmade paper – add more paper pieces to soak.

How to make paper – handmade paper tutorial, step 1

Step 2

Fill the blender half full with warm water. Add handfuls of paper and whizz until it is reduced to fibres. Keep adding paper, and add more water if necessary so that the motor doesn’t work too hard. Clean your blender thoroughly before the next use, and the paper will dry and harden.

How to make paper – handmade paper tutorial, step 2

Step 3

Half fill a large plastic box with warm water and add the paper slurry. Swirl to distribute evenly. Put the deckle onto the frame, mesh side up, and lower into the water bath vertically.

How to make paper – handmade paper tutorial, step 3

Step 4

Turn the frame so that it is horizontal and near the bottom of the water bath. Hold down and swirl the water gently to distribute the paper slurry. Begin to raise the frame slowly. A thick layer of paper pulp will result in thick handmade card, and a thin layer of paper pulp will result in thinner handmade paper – but be careful to not make it too thin, otherwise, your handmade paper will end up with holes (unless that’s the look you’re going for, of course!)

How to make paper – handmade paper tutorial, step 4

Step 5

Once you’re happy with the distribution of the paper pulp, take the frame out of the water and rest on the top of the box to drain off the excess water. Fold a hand towel and lay a J-cloth on top.

How to make paper – handmade paper tutorial, step 5

Step 6

Remove deckle and put the frame on its side on the J-cloth. Tip down onto the prepared mat. Press a sponge all over the mesh to remove excess water, then lift the frame up from one edge, leaving the handmade paper behind. Your handmade paper will be very delicate at this stage, so try not to touch it too much.

How to make paper – handmade paper tutorial, step 6

Step 7

You can add things to the paper slurry to make the paper more interesting. Whizz some tiny flowers or petals and small leaves in the blender with the water, or chop with scissors and add to the water bath. Adding dried flower to the blender will yield different results to simply pressing the dried flowers into your paper, once you’ve turned it out on the J-cloth. Experiment and see what you like best!

How to make paper – handmade paper tutorial, step 7

Step 8

Repeat the process with the frame and deckle, making sure you swirl the flowers to get a good distribution over your handmade paper. Lift onto the box sides and leave to drain. You can add a few more flowers to make an even spread.

How to make paper – handmade paper tutorial, step 8

Step 9

Tip out the handmade paper and layer between two J-cloths as before. Once your sheets are made, pile them up and squeeze out the excess water. It can take a day or two (sometimes up to a week if your paper is very thick!) to dry completely. Once completely dry, carefully peel your handmade paper off the J-cloths to reveal your beautiful, tactile handmade paper.

How to make paper – handmade paper tutorial, step 9


How to make 3D shapes from paper pulp

Step 10

To make moulded elements for card toppers, pour some of the paper pulp into a sieve. Take a little of the soggy slurry and tip into the mould or onto a rubber stamp. Press gently to remove excess water. Making shapes out of paper pulp is really fun, and a great activity to do if you have children.

How to make paper – handmade paper tutorial, step 10

Step 11

Repeat two or three times, pressing into all the details until the mould is full. Lay paper side down on a J-cloth on the mat, and press to remove excess water. Tease away any excess paper around the edge.

How to make paper - handmade paper tutorial, step 11

Step 12

Leave to dry for a little while and then remove gently from the mould. Lay the paper clay topper flat to dry. You can tease the edges slightly once it has dried a little more to make a ragged edge if you wish.

How to make paper - handmade paper tutorial, step 12

Buy paper making supplies!

1. Floral papermaking kit

Buy now: £24.99, Etsy

Papermaking kit – Etsy

2. Handmade paper kit with dyes

Buy now: £43.82, Etsy

Handmade paper kit, Etsy

3. Quality wooden frame

Buy now: £30.99, Etsy 

High quality wooden frame for paper making, Etsy

4. J-Cloths (for drying handmade paper)

Buy now: £6.05, Amazon

J cloths for paper making – Amazon

5. Dried flowers

Buy now: £15.99, Amazon

Dried flowers for paper making, Amazon

 6. Blender

Buy now: £59.99, Amazon

Blender for making paper, Amazon


Handmade paper inspiration

How to make paper – handmade paper cards

Add a beautiful, textured look to your cards when you make your own paper – here are three beautiful cards made with handmade paper to try!

Card inspiration using handmade paper – card 2

Birthday card

  1. Cut a 200 x 150mm piece of off-white handmade paper with an attractive ragged edge along the bottom. Spritz with water and then paint blue and pale yellow watercolour so that it shades down the paper. Add a few streaks of deeper blue and leave to dry flat.
  2. Colour the bottom of a 150mm square, top-fold base card with blue chalk, fading the colour as you go up. Trim the handmade paper to 100mm tall, and cut five 28mm wide strips.
  3. Attach the strips to about 7mm below the top edge of the base card as shown, machine stitching across the top to secure. Cut some letters for ‘Happy’ from denim fabric. If you die cut the letters, you can put the denim between a sheet of A4 paper and the dies, then it will cut the letters cleanly.
  4. Attach the letters onto the banners. Attach a strip of blue raffia along the bottom of the base, with a brad at each end. Stamp the greeting with VersaMark ink onto some white card, and colour with blue chalk. Trim, and layer onto denim. Attach to the raffia, using spray adhesive.

Card inspiration using handmade paper – card 3

Handmade paper with dried flowers

  1. Colour the bottom and right-hand edges of a 140mm base card with blue chalk. Hold a piece of floral handmade paper on the card so that the ragged edge is to the bottom and right sides. Trim the other sides level with the base card.
  2. Stick the paper to the base, avoiding where the stitching will be, and then machine stitch the left and top edges to secure.
  3. Stamp the greeting onto ivory card using VersaMark ink. Colour the lettering with blue chalk, keeping the centre fairly light and making it darker further out. Trim to 80 x 60mm and colour the edges slightly darker. Layer onto a 90 x 70mm piece of denim fabric, and machine stitch around the edges.
  4. Attach greeting panel to the base card with spray adhesive. Cut slits and add denim brads in each corner. Finish with a raffia bow.

How to make paper clay

3D paper clay embellishment

  1. Make a ‘paper clay’ heart using plain off-white paper slurry, and leave to dry. Draw a heart in a 70mm square and an 85mm square. Cut out both hearts to use as templates.
  2. Cut the smaller heart out of denim fabric. Draw the larger heart on the reverse side of off-white handmade paper. Paint a line of water just outside the pencil line, and pull away the wet paper to leave a ragged heart shape. Once dry, stitch or attach the hearts together.
  3. Stamp the sentiment around a 140mm square, top-fold base card, using VersaMark ink. Colour the whole area with blue chalk, making it slightly darker around the edge. Add a strip of raffia across the middle and two denim brads.
  4. Carefully lift the paper clay heart out of the mould. Dip your finger into the blue chalk and gently rub on the raised areas of the heart. Darken the edges of both paper hearts too. Glue the paper clay heart to the denim heart, then attach the heart topper to the centre of the base with sticky fixers. Finish with a raffia bow.

Intro images in this article, How to make paper, by Nadezhda Spasibenko and Loretta Rosa