Contemporary patchwork quilt pattern
Look forward to Sunday morning lie-ins with Lynne Goldsworthy’s contemporary patchwork quilt.

Published:
If you’ve never given quilting a go before, this Nordic-feel project is a great place to start. Not only does it tap into this winter’s trend for all things Scandi, it’s also a beautiful heirloom make. Start it now and give to someone special as a thoughtful (and seriously impressive) Christmas gift.
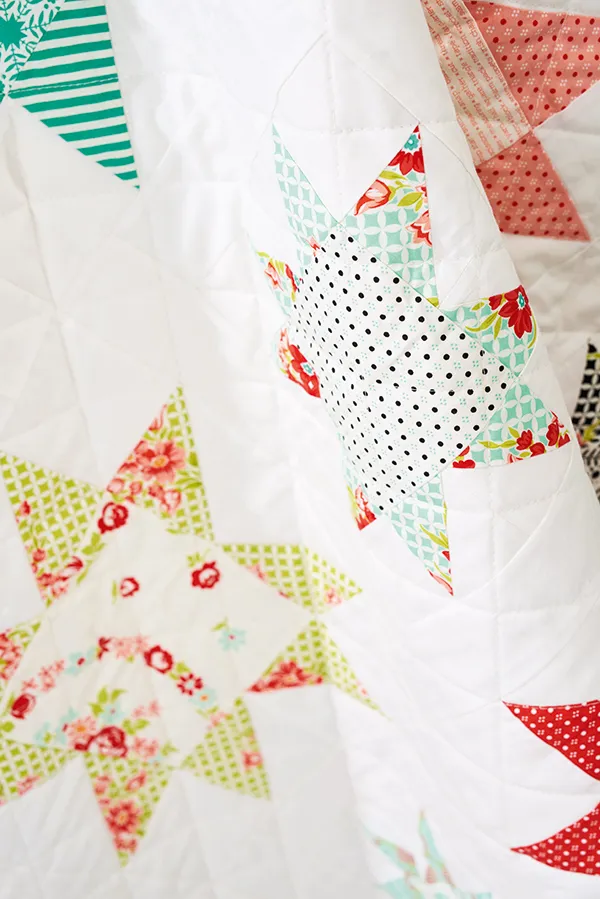
Made using the traditional morning star quilt block in fresh, contemporary fabrics, you’ll piece together triangles and squares using basic quilting techniques that are easy to master. Lynne used a Handmade by Bonnie and Camille for Moda Fabrics fat quarter bundle for the top, back and binding, then Robert Kaufman Kona Cotton in Snow for the background. But, you can mix and match fabrics of your own if you prefer, or switch up the colour scheme – we like the idea of using a selection of solid brights against a wintery grey base.
This project was created by Lynne’s for Mollie Makes magazine – for more easy-make craft projects and creative inspiration, subscribe to Mollie or click here to find out more.
Materials
- Background fabric, 2.5m (23⁄4yrds)
- Scrap fabrics, 2.6m 7 (2 /8 yrds) total or 12 fat quarters
- Backing fabric, 3.5m (33⁄4yrds)
- Binding fabric, 0.5m (1⁄2yrd) or 2 fat quarters
- Wadding, 1.7m (68″) square
- Paper for templates
- Templates from issue 71 which you can download here
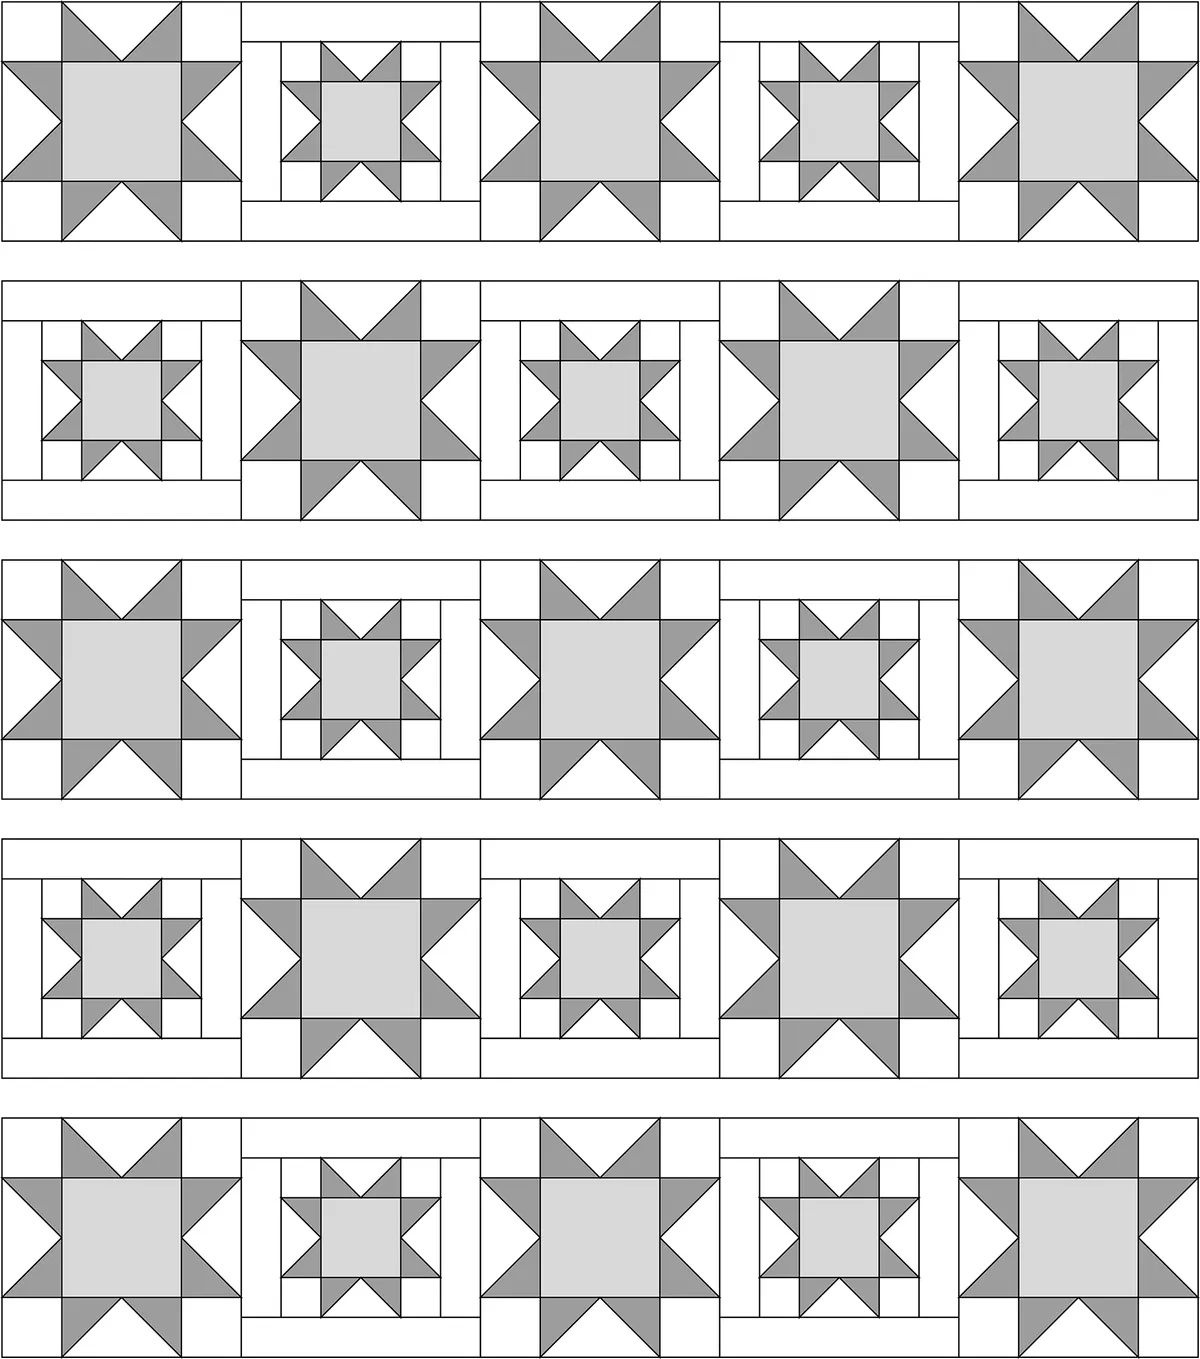
- Quilt chart

Contemporary patchwork quilt pattern chart

Contemporary patchwork quilt pattern
You Will Need
- Fabric
- Wadding
- Templates
Total time:
Cutting
Step 1
Cut the print fabrics into twelve 11cm (41⁄2″) squares for the small star centres, thirteen 16.5cm (61⁄2″) squares for the large star centres, twelve 16.5cm (61⁄2″) squares for the small star HSTs (half square triangles) and thirteen 21.5cm (81⁄2″) squares for the larger star HSTs.
Step 2
Cut the background fabric into sixteen 6cm (21⁄2″) WOF (width of fabric) strips and cut those into forty-eight 6cm (21⁄2″) squares, twenty-four 6 x 21.5cm (21⁄2 x 81⁄2″) strips and twenty-four 6 x 5cm (21⁄2 x 121⁄2″) strips. Then cut five 9cm (31⁄2″) WOF strips and cut those into fifty-two 9cm (31⁄2″) squares, cut two 16.5cm (61⁄2″) WOF strips and cut those into twelve 16.5cm (61⁄2″) squares and cut three 21.5cm (81⁄2″) WOF strips and cut those into thirteen 21.5cm (81⁄2″) squares.
Step 3
Sew the two binding fat quarters end to end and cut into six 6cm (21⁄2″) WOF strips.
Step 4
Cut the backing fabric into two equal lengths.
Making the quilt top
Step 1


Pin a pair to a HST template with the background fabric and reverse of the template together, making sure the fabric overhangs by at least 0.5cm (1⁄4″) all round.
Step 2
Shorten the stitch length on your machine to 1.5 to make removing the paper easier, then sew along the green lines.
Step 3


Step 4

Tear away the paper from the back of the HSTs, then with RS and matching fabrics together, sew along the side of one white triangle and press open.

Step 5

Sew two of these HST pairs to a star centre square and sew background fabric squares to the ends of two more of these pairs as shown above – 11cm (41⁄2″) print and 6cm (21⁄2″) background fabric squares will be used for the twelve smaller stars and 16.5cm (61⁄2″) print and 9cm (31⁄2″) background fabric squares will be used for the thirteen larger stars. Press seams away from the HSTs in each section.
Step 6

Sew the three rows together to complete a morning star block, pressing the seams towards the centre of the block.
Step 7

Sew 6 x 21.5cm (21⁄2 x 81⁄2″) background fabric strips to both sides of each of the smaller star blocks, then sew 6 x 5cm (21⁄2 x 121⁄2″) background fabric strips to the top and bottom of each of the smaller stars.

Step 8
Sew the star blocks into five rows of five as shown in the diagram on page 84 and press the seams away from the larger star blocks in each row. Sew the five rows together to finish the quilt top.
Finishing
Step 1
Sew the two pieces of backing fabric together along the length using a 0.5cm (1⁄2″) seam. Press the seam open.
Step 2
Layer the backing RS down, wadding and finally quilt top RS up and tack together. Top stitch as desired – we quilted diagonally across our finished patchwork using a walking foot.
Step 3
Sew the binding strips together in one continuous length, then press in half along the length with wrong sides together.
Step 4
With the quilt RS up, attach the binding to the first edge starting halfway along, leaving 10cm (4″) unattached at the start. Stop sewing 0.5cm (1⁄4″) from the edge of the quilt, then turn 45° and sew to the corner. Remove from the machine and rotate to the next edge.
Step 5
Pull your binding strip up away from the quilt in line with the raw edge so it forms a 45° angle at the corner. Hold the fold in place then bring the binding strip back down along the edge of your quilt, aligning the edges. Pin in place and begin stitching the next seam from the top edge.
Step 6
Continue around the four edges in the same way, stopping 10cm (4″) away from the starting point. Fold back the two ends of the binding at 45° so they touch, and mark with a pin. Open out the binding and join the ends with a diagonal seam. Trim to a 0.5cm (1⁄4″) seam and press it open, then refold and finish stitching the binding in place.
Step 7
Fold the binding over to the back of the quilt and slip stitch in place by hand. At the corners, fold the edges over in the opposite order to the front to mitre them neatly.


We hope you enjoyed making Lynne’s project. Share a picture of your contemporary quilt with us on Instagram using #molliemakers, and don’t forget to subscribe to Mollie Makes to get creative inspiration delivered to your door every month!

Lynne is a modern British quilt designer who goes by the name of Lily’s Quilts. She’s written three quilting books, her most recent being Quick and Easy Quilts, is a regular UK quilting magazine contributor and designs beautiful quilts for several different quilting fabric companies.