Fussy cutting for beginners

Fussy cutting is, put simply, choosing which bit of a print to highlight when you cut and place your patchwork shapes, so that when you position several units together, the smaller pattern pieces come together to form new and eye-catching formations. Read on for our how to guide.

Try 6 issues of Love Patchwork & Quilting magazine for £9.99| SAVE 76%

Published: October 17, 2019 at 8:57 am

When we first created this post we were fresh from working on a book of fussy cutting projects for one of our past issues that came with some free fussy cutting templates. Putting the book together was possibly the most fun we've had in at LP&Q headquarters – and we've caught the bug so much so that we've spent many a happy evening planning, trimming and basting our own fussy-cut units.

You can achieve the coolest of kaleidoscope effects in this way. We'll talk you through how it's done with our free Guide to How to do Fussy Cutting, below.

Notes

  • Use a ¼in seam allowance throughout.
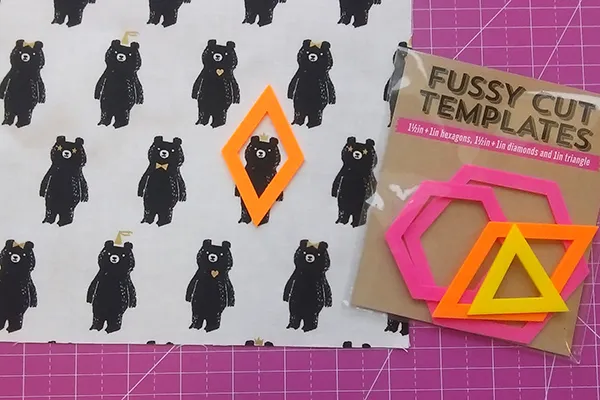
  • The acrylic templates we use in this tutorial were free with the print edition of Love Patchwork & Quilting magazine issue 38 but you can still try this technique with our free fussy cutting templates here.
  • Press all fabrics well before cutting (a little starch also helps to give crisp edges).

How to create fussy cutting effects from a single repeat print

Select part of a print

When fussy cutting, you need to look at the print as a whole and consider what you want to emphasise – use the window in the template to select the element you want to cut.

Think big - consider the whole picture

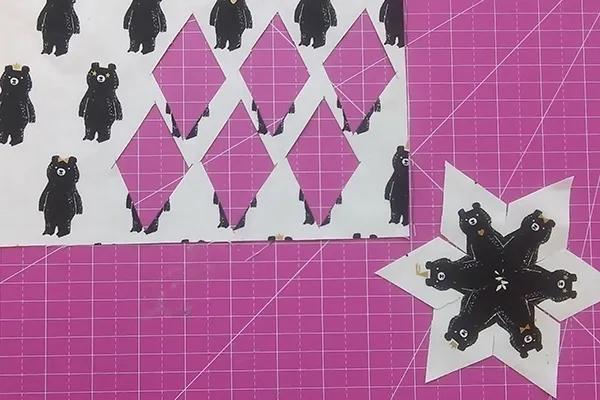
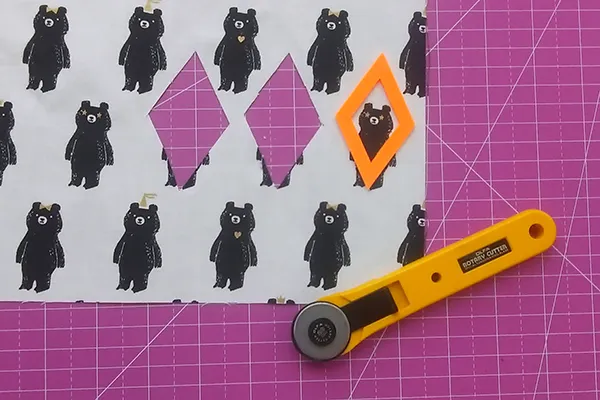
Here we’re cutting six-point diamonds from the Bear Hug print. We have chosen to highlight the bear’s head and shoulders when cutting. If you’re fussy cutting for a larger design, it’s important to consider the colour palette used in your motif – make sure it allows you some flexibility when selecting fabrics for the other fussy-cut elements.

Get cutting

Use your template to cut identical elements of the print. We think that a small 28mm rotary cutter is ideal for a template of this size.

Play around with placements

Cutting different sections of the design gives a very different finish – play around with different placements until you achieve the desired effect. Here we've created a happy star-shaped gathering of playful bears.

How to duplicate a single motif

Step 1

Getting started

Here we’re cutting three 1½in hexagons from the Flock print. Choose any section you would like to fussy cut and place the paper shapes on that part of the print. To avoid slipping, you can tape individual paper shapes together with washi tape, as shown.

How-to-do-fussy-cutting-Fig-D

Step 2

Always begin with your central shape

In this instance, our central shape will be the hexagon. Place it in the middle of the section of print that you want to fussy cut, taking care to be exact.

How-to-do-fussy-cutting-Fig-E

Step 3

Now build a pattern – add the next logical shapes

In our example, we’ve added two diamonds to one side of our original hexagon.

How-to-do-fussy-cutting-Fig-F

Step 4

Use templates to highlight the next part of the print

Now place the acrylic template on top of the uppermost diamond and hold in place. Take care that you don’t slip. Whilst holding the acrylic template in place, gently slide the paper piece out from underneath.

How-to-do-fussy-cutting-Fig-G

Step 5

Check your placement

Cut out the shape, then replace the paper pieces and layer the acrylic template over the hold in your fabric, as shown. This allows your to check that the fabric you’ve cut is in the right place.

How-to-do-fussy-cutting-Fig-H

Step 6

Make the most of your available fabric

Consider which shape to cut next for maximum fabric efficiency. In this example, we chose to cut the bottom left pentagon. As in step 4, position your acrylic template over the paper pieces, then remove the papers and cut out.

How-to-do-fussy-cutting-Fig-I

Step 7

The perfect match

To cut the central shape, place one of your fussy-cut pieces of fabric in place over the print, matching it exactly. Place the acrylic template over the top and gently remove the fabric, instead inserting the paper pieces.

Step 8

Use your templates

Use the paper templates to carefully position the relevant acrylic template. Using the same technique as before, cut out the central shape.

How-to-do-fussy-cutting-Fig-J

Step 9

Cut the remaining two pentagons

Position the diamond cut for the centre of the EPP shape accurately over the same motif on the fabric. Position the acrylic template on top of this and use the template as a guide for positioning the pentagon paper.

Step 10

And repeat!

Follow steps 2-7 to cut out the remaining two pentagon pieces.

How-to-do-fussy-cutting-Fig-K

Step 11

Check your placement

Once you’ve cut your first set of EPP shapes, consider how best to cut the next round for fabric efficiency. Remember, before basting your paper pieces to your fabric, you can use your acrylic template to ensure that you've positioned the fabric in the right place, ensuring that right parts of the print appear through the template window.