How to cover and baste the scallop templates
Step 1
Take a paper scallop shape template and trim a piece of fabric to 1⁄4in larger than than the template around every edge.
Step 2
Attach the paper template to the centre of a small piece of fabric and pin to hold in place. You can also use a binding clip for this too.
Step 3
With a knotted length of thread in your needle, take a large running stitch along the top curve within the seam allowance (Fig 1). Draw up the thread to gather the fabric around the top of the template (Fig 2).

Step 4
Backstitch within the seam allowance to secure the thread, and knot off.
Step 5
Press the curve well with a hot iron. Leave to cool slightly, then remove the paper before pressing the curve again.
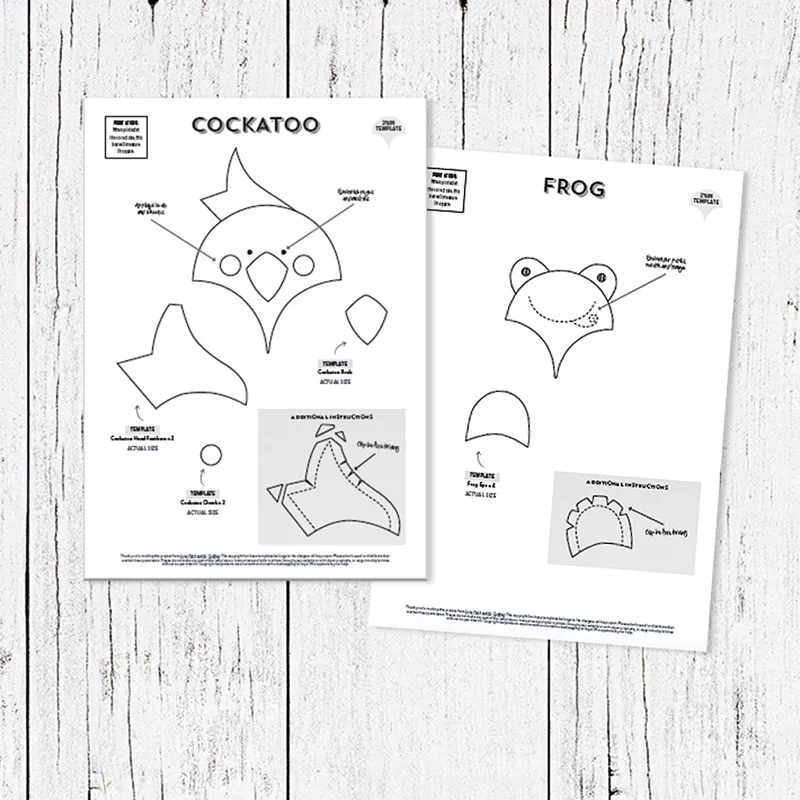
Making the animal appliqué features
Step 1
Now it’s time to have fun making the applique animal features. Trace the animal shape templates onto the paper side of fusible webbing and cut out. Fuse the shapes to the wrong side of your fabric, following the manufacturer’s instructions, then cut out each shape neatly on the marked lines.
TIP: when cutting the appliqué features and ears, mark half of the pieces required and then turn your template over to mark out the remaining half – so that the pieces are cut as mirror images of each other.
Step 2
To make the ears, prepare the fabric shapes as above, then place two pieces right sides together (note if you’re making the Owl design from issue 53, you fold each ear, instead of cutting multiples). Sew along the top of the ear – leaving the bottom open for turning. Clip V-shaped notches in the seam allowance at regular intervals, taking care to avoid cutting the stitching. Turn right side out and press. Repeat for the other ear.
Step 3
Now remove the backing paper from your animal’s features and position the features onto one basted fabric scallop, referring to the animal pictures in our Sewing Curves book as a placement guide. Now fuse them in place and repeat for any remaining features.
Step 4
Use embroidery thread to add details such as eyes and mouths to your animals.
Attaching the ears
Step 1
Arrange all of your scallops onto a background fabric, taking care to cover raw seam allowances with the basted curved pieces. Pin all of the scallops in place.
Step 2
To add the ears, tuck the raw fabric edges of the prepared shapes behind the scallop face using a seam allowance of 3⁄8in. Adjust the position as desired and pin into place.
Step 3
Appliqué the scallops in place, by hand or machine, stitching around the upper curve of each scallop. Once all of the scallops have been sewn in place, sew around each of the facial features to fully secure them.