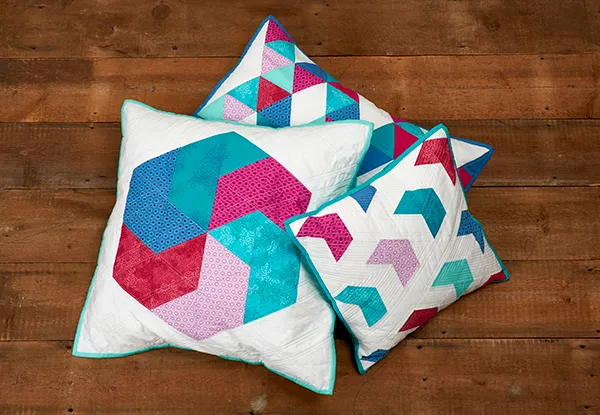
How to make modern arrow patchwork cushions

Mix and match 60-degree triangles to make a trio of colourful cushions by Jemima Flendt. This is the first of three tutorials where we'll show you how to sew triangles into patchwork cushion in three ways. 

Try 6 issues of Love Patchwork & Quilting magazine for £9.99| SAVE 76%

Published: October 21, 2019 at 10:59 am

This small (16in) cushion is the first of our trio of on-trend geometric cushion sewing patterns – find links to the others below.

As this is the first in the set, the fabric listed below will be enough for you to make the set of three. You'll need roughly a third of the amount of fabric if you're just making this one cushion but if so then you may need to do a spot of quilt maths before you go fabric shopping! See more of Jemima's designs over at tiedwitharibbon.com or follow her on instagram @tiedwitharibbon.

You will need (for the set of 3 cushions)

  • Print fabrics: ten (10) fat eighths
  • Background fabric (white): 118yd
  • Backing fabric: 1¾yd
  • Batting: ¾yd x 2½yd
  • Binding: ¾yd
  • Cushion back fabric: 158yd
  • Batting: one (1) 16½in square, one (1) 23½in square and one (1) 25inx15½in rectangle
  • Binding: ¾yd
  • Cushion pad: one (1) 16in square, one (1) 23in square and one (1) 24½inx15in

Notes

  • Seam allowances are ¼in, unless otherwise noted.
  • RST = right sides together.
  • WOF = width of fabric.
  • WST = wrong sides together.

We've used...

We've Art Gallery Fabrics in the following prints:

  • Ocean Breeze and Raspberry Tart from the Nature Elements collection.
  • Capri Blue and Shocking Pink from the Floral Elements collection.
  • Sapphire, Amethyst and Crocus from the Oval Elements collection.
  • Snow, Parisian Blue, Fresh Water, Mirage Blue and Raspberry Rose from the Pure Elements collection

Top tip: Spray starch your fabrics before you cut to prevent distorting your bias edges

How to sew the small Super Nova cushion

Finished size

16in square approx

Complete the set!

Had fun making this cushion? Find out how to make Jemima's other designs in our sister project posts!

Cutting out

Step 1

From the white fabric cut four (4) 2½in x WOF strips. Subcut to give eighty (80) 2½in 60-degree triangles.

How to cut out 60 degree triangles

Step 2

From the print fabrics cut:

  • Four (4) 2½in 60-degree triangles from each of seven (7) different prints.
  • Seven (7) 2½in 60-degree triangles from one (1) print.
  • Three (3) 2½in 60-degree triangles from one (1) print.
  • Two (2) 2½in 60-degree triangles from one (1) print.

You will have forty (40) triangles in total.

Cutting out the 60-degree triangles

Step 1

From the cushion back fabric cut two (2) 16½in x 11½in rectangles.

Step 2

From the binding fabric cut two (2) 2½in x WOF strips.

Making the cushion top

Step 1

Arrange the white and print fabric triangles into eight rows of fifteen triangles each, experimenting with different print placements and rotating alternate triangles by 180 degrees so that the triangles tessellate.

Heringbone patchwork cushions layout

Step 2

Sew the triangles together one row at a time. Start by taking the first triangle and placing it right side up. Insert a pin centrally in the triangle, with the pin’s head facing towards the top edge of the triangle. The pin is a useful marker to ensure you keep the rows correctly orientated when sewing. Take the second triangle in the row and place it RST with the first triangle and pin along the edge to be joined, placing the pins at right angles to the seam. This will help to avoid any bias stretch as you sew.

Modern-geometric-patchwork-cushions-tutorial-step-6

Step 3

Sew the triangles together. Open out and finger press the second triangle to the right.

Modern-geometric-patchwork-cushions-tutorial-step-7

Step 4

Take the third triangle and place it RST with the second triangle. Pin in place and then repeat steps 6–7 to join. Open out and finger press the third triangle to the right.

Modern-geometric-patchwork-cushions-tutorial-fig C Step nine: Repeat step eight to add the remaining triangles to the row. Once you have sewn the entire row, press the seams and trim off any dog ears. Step ten: Repeat steps 6–9 to make the remaining rows. Alternate rows will start with a triangle that’s orientated in the opposite direction to the previous row. Fig F Step 11: Join the rows, making sure you carefully pin the points of your triangles in place before you sew. Press the seams open. Step 12: Trim the cushion top to 161⁄2in square, making sure to leave a 1⁄4in seam allowance to avoid losing the points of the triangles when binding. Fig D Step nine: Repeat step eight to add the remaining triangles to the row. Once you have sewn the entire row, press the seams and trim off any dog ears. Step ten: Repeat steps 6–9 to make the remaining rows. Alternate rows will start with a triangle that’s orientated in the opposite direction to the previous row. Fig F Step 11: Join the rows, making sure you carefully pin the points of your triangles in place before you sew. Press the seams open. Step 12: Trim the cushion top to 161⁄2in square, making sure to leave a 1⁄4in seam allowance to avoid losing the points of the triangles when binding. Fig E

Step 5

Repeat step eight to add the remaining triangles to the row. Once you have sewn the entire row, press the seams and trim off any dog ears.

Step 6

Repeat steps 6–9 to make the remaining rows. Alternate rows will start with a triangle that’s orientated in the opposite direction to the previous row.

Modern-geometric-patchwork-cushions-tutorial-Fig-F

Step 7

Join the rows, making sure you carefully pin the points of your triangles in place before you sew. Press the seams open.

Step 8

Trim the cushion top to 16½in square, making sure to leave a ¼in seam allowance to avoid losing the points of the triangles when binding.

Modern-geometric-patchwork-cushions-tutorial-Fig-G

Quilting & finishing

Step 1

Place your cushion top on top of the 16½in batting square and baste in place. Quilt as desired. Jemima quilted a variety of diagonal lines. Trim off the excess batting.

Step 2

Take the two (2) 16½in x 11½in cushion back rectangles. On one long edge of each rectangle turn over a ¼in seam to the wrong side, then turn over another 1in and press. Topstitch the folded edge to secure. These are the cushion back pieces.

Step 3

Place the quilted cushion front right side down. WST and matching up the raw edges place one cushion back piece on top with the neatened seam running across the centre of the cushion. Then in the same way place the second cushion back piece on top – the cushion back pieces will overlap. Pin or clip all around. Stitching through all of the layers, machine baste all around the perimeter stitching approx 18in from the edge.

Step 4

Join the binding strips together end-to-end using a diagonal seam. Press the seam open and trim away the dog ears. Fold in half lengthwise, WST, and press.

Modern geometric patchwork cushions tutorial step 17

Step 5

Sew the binding to the right side of the cushion using a 1⁄4in seam, folding a mitre at each corner. Fold the binding over to the back of the cushion and then hand stitch in place to finish.


patchwork triangles cushion pattern

Had fun making this cushion? Make this large triangle cushion to match!