How to sew set-in seams

Master the art of set-in seams – also known as Y seams or inset seams. We'll show you how to hand stitch or machine stitch these essential angled seams, using a Tumbling Block and Attic Windows Block to demonstrate.

6 issues of Today's Quilter magazine for just £9.99|Save 76%

Published: December 1, 2019 at 5:00 pm

Set-in seams are a crucial tool for your quilting repertoire when it comes to sewing quilt blocks with unusual angles. In this taster of our Essential Guide series of next-step quilt tutorials by quilting expert Lin Clements. Today, today we're here to show you how to master set-in seams.

Once you practise a bit, this technique is actually pretty straightforward, so we're here to help you learn to love these seams, plus explain how to use this technique in your quilt block repertoire in the process.

What is a Set-In Seam?

A set-in seam, sometimes called an inset seam or a Y seam, is necessary when three (or more) pieces of fabric that have angles other than 90 degrees meet at one point. Such seams often form a Y shape, hence the name. Set-in seams can be sewn by hand or machine. Many quilters like to hand sew these seams, and for your first time you might like to try the hand method, as it’s a good way to see exactly how the seams fit together.

The process of sewing a set-in seam is also useful if you like to use mitred borders on your quilts, as the same principles apply. If you want to see the wonderful effects that can be created with blocks using these seams then seek out the work of Jinny Beyer. Some block examples are also shown below, and this tutorial will give you detailed instructions on sewing two quilt blocks – Tumbling Block and Attic Windows – so you can practise the technique.

How to sew set in seams cushinons
Cushions are a great way to put your practice blocks to good use. These two examples use Tumbling Block and Attic Windows.

Marking seam allowances

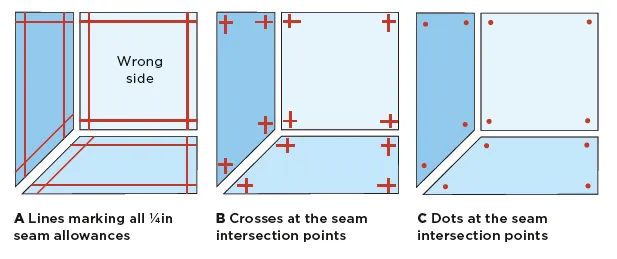
When sewing set-in seams, the stitching line where the pieces meet needs to stop ¼in from the raw edge of a fabric piece, to allow another piece to be inserted. Most people find these seams easier to sew by marking this ¼in on the wrong sides of the fabric pieces. There are various ways you can do this and Fig 1 gives some examples. For your first time sewing a set-in seam you might find method A the most useful. As the technique becomes easier (and it will, very quickly) simple dots or crosses will be sufficient, as in methods B and C. A sharp pencil is usually fine. For darker fabrics try a light-coloured watercolour pencil. This is also a good time to double check that your machine is sewing an accurate ¼in seam.

Fig 1: Methods of marking the seam allowance

How to sew Y seams

Technical tip

If you plan to make a lot of blocks with set-in seams then instead of using your quilter’s ruler, you might find a seam allowance guide useful. There are various products available. One of the simplest is an acrylic rod in a cube shape that is exactly ¼in wide and about 12in long. It is easier to handle than a large quilter’s ruler.

Blocks using set-in seams

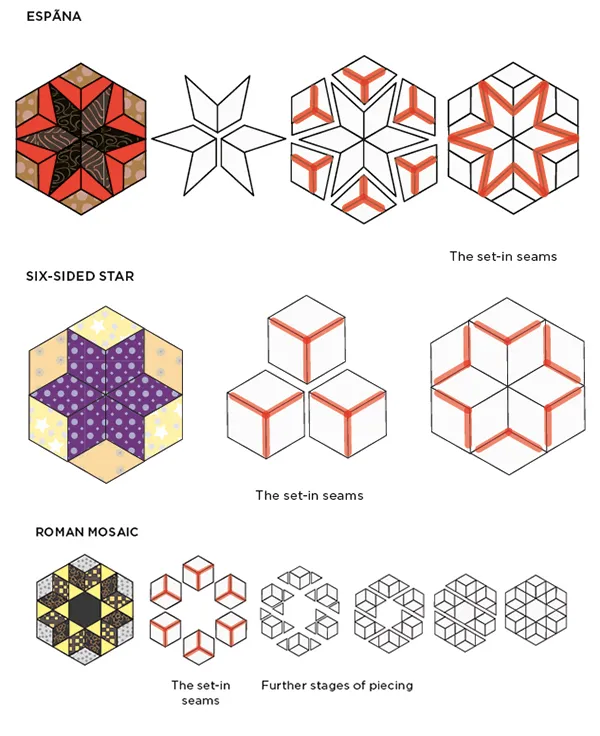
If you want to practise the technique and explore the block possibilities using this method, then try any of the blocks below. The set-in seams are shown by the orange lines on the monotone diagrams. Some of these blocks, such as those that are a hexagon shape once pieced, also need inset seams to join the blocks together.

How to use inset seams in quilt blocks

Read on and we'll show you how to sew a Tumbling Block using a hand sewing method, and Attic Windows using a machine sewing method. The adventurous among you could also explore Roman Mosaic or Morning Star.

Essential-Guide-seams-quilt-blocks-2

Technical tip:

The more complex the block, as in the Roman Mosaic and Morning Star examples, the more accurate your templates and set-in seams need to be, to ensure that all parts of the block fit together. Making these blocks a generous size will also make piecing easier.

How to hand sew a set-in seam

Step 1

Tumbling-blocks-quilt-blocksHere we’ll show you how to sew a Tumbling Block as an example.

Choose three different fabrics – one dark, one medium and one light. The sizes suggested in step 2 use a 2in (2½in with seam allowance) 60-degree diamond, which will make a 4½in wide x 5¼in tall block (4in x 4¾in finished).

Step 2

Cut out your diamonds individually. We’ve cut our outer diamond shapes with a ¼in seam allowance all round, or for a quicker method cut 2½in wide strips of fabric and use the 60-degree line on your quilter’s ruler to cut the diamonds, cutting them 2½in (Fig 2A). For one block, cut one diamond from each of the three fabrics.

Essential-Guide-to-seams-Fig-2

Step 3

On the wrong side of all the fabric pieces, mark ¼in seam allowances all round, using the method of your choice. Fig 2B (below) shows red dots where pencil marks would be on your fabrics.

Essential-Guide-to-seams-B


Step 4

Take diamond B and pin it right sides together with diamond C (Fig 2C, below), aligning the dots. Thread your hand sewing needle with a doubled thread and tie a knot at one end. Start by inserting the needle through the dot on the right-hand side (reverse this if you are left-handed) and through the corresponding dot on diamond B. Sew a tight running stitch to the end of the seam, ending at the dot (Fig 2D, below). Secure the thread well on the back of the work. Press the seam toward the darker fabric. Hand-sewn seams are weaker than machine-sewn seams, so pressing to one side will help strengthen the piecing.

Step 5

Now pin diamond A right sides together with unit B/C, as in Fig 2E (below), aligning the edge and dots as shown. Hand sew the seam as before, sewing from the dot on the left-hand side of diamond A (from the centre out). Press away from diamond A.

Essential-Guide-to-seams-C-E


Step 6

Re-align diamond A, so its other edge is aligned with the edge of diamond B, as in Fig 2F (below). Pin in place and then sew from dot to dot. Press the seam and then the block (Fig 2G).

Essential-Guide-to-seams-F-G

Step 7

To sew blocks together, first sew the blocks into rows (Fig 3A). Sew the rows together with a seam that zigzags along the length of the row (shown by the blue lines in Fig 3B). Again, sew from ¼in mark to ¼in mark. If doing this by machine, you might find it easier to sew the seams individually, rather than pivoting at the zigzags.

Essential-Guide-to-seams-Fig-3


Step 8

Step 8: Once the blocks are sewn into a unit the patchwork can be sewn to a background by turning in all outer edges by ¼in and sewing in place with small slipstitches. Alternatively, piece it into a larger unit.

Technical tip: If this is your first foray into set-in seams then striped fabrics are best avoided, as they can show up mistakes more easily. If you do want to use a stripe, then cutting the stripes horizontally, will slant the stripe when sewn into place, adding to the 3D illusion on the block. Make sure that the strips are straight (don’t cut the fabric wonky).

How to machine sew set-in seams

Step 1

Now we'll look at how to sew a set-in seam by machine – using an Attic Windows quilt block as an example.

How to sew attic windows

Choose three different fabrics – one dark, one medium and one light. The sizes suggested in step 2 will make a 7¾in square block (7¼in finished).

Step 2

Cut one 5½in square in light fabric (piece A). Cut one 2¾in x 8¼in rectangle in dark fabric (piece B). Cut one 2¾in x 8¼in rectangle in medium fabric (piece C). On the dark rectangle use a quilting ruler, or the 45-degree line on your quilting mat, to trim off one corner at 45 degrees, slanting from the bottom right corner up to the top (Fig 4A), or see our Technical Tip (below) Repeat on the medium rectangle but cut in the opposite direction, as shown.

Technical tip: You can cut the 45-degree lines on pieces B and C at the same time if you like. Place the fabric B rectangle right side up and fabric C rectangle on top, right side down and make the cut.

How to sew attic window quilt blocks

Step 3

On the wrong side of all fabric pieces, mark ¼in seam allowances all round, using the method of your choice – thin lines are  shown here (Fig 4B).

Step 4

Take square A and place it right sides together with piece B (Fig 4C), aligning the dots. It helps to put a pin through the pieces at the dots – look underneath to the wrong side of piece A too, to make sure the pin is going through that dot as well. Keeping the pieces in this position, pin together, easing the rectangle to fit if necessary. Repeat with the lower dot.

Place the work on the machine and using a ¼in seam allowance, lower the needle so it pierces the exact position of the first dot. Sew from the top dot to the lower edge, as in Fig 4D, backstitching for a couple of stitches at each end to secure the seam ends. Press the seam away from the square.

Essential-Guide-to-seams-D-F

Step 5

Now pin piece C right sides together with the square (Fig 4E), again, aligning the
dots. Sew from dot to dot. Press the seam away from the square.


Step 6

Fold the unit right sides together so you have access to the final seam (Fig 4F). Making sure that the square of fabric and previously sewn seam are out of the way, pin and then sew from the dot to the outer edge. Press the block – Fig 4G shows a back view of the seams. Check the block is 7¾in square (Fig 4H).

Attic windows quilt block tutorial

Technical tip: Depending on the block, not all seams will need to start and stop at the marks – only those that need to be set-into other pieces of the blocks or into other blocks. For example, in Attic Windows shown here, the only seams that stop ¼in from the end are those that meet in the centre of the block. The seams ending at the outer edges of the block can be sewn right to the edge as normal.

This Essential Guide was first published in issue 3 of Today’s Quilter magazine. To read the final part of this feature (Lin’s trouble shooting Q&A for readers’s set-in-seams problems), you can still get your hands on this issue now via our app for Apple NewsstandGoogle Play or Zinio.