Hems are the crucial finishing touch for every garment and many home sewing projects, so it’s important to choose, work, and finish them properly. They can be worked by machine or by hand – here, we show you how to hem using your sewing machine. We’ve covered the most popular hem types and shared some tips to help you work them as neatly as possible.
Checking the length of your garment
Try your garment on and check you are happy with the length of the hem. It is best to make any adjustments to the length gradually and keep checking. You can always make the garment shorter, but it’ll be harder to lengthen it if you accidentally cut away too much in one go!
Choosing a hem
There are many types of hem and you need to consider several factors when choosing one, such as the shape and style of your garment, the weight and drape of the fabric, and how visible it may be. The width of the hem is also crucial. Generally, the fuller the fabric, the narrower the hem so minimal bulk is added. Sewing patterns often set a hem allowance – this is the width of the fabric that will be folded under to create the finished hem.
Hemming with knits
If you’re hemming a knit fabric, then you need to use a slightly different technique, as the fabric stretches. Use a ballpoint or stretch needle in your machine so it separates the threads in the fabric rather than pierces them. A regular zigzag stitch is ideal, but many sewing machines have a lightning stretch stitch which you can use instead. A single fold hem is usually enough as the knit fabric won’t fray.
5 ways to sew a hem
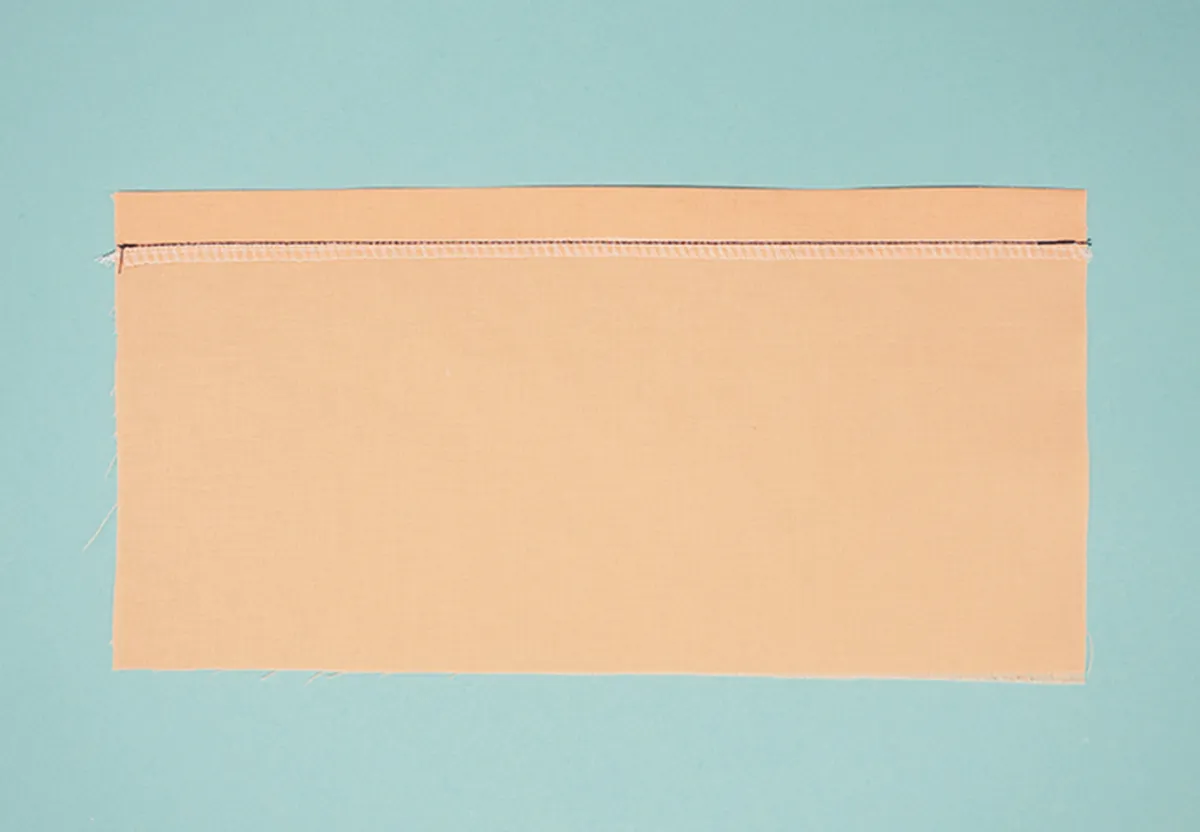
1. Single fold hem
This type of hem is ideal for when you want minimal bulk, such as on a full skirt or for knit or heavier fabrics. It’s also useful if you’re lengthening a garment and are short of fabric.
Step one
Work a machine zigzag stitch or overlock stitch along the raw edge of your fabric to neaten it and prevent it fraying.
Step two
Turn the neatened edge under by the hem allowance to the wrong side (WS) and press, then machine stitch this into place just inside the raw edge.
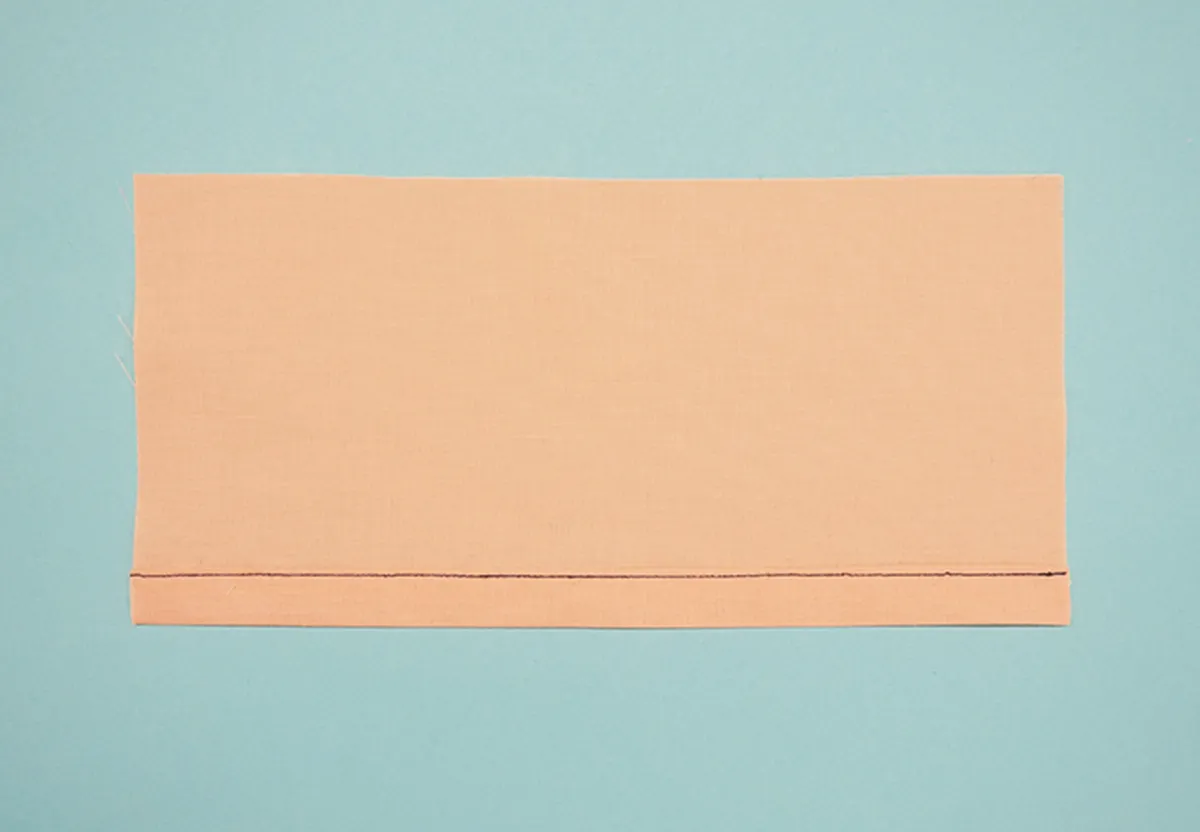
2. Double fold hem
This is the most common hem type. It works best on straight fabric edges and if there isn’t too much fullness or flare in the garment. If the fabric you’re using has a tendency to fray, this is a good choice as the raw edges will be neatly enclosed within the folded hem. For lightweight fabrics, use a narrow hem allowance so that it drapes well; for heavier-weight fabrics a wider hem is a better choice and will also add weight to pull the fabric down, which is ideal for hemming trouser legs.
Step one
Decide the hem allowance and add 1cm (3⁄8in) to this. Turn the raw edge under by 1cm (3⁄8in) to the WS and press.
Step two
Fold the hem under by the hem allowance to the WS and press.
Step three
Stitch the hem into place close to the first folded-under edge to secure.
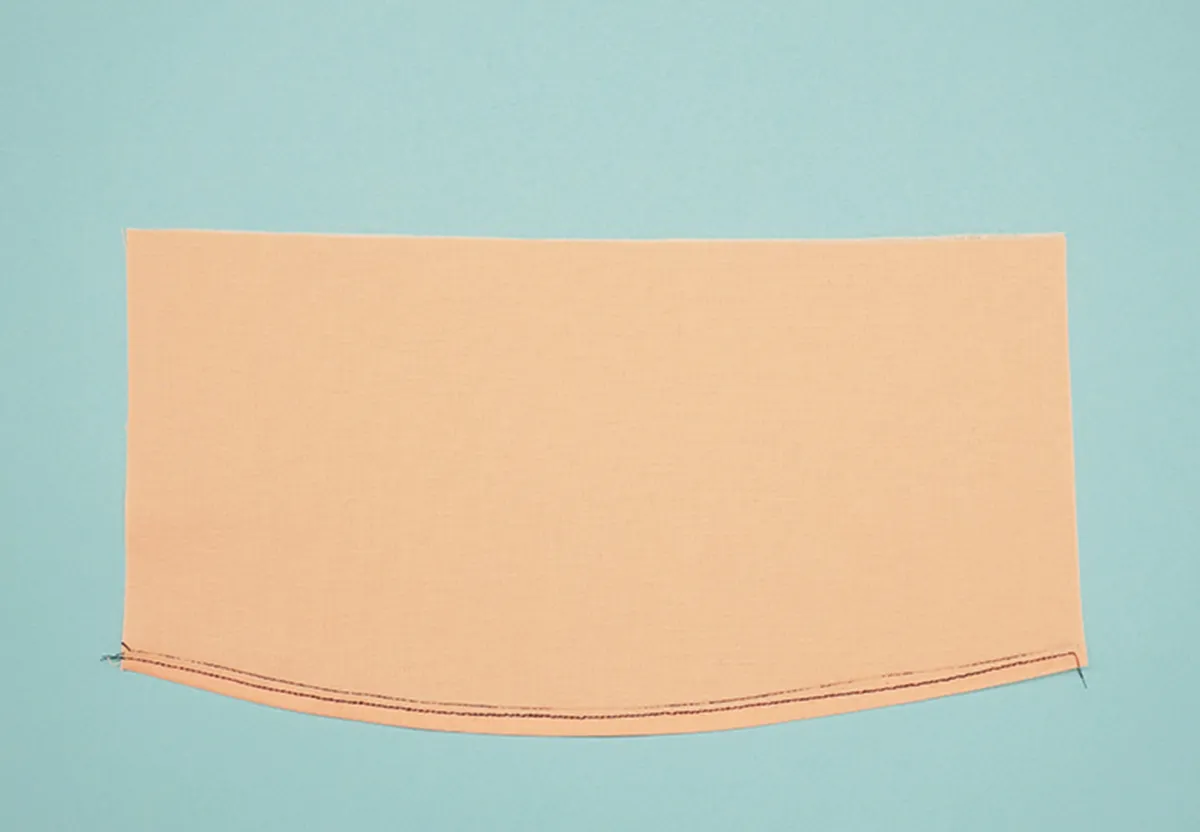
3. Curved hem
This technique is used when the hem is curved, such as on a circle skirt, a peplum top or a shaped sleeve. The raw edge that is folded under is longer than the actual seamline, which adds bulk to the hem. It’s best worked with lightweight fabrics or those with drape.
Step one
Work a line of stitching just 5mm (1⁄4in) from the raw edge around the hem.
Step two
Press the raw edge over to the WS, keeping this line of stitching on the edge so you get a neat and even curve. Step three Now turn and press the hem over again to the WS so that the raw edge is tucked under and is touching the first pressed edge. The line of stitching will sit on the very edge of this second fold and can be used as a guide to follow whilst pressing the fold over. Step four Pin and then stitch the hem down close to the second fold.
4. Rolled hem
This is quite a fiddly, narrow hem, but it gives a neat finish. It can be worked by using a special rolled hem foot, or with an ordinary machine foot by using some extra steps. It’s the ideal hem to use for lightweight fabrics such as lawn, voile, and silk. It’s perfect for sheer fabrics as well as it doesn’t stand out and only adds minimal bulk.
Step one
Decide what your hem allowance is then stitch a line 5mm (1⁄4in) inside this. For example, if you want a 2cm (3⁄4in) hem allowance you’ll need to stitch a line 1.5cm (5⁄8in) in from the raw edge.
Step two
Fold the fabric to the WS so that the stitched line lies just inside the folded edge, not on it.
Step three
With the WS facing upwards, stitch the fabric again, aim to position this line of stitching exactly on top of the first stitched line.
Step four
Press the hem and then trim the folded-over fabric off right up to the stitched line but not through the actual stitches.
Step five
Fold the fabric over once again by 5mm (1⁄4in) to enclose this raw trimmed edge – this is the actual hemline end point you wanted to achieve at the beginning.
Step six
From the right side (RS) there will be no stitching showing as it’s just on the WS.
Step seven
Working from the WS again, stitch on top of the stitched line to hold the hem in place. You will now have one line of stitching on the RS and what will appear to be just one line of stitching on the WS.
5. Bias faced hem
Bias hems are ideal for curves and also for heavier fabrics as the hem of the garment is only folded once. Use pre-made bias binding for a quick and easy finish or make your own by cutting strips diagonally on the bias (find out how to make a bias binding here) This is a great way to add a little colour inside a garment.
Step one
Trim your garment so it has the same hem allowance as half the width of the bias tape – this is the distance between the raw edge of the tape and one folded edge.
Step two
Take the strip of bias tape and unfold it to open out one side. Place this RS together with the hem, matching the raw edges, and pin together all the way along the hem.
Step three
Leaving about 5cm (2in) of tape loose at the beginning (this will be used to neatly finish the binding loop at the end), stitch the tape to the fabric, working along the creased line you unfolded.
Step four
Stop stitching approximately 10cm (4in) from where you started.
Step five
Trim and join the short ends of the bias tape with RS together. Stitch the joined tape to the hem.

Step six
Trim the seam off both the fabric and the bias tape then press the seam open between the binding and hem.
Step seven
Fold the binding over to the WS of the fabric. Press again so that just a little of the fabric edge can be seen from the WS.
Step eight
With the unstitched edge of the bias tape folded under, pin it to the fabric then stitch close to the folded edge of the tape to finish.