
Free Teddy Bear Sewing Pattern
A handmade teddy bear is the kind of gift that will really be treasured – and even passed down through the family. It might sound a little daunting at first, but it's much easier than it looks.
- Sewing machine tips and tricks
- Beginner's guide to sewing
- 24 best sewing gifts for enthusiasts to spark creativity
This would be a lovely gift for a baby or young child – just make sure you use safety eyes. And as the evenings get longer, sewing this adorable fuzzy friend is the perfect way to spend the extra time.
Notes
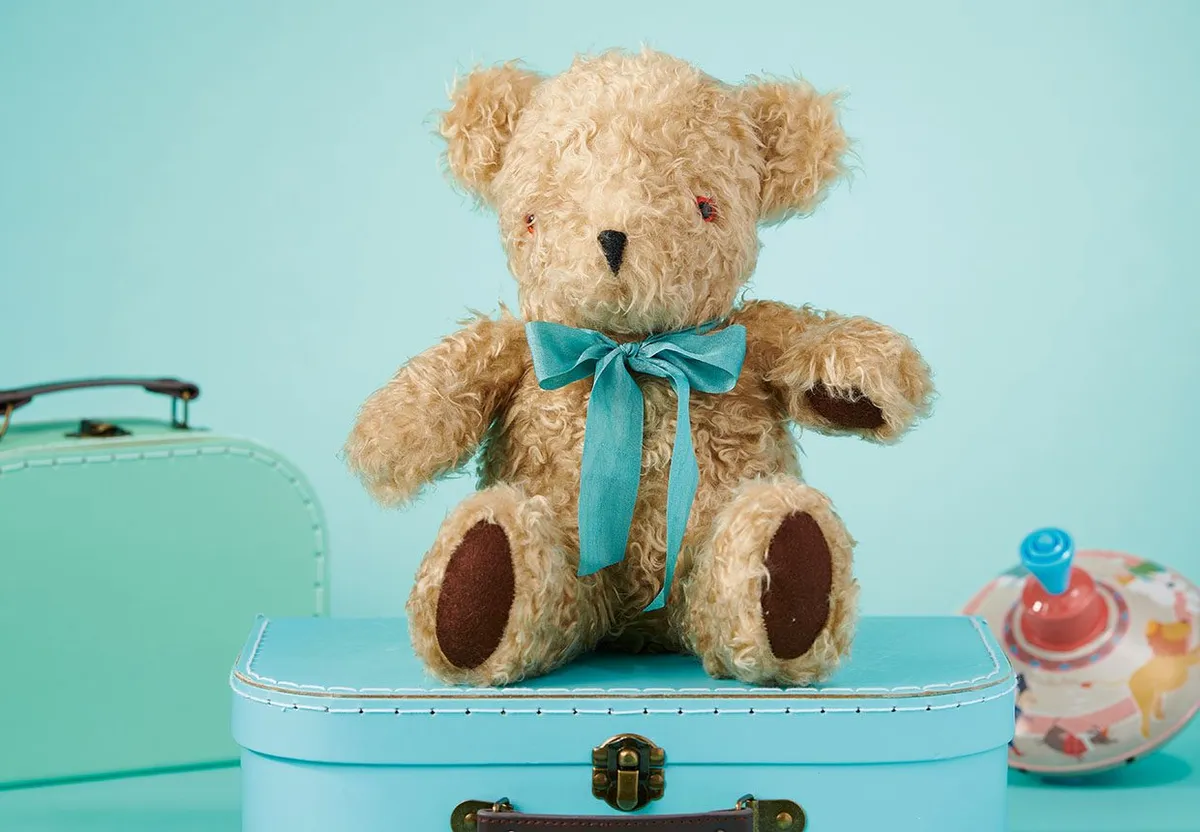
- Finished size: Approx 22cm (8¾in) tall
- Download the free templates here.
- Measurements are width x height.
- Place the pattern pieces and cut the fabric so that the stretch is on the width. The nap on the fur fabric should run downwards.
- Use 6mm (¼in) seam allowance throughout unless otherwise stated.
- After sewing each part of the bear, gently pull out trapped fur from the seams, using a large bodkin or similar sized blunt tool.
You will need
- Fabric A: 58x48cm (23x19in) honey brown faux fur
- Fabric B: 10x12cm (4x4¾in) dark brown wool felt
- Black stranded cotton
- Safety eyes
- Polyester toy filling
- Length of ribbon
- Extra-long pins
- Matching thread
- Basic sewing kit
Free teddy bear sewing pattern
Cutting out
Step 1
Download, print and cut out the teddy bear templates.
Step 2
Pin the pattern pieces onto the reverse side of the fabrics and draw around them. Cut out, mark openings, darts and positions where indicated on the pattern templates.
Step 3
From Fabric A, cut out as follows:
- Body: one pair using the template
- Head: one pair using the template
- Head gusset: one using the template
- Arms: two pairs using the template
- Legs: two pairs using the template
- Ears: two pairs using the template
Step 4
From Fabric B, cut out as follows:
- Paw pads: two using the template
- Foot pads: two using the template
Making the head and eyes
Step 5
With right sides (RS) together, pin, tack then sew the head gusset along the top of one of the head pieces, from point A to point B.

Step 6
Remove the tacking then trim the seam. Repeat for the other side of the head.

Step 7
To close the head, pin the head pieces with RS facing and tack them together. Quickly turn the head RS out to check you have properly matched points A and B and that the previously sewn seams meet up. Turn the head RS together again and sew down from point A to the neck opening at C and from point B to the neck opening at D.

Step 8
Trim seams and remove tacking.
Step 9
Using a small awl or the tip of a pair of small scissors, make a tiny hole in the fur fabric where you have marked the eye from the template. It can be useful to check the position of the eyes before cutting this hole by pushing a drawing pin through the fabric from the RS. Adjust if necessary.

Step 10
Insert the eyes following the manufacturer’s instructions.

Step 11
Carefully, but firmly, stuff the head so it becomes a rounded, full shape and the nose end is firm. At the neck, turn the raw edge under by 8mm and sew a running stitch through both layers of the fabric, close to the edge. Use double or extra-strong thread so that it won’t break when you pull the running stitches to gather them.

Step 12
Fasten off with a few hand stitches to hold the gather in place.
Making the ears
Step 13
Pin an ear RS together and sew. Trim the seams and turn RS out.
Step 14
Turn under the raw edge of the ear by 8mm and using small overstitches, sew the opening closed. Repeat for the other ear.
Step 15
Pin both of the ears onto the head, using extra-long pins. Position each ear just to the outside of the head gusset seam and pin in a slight inwards curve, so that they form a gentle cup shape. Check the ears are equally positioned before ladder stitching along the front and back to attach them. Repeat stitching to be doubly sure the ears are secure.
Making the body
Step 16
Pin and sew the darts on the front and the back body pieces. Trim the dart seams so that they open to lie flat.
Step 17
With RS together, pin around the body pieces, using plenty of pins.

Step 18
Sew the body, leaving the top open for turning. Clip the curves and trim the seams.
Step 19
Turn the body RS out. Stuff it firmly, then turn under the raw edge of the fabric at the top by 8mm. With double or extra-strong thread, make a running stitch close to the edge, through both layers of fabric, as with the head. Pull the thread taut to gather the stitches, and close up the body, before fastening off with a few stitches to secure the gather. Remove pins.
Making the arms and paw pads
Step 20
Pin two arm pieces RS facing and sew. Leave an opening to turn through, as marked. Use lots of pins and tack first, if preferred. Trim the seams, then turn the arm RS out. Stuff firmly, then ladder stitch the side opening closed. Repeat for the other arm.
Step 21
Pin a felt paw pad onto the centre of the end of the arm, using the images to check the position. Pull as much trapped fur out from underneath the felt before stitching the pad in place. Appliqué all around the pad by hand, using very small stitches in matching thread. Repeat for the other arm. Remove the pins.

Making the legs and foot pads
Step 22
Sew one leg down the sides, RS together, leaving both the top and bottom edges open. At the bottom, sew down to the foot pad marks drawn from the template.

Step 23
Trim the seams and clip a notch in the curve. Repeat for the other leg.
Step 24
Leave the leg RS together, place one foot pad at the bottom end. Line up the centre points of the paw pad with the seams of the leg. Pin at these two points first and gradually add more pins until the fabrics lie smoothly together. Tack first, before sewing.

Step 25
Sew slowly, from the top side of the leg. Alternatively, if you find it easier, the foot pad can be stitched by hand, using a small backstitch. Repeat for the other leg.
Step 26
Remove tacking. Trim seams to create a smooth paw pad when the leg is turned.
Step 27
Turn each leg RS out and stuff firmly. Turn the top edge of each leg under by 8mm.
Attaching the legs, arms and head
Step 28
Use extra-long pins to position the bear’s head centrally on the top of its body. Begin to ladder stitch the head to the neck. Repeat the stitching once or twice more to make sure the head is attached securely.
Step 29
With long pins, attach the arms to the side of the body, 5mm (¼in) down from where the head is attached to the neck and with the back of the arm level with the body side seam. Attach them using ladder stitch in matching thread. Repeat the stitching twice more to make sure the arms are held securely.
Step 30
Using the extra-long pins, pin the legs to the bottom front of the body, at a right angle, so the teddy is in a sitting position. Each leg should be pinned at the same distance away from the centre dart seam. Remove all pins.

Step 31
When you are happy with the position, ladder stitch the legs into place. Repeat the stitching once or twice more to make sure the legs are attached securely.
Making the nose and finishing off
Step 32
Using the images as a guide, use three pins to mark a triangle shape at the tip of the nose where the head seams meet. With four strands of black stranded cotton, sew a satin stitch within this guide to create a triangle shaped nose.

Step 33
Check to make sure that as much fur as possible has been freed from the seams.
Step 34
Tie a piece of ribbon around the neck and stitch it securely in place to finish.
Well done on finishing your free teddy bear sewing pattern! We hope your bear becomes a much-loved toy.

Make a stuffed bunny toy
If you have loved making this super-cute teddy bear, why not try your hand at our free bunny sewing pattern?

