How to adjust the length of a sewing pattern
Making your garment longer or shorter is one of the simplest adjustments to make to a pattern. Many patterns have two sets of horizontal lines marked on them, labelled ‘lengthen or shorten here’, so it’s easy to see where to do this.
If your pattern doesn’t have these, you can draw your own set of lengthen or shorten lines onto your pattern where you want to make this adjustment.
How to lengthen a sewing pattern
Step 1
Measure yourself (or ideally make a toile) to work out how much longer you will need your pattern piece to be.
Step 2
Cut along the lengthen/shorten line to separate the pattern piece.
Step 3
On a separate piece of paper, draw a strip a little wider than the width you want to add to the pattern and slightly longer then the cut line.
Step 4
Stick this strip of paper beneath the pattern pieces between the lines to lengthen the pattern piece by exactly the amount you need. Redraw the side seams so they merge from one cut pattern piece to the other gradually, if they weren’t straight lines originally.
Step 5
Remember to adjust any other relevant pattern pieces in the same way. For example, if you lengthen the bodice front then you’ll need to lengthen the bodice back by exactly the same amount. You can now use your pattern to cut out the fabric in the usual way.
How to shorten a sewing pattern
Step 1
Measure yourself to work out how much shorter you will need your pattern piece to be.
Step 2
Cut along the lengthen/shorten line to separate the pattern piece.
Step 3
Overlap one piece on top of the other by the amount you want to shorten it, then stick into place.
Step 4
Redraw the side seams so they merge or curve gradually, and your pattern will be ready to use. Remember to shorten any other relevant pattern pieces by the same amount too.
How to adjust the bust of a sewing pattern
Most patterns are designed to fit an ‘average’ bust size – which is a B cup (according to the pattern manufacturers!). So, if your cup size is smaller or larger than this you’ll need to adjust your pattern for a perfect fit. If you choose a pattern size which matches your bust measurement, then the garment may not fit properly on the upper chest and shoulders. If the garment you are making has quite a loose fit then this may not matter, but if it’s a closely fitted item then you’ll need to make some adjustments.
Use your bust measurement and your high bust measurement and work out what the difference between them is. If it’s more than 6.5cm (2½in) you’ll need to make a full bust adjustment. If it’s less than 4cm (1½in) then you’ll need to make a small bust adjustment.
How to alter a pattern for a Full Bust Adjustment (FBA)
Step 1
Choose the pattern size that matches your high bust measurement and trace around it and cut it out (so you can keep keep the original pattern uncut). The difference between your bust measurement and high bust measurement is the amount you need to add to your pattern, but you need to half this difference for each side of the garment so they add to the same for both sides once cut. For example, if the difference is 3cm then you’ll need to add 1.5cm to the pattern piece as it will most likely be cut on the fold.
Tip: You can use any paper for tracing patterns, though it’s easier if you can see through it to be sure you trace all the lines and markings.
Step 2
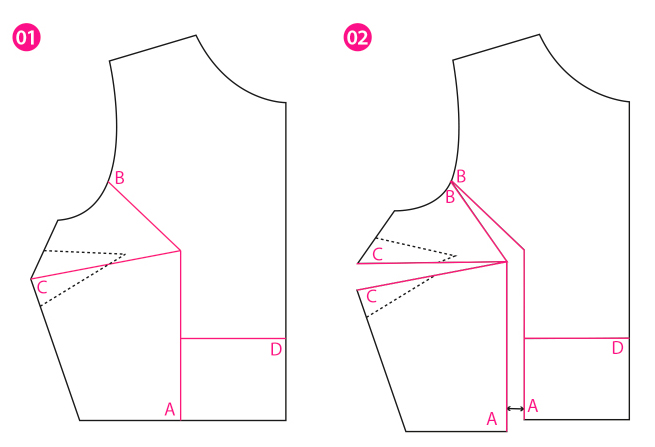
Mark your bust point on the pattern piece (by either measuring or holding the pattern pieces against yourself) and draw three lines out from this point.
A = down to the waist, or hem, parallel to the centre front.
B = to the lower third of the armhole curve.
C = to the side seam, through the centre of the bust dart
D = from line A at right angles to the centre front, about a third of the way above the waist or hem. <FIG 1>
Step 3
Starting at the bottom edge, cut up line A then along line B, stopping just before the end so you have a small hinge in the paper.
Step 4
Starting at the side seam, cut along line C, stopping just before the end again to make a small hinge.
Step 5
Carefully lay your cut pieces onto a new piece of pattern paper to draw your new pattern. Tape the centre front seams to the paper to hold it in place. Spread the pieces apart at line A by half your calculated difference between your high bust and bust. This is shown by arrows on the diagram. As the paper pieces are hinged then lines B and C will open up as well to form spaces between them for the new bust dart. <FIG 2>
Step 6
Cut along line D and move it down so it lines up with the waist or hem, as this will have moved downwards.
Step 7
Pin or tape these moved pieces to the pattern paper beneath to hold them securely in place.
Step 8
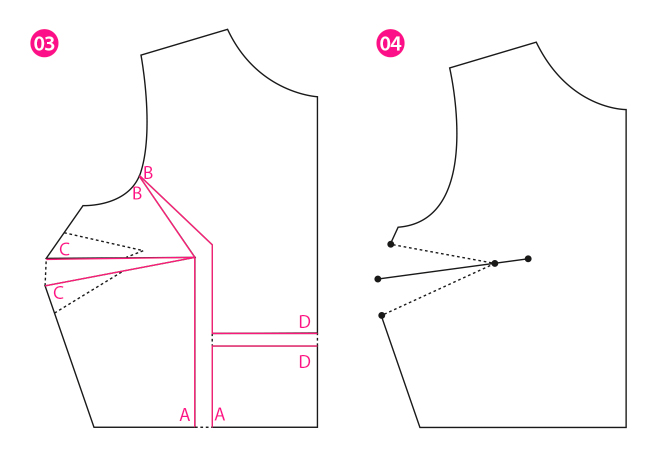
Draw around your moved pattern pieces, extending the centre front too so it lines up with the waist or hem. <Fig 3>
Drawing the new bust dart
Step 1
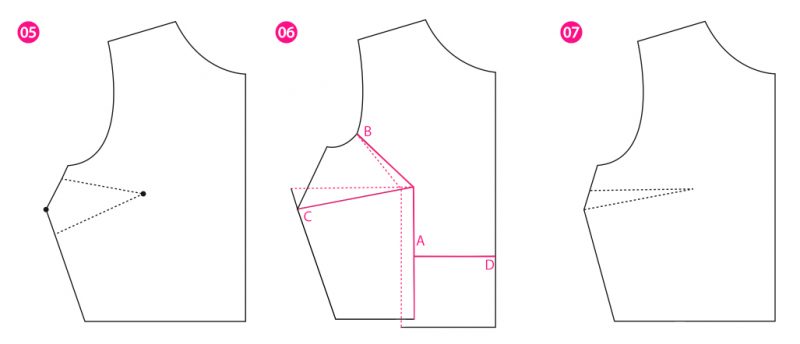
Now you need to draw the new bust dart. Draw a line from the bust point to the side seam through the centre of the section you’ve opened up when you separated line C.
Step 2
Mark a point 2cm (3⁄4in) in from the bust point along this line for the new dart apex.
Step 3
Draw the dart legs from this new dart apex to the side seams where the original dart legs started. <Fig 4>
Step 4
Redraw the side seams so they are joined at the centre line between the dart legs. <Fig 5>
Step 5
You can now remove your cut pattern pieces to reveal the newly adjusted pattern piece below. Cut around this and use it to make your garment.
How to alter a sewing pattern for a Small Bust Adjustment (SBA)
This is done in the same way as the FBA but in reverse.
Step 1
Draw the lines on your pattern and cut along them as in steps three and four of the FBA. But, instead of opening out lines A and B, overlap them to the right by half of the difference between your bust and high bust. Line C will overlap too when you straighten up line A. <Fig 6>
Step 2
Cut along line D and move it up so it lines up with the waist or hem, as this will have moved upwards. Draw around your moved pattern pieces.
Step 3
Redraw the bust dart in the same way as for the FBA.
Step 4
Redraw the side seam by drawing a line from the under arm to the centre of the dart, then another from there to the waist. <Fig 7>
