Step 1
Cut the fabric out using the pattern template. Stay-stitch front and back pieces around the neckline approx. 13mm from the edge in the direction of the arrows. TIP: Stay-stitch prevents the curved edges from over-stretching.
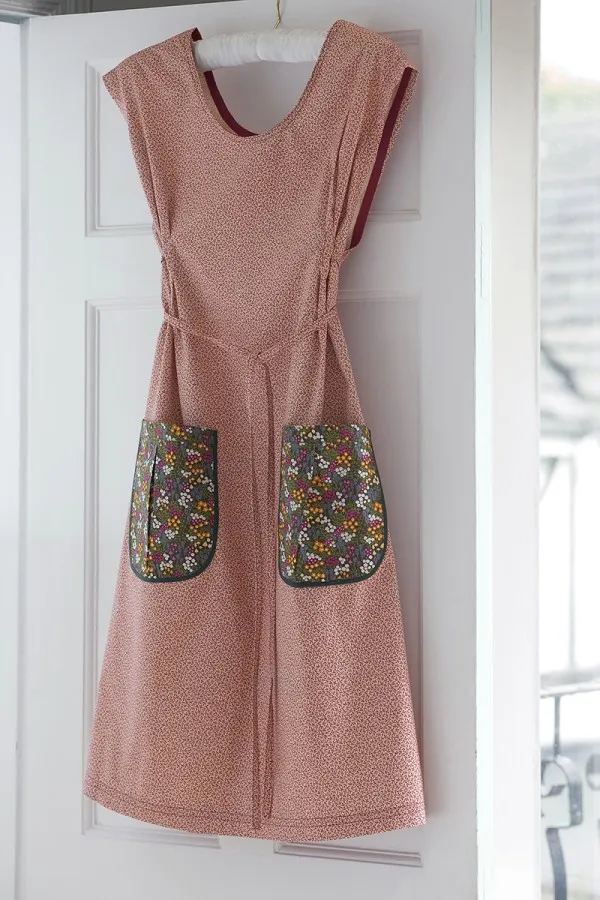
To make the Dottie Angel pattern pockets
Step 1
Make a pleat on RS of pocket by folding along the solid lines marked. Bring fold in towards the broken line and pin. Sew along the edge.
Step 2
Along one edge of the pocket band, press under 6mm and pin RS of band to WS of pocket with edges even. Sew 6mm seam, and press towards band. Turn band towards the RS. Pin and press band edge over the seam. Stitch edge to RS of pocket, and topstitch close to upper edge.
Step 3
Cut a piece of double-fold bias tape that will fit around the pocket curve plus additional 13mm. Pre-shape the tape to the pockets curve with a steam iron. Place pocket between folded bias tape with 6mm to spare at the upper edge. Place the bias edge against the centre crease and the wider folded edge on the WS of pocket. Tack in place to encase the edge.
Step 4
Pin pocket to the front RS matching the dots on the pattern and tack close to the inner fold of binding, stitch along the pocket line turning the extending bias ends under. Reinforce the pocket by sewing 1cm from the bound edge and 1cm away from the upper edge. Remove tacking.
To make the Dottie Angel pattern belt
Step 1
On one short end of belt – fold under 1cm seam and press. Fold the tie belt in half, lengthwise with WS together. Press. Open belt out and with WS sides together, turn the long sides in so that they meet at the crease. Press. Fold in half lengthwise bringing pressed edges together. Stitch closed.
Step 2
Attach tie on RS front, lining up with the dots marked on pattern and sew in place. To make front tucks – bring the broken lines together on RS and press. Stitch across the broken lines to secure. On RS, stitch 3mm away from fold between stitching. Remove basting.
To make the Dottie Angel pattern seams
Step 1
With RS together, pin front to back at the shoulder seams, matching the notches and sew together using a 1cm seam. Trim seam to 3mm, and press open.
Cut a strip of single-fold bias tape the length of the shoulder seam. On WS, pin tape over the seam and tack into place. On RS, topstitch and remove tacking.
Step 2
For neckline, open out one edge of single fold bias tape and with RS together, pin tape to neck edge 1cm from the edge. Turn under and secure overlap at centre back. Stitch in about 1cm. Trim and clip curves. Turn the tape to WS making sure to roll an extra 3mm of the main fabric. Press. Tack close to the inner tape edge. On RS, topstitch where tacked, and stitch 6mm above the first row of stitching.
To make the Dottie Angel pattern armholes
Step 1
With RS together, pin single fold bias tape to armhole having creased 15mm from raw edge. Pin between the large dots and notches, and sew in place. Trim and clip. Turn tape to WS along the fold line. Press and tack close to inner tape edge. On WS, topstitch as before.
To make the Dottie Angel frock
Step 1
At side seams, stitch front to back using a French seam. How to sew a French seam: With WS together, sew 6mm from side edges. Trim close to stitching. Turn garment and sew again to encase the first seam. Press seams toward the back.
To make the Dottie Angel pattern hem
Step 1
Mark the desired length and press. Trim to leave a 2cm hem allowance. On WS, pin single-fold tape over hem edge and attach as previously instructed above.