We're joining in with Sew a Softie 2018 by sharing this free toy sewing project. Make playtimes rock with Kajsa Kinsella’s soft toy guitar decorated with scraps from your stash..
This free softie project is the perfect gift for little rockstars, both to play with and involve them making it with you!
Created by Trixi Simmonds in 2016, the yearly initiative aims to ignite a love of hand sewing in a new generation. It encourages parents and children to turn off their computers, put down their smart phones and discover the fun and fulfillment that comes from creating a simple-to-sew softie.
So let's get sewing!
This guitar sewing project first appeared in Simply Sewing issue 16 and is designed by Kajsa Kinsella, author of Sew Scandinavian
You will need
- Cotton fabric: two x 85cmx30cm (34x15in) pieces or measure to fit your pattern (see step one).
- Scraps of fabric to decorate
- Iron-on interfacing
- Soft toy stuffing
- 6 pipe cleaners
- 6 large wooden beads
- Basic sewing kit
Download your free sewing templates
You will find the birds, hearts and flowers templates for this project on our issue 16 free sewing patterns sheet.
How to sew a soft toy guitar
Cutting out
Step one: Start by making a pattern for your guitar shape. To do this we drew around dinner and side plates to create the guitar shape, then drew a long rectangle at the top to form the neck and a wider, shorter rectangle (with rounded corners) for the head at the top of the neck. Our finished guitar is 80cm (31in) long and 25cm (10in) wide. Add a 1.5cm (5⁄8in) seam allowance all the way around. Now cut out your pattern.
Step two: Cut two pieces of cotton fabric using the pattern, one for the front of the guitar and one for the back.
Decorating the guitar
Step three: Prepare the shapes to decorate the front of the guitar. Download and trace our shape templates and cut them out to use as patterns. Press iron-on interfacing to the wrong side of some fabric scraps and then cut out the shapes from these scraps following the steps below. This interfacing will help stop them from fraying.
Step four: For the sound hole cut a 10cm (4in) diameter circle and press this to the centre of the lower part of the guitar.
Step five: Cut out eight of each of the two petal patterns then press around the outside of the fabric circle.
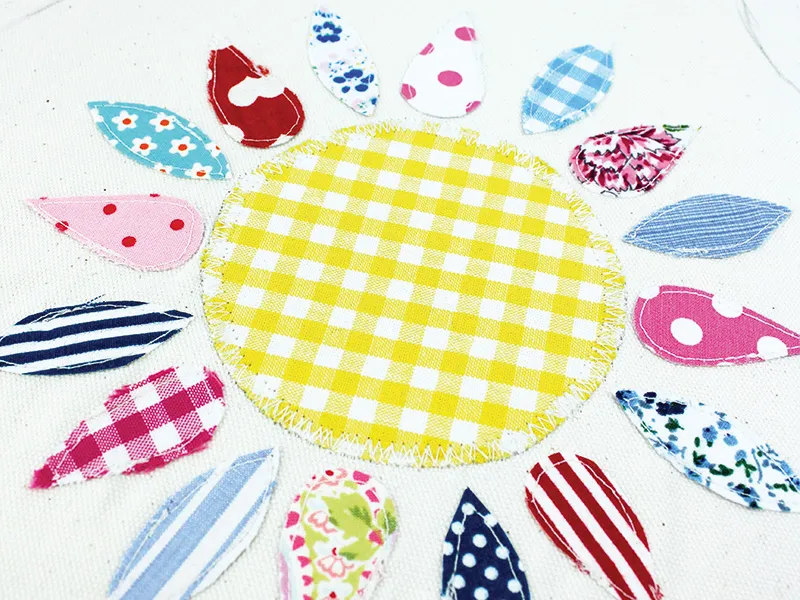
Step six: Cut out two birds, remembering to flip the template so they face each other. Cut out a tulip and three hearts. Press these in place to the front of the guitar as shown.

Step seven: Appliqué all the fabric pieces into place by either working a machine straight stitch or zigzag stitch around the edge.
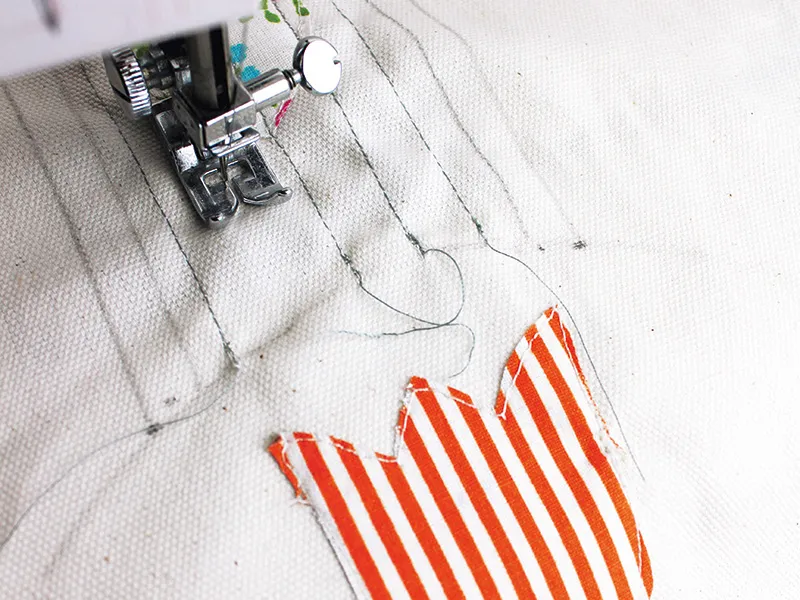
Step eight: Draw parallel lines down the neck of the guitar to represent the strings, making sure they are evenly spaced. Stitch over the drawn lines using grey thread.
Making the tuning pegs
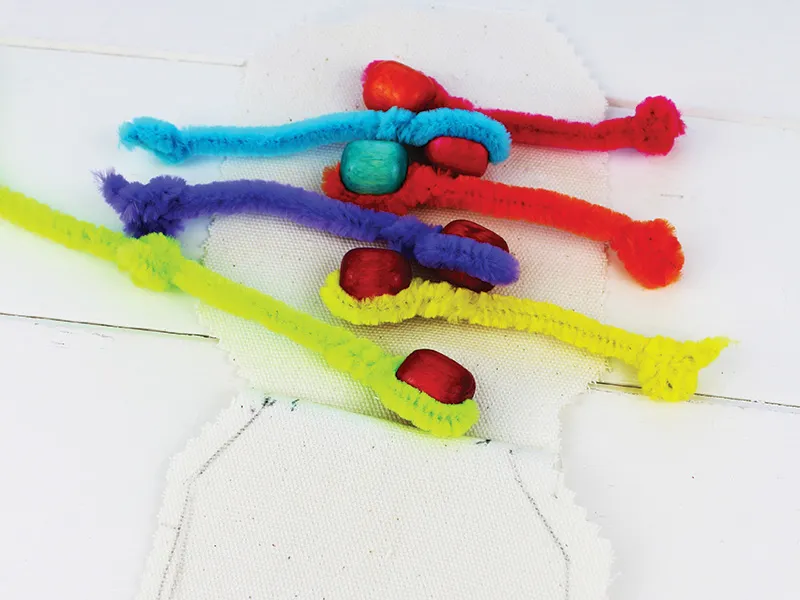
Step nine: Push a pipe cleaner through a bead, leave 2.5cm (1in) sticking up beyond the bead at the top then bend it downwards to wrap around the bottom of the bead.
Step 10: Trim the pipe cleaner to 10cm (4in) and tie a knot at the end so it doesn’t slip out. Make six of these keys in funky colours.

Making the guitar body
Step 11: Place the decorated front right sides (RS) facing with the plain back piece and stitch together all the way around, leaving a turning gap at the bottom. Leave the guitar head open.
Step 12: Sandwich the pipe cleaner tuning pegs, three each side in between the head pieces with the bead end facing inwards.
Step 13: Sew across each tuning peg to fasten in place and around the whole unstitched head of the guitar. Run the sewing machine back and forth over each peg a few times to secure them and do remember to stitch slowly as you may well hit the metal thread of the pipe cleaner!
Finishing the guitar
Step 14: Turn your guitar RS out and stuff well, pushing the stuffing right up inside of the head. Slipstitch the gap closed to complete.