What is jersey fabric?
Jersey fabric is a knit fabric known for its stretch and comfort. It's perfect for a variety of garments, and is a popular choice for T-shirts and dresses.
Jersey is usually made from cotton, but can also be made in wool, bamboo, and silk. There are many varieties of jersey available, and each is better suited to different projects. Single-knit jersey has a wrong and right side, and fabrics such as a viscose jersey are very light and perfect for garments with drape. Heavier, double-knit jerseys are more stable, and fabrics such as Ponte Roma and scuba are used for dresses and jumpers.
It can feel daunting to work with jersey, but it's actually really quick to sew with, it doesn't fray, it's easy to wash, and easy to fit. If you're just starting out with jersey fabrics, you can make it easier for yourself by choosing a single-knit jersey with good recovery.
Here we give you some top tips for working with jersey, as well as a step-by-step guide to making a poncho so you can put your new skills to the test.
Calculating stretch percentage
Some dressmaking patterns will call for a jersey with a certain stretch percentage. This can be confusing if the fabric store doesn’t specify, but it is very simple to calculate yourself. All you need to do is take a tape measure with you to the shop!
First, hold 10cm of fabric between your thumbs and pull to a comfortable stretch. Don’t pull as far as the fabric will allow you to, but try to replicate the amount of stretch that a fitted T-shirt might have when worn. Measure the stretched length of the fabric between your thumbs and this will allow you to calculate the stretch percentage. You now need to find the percentage increase between the original 10cm and the amount that the fabric stretched to. For example, if 10cm stretched to 12cm that is an increase of 20%, so your fabric has 20% stretch. If it stretched to 15cm, your fabric has a 50% stretch. Some stretch fabrics have a horizontal and vertical stretch, so you can use this method to calculate the stretch in both directions.
Equipment to use
Ballpoint pins and sewing machine needles will pass through jersey easily, whereas regular machine needles will pierce the threads causing skipped stitches or laddering your fabric.
Sharp scissors are essential when cutting out jersey fabric – blunt scissors will ‘drag’ the fabric as you are cutting it, resulting in stretched edges before you even begin to sew!
Machine settings
If your machine allows you to do so, reducing the pressure foot pressure can help if your fabric is stretching when sewn. The dogteeth in your machine will guide the fabric through as you sew, but if the foot pressure is too high the foot will pull on the fabric as you sew, resulting in the dreaded wavy seams.
Sew slowly – if you have a speed control on your sewing machine select the slowest setting, and if you don’t have speed control press very lightly on your foot pedal.
Always sew a sample, or at least a use a scrap of fabric to practise your stitching before you start sewing the final garment.
Making garments with jersey
When sewing garments in jersey fabric you might find that it is helpful to use different techniques and stitches, depending on the desired finish. For example, finishing a hem with a twin needle will give a professional look, whereas you might think that a neckline would look nicer when finished with binding. You may like the effect of overlocking without stabilisers for the ends of the sleeves for a wavy, ‘petal’ effect. The best way to see what works best on your machine and what is to your taste is to experiment with a scrap of your fabric, and make sure to note down the stitch details next to each sample. This will help you to decide which stitch to use and save time in the future!
Top tips for sewing with jersey
- Cutting along the exact grain of the fabric will make the jersey less likely to distort when sewn. Cut on a flat surface and make sure your fabric isn’t hanging off a table when cutting as this will cause the fabric to stretch.
- Interfacing will prevent the jersey from stretching as you sew, so iron bias-cut strips onto the edge before sewing. Ensure you cut the bias strips evenly to ensure a neat finish.
- Ballpoint/stretch needles are best for sewing with jersey as the rounded tip will pass through the fabric smoothly, preventing skipped stitches and ladders in the fabric. Twin ballpoint needles are also available.
- Straight stitches will not stretch with the jersey and so will rip out as soon as the fabric is stretched. Narrow zigzag stitch is a good alternative when sewing with jersey. We use a stitch length of 3mm and a stitch width of 5mm, but experiment to find the stitch that works best for you.
- Overlockers provide a neat finish on jersey and allow a lot of stretch in the seam. You can place a stabiliser on the fabric and stitch over it to stabilise and overlock at the same time.
- Sew with a piece of tissue paper underneath your fabric and then carefully rip it away afterwards to prevent jersey stretching.
- Press jersey fabric from the wrong side to avoid shiny iron marks. As jersey contains elastic fibres, it will mark easily if your iron is too hot. It’s best to test a scrap of your fabric first to find the ideal heat setting.
- Tacking is a great way to avoid disasters with jersey and will help you to get your stitches right first time. Even if you wouldn't normally tack, you won't regret it with jersey!
How to make a poncho

You will need
- Medium-weight jersey: 1.5mx115cm (60x40in)
- Ballpoint pins or fabric weights
- Ballpoint sewing machine needle
- Twin ballpoint sewing machine needle (optional)
- Iron-on interfacing 60x60cm (24x24in)
- Erasable fabric marker or tailor's chalk
- Basic sewing kit
Notes
- Use a 1cm (3⁄8in) seam allowance.
- Our poncho has no shoulder seams so that you can wear the poncho at any angle you like without having to consider the seam placement.
Cutting out
From the main fabric cut:
- Poncho: rectangle 110cmx145cm (43x57in). This can be altered depending on your desired size.
- Binding strip: 3.5x84cm (1½x33in).
Making the neck opening
- Fold your rectangle in half widthways. You can place your neck opening in the centre or you can decide, as we did, to move the circle slightly off centre for an asymmetric poncho. Measure the width of your neckline opening – ours is 26cm (10in). Mark this measurement with pins and also mark the halfway point.
- Measure in from the halfway point by your desired neckline depth – we measured in 10cm (4in) from the centre. Make another mark at this 10cm (4in) point.
- Using an erasable fabric marker or tailor’s chalk, draw a smooth curve connecting the three points. Pin the jersey together in several places around the curve to secure.

- Cut along the curve.
- Fold the long edges of the binding strip to the wrong side (WS) by 1cm (3⁄8in) and press. Fold the entire strip in half again lengthways with WS together and press.
- Open out and pin the short ends of the binding together right sides (RS) facing.
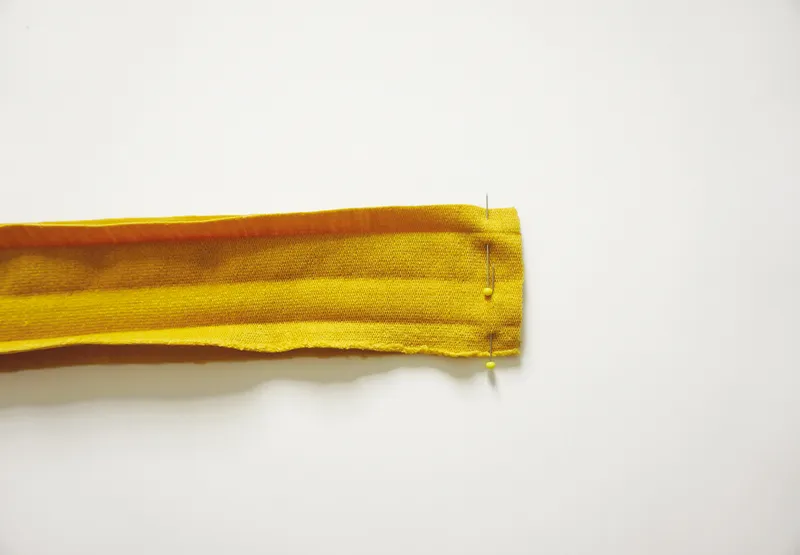
- Stitch the ends of the binding using an overlocker or narrow zigzag stitch.
- Slide the binding over the neckline with RS facing. Pin the binding to the neckline along the 1cm (3⁄8in) fold line.
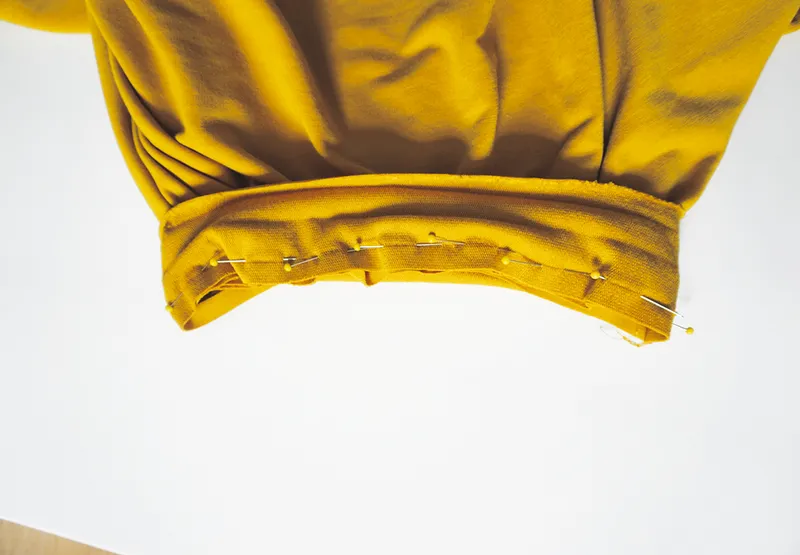
- Fold the binding over to the WS and pin then tack in place. Make sure the binding is even and smooth around the neckline.
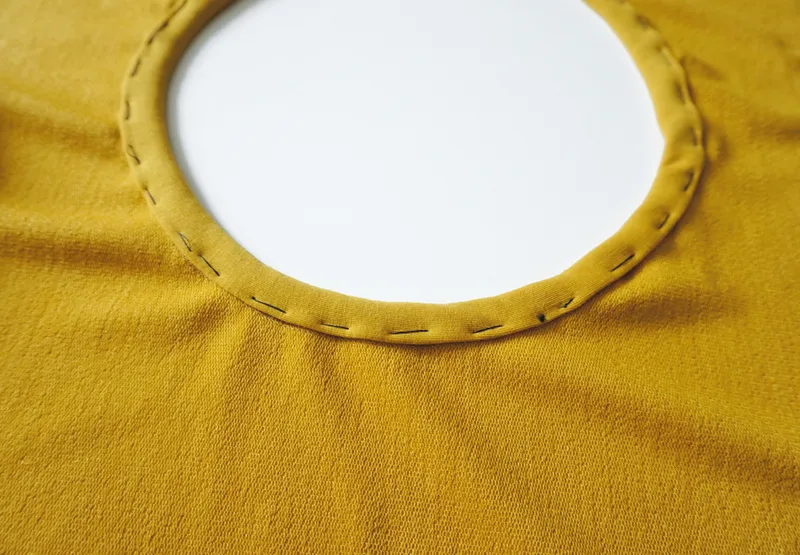
- Topstitch in place from the RS, making sure you catch the back of the binding and the seam allowance, to secure.
Hemming the poncho
- Press iron-on interfacing to the WS of all raw edges, overlapping at the end of each interfacing strip so that there are no gaps.
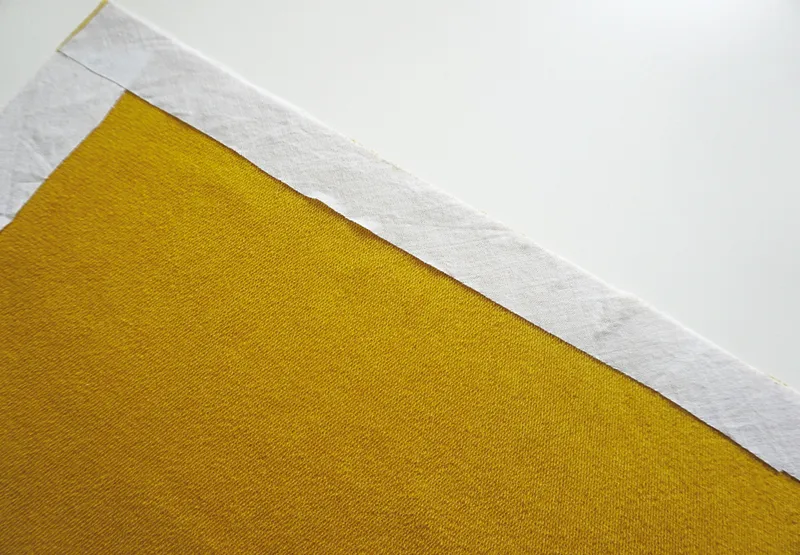
- Finish the raw edge of the jersey and interfacing with an overlocker or zigzag stitch.
- Turn the short edges over to the WS and press. Topstitch in place using a narrow zigzag stitch or a twin ballpoint needle.
- Repeat for each of the long edges.
- Press on the WS to finish.