Embroidery is a beautiful and mindful hobby, and learning the basic stitches is easy. If you are new to embroidery having a library of different stitches is essential. It'll help you to remember the stitches you have learnt and help you to master new techniques.
If you are brand new to embroidery and would like some more context in this rich craft, make sure you read our complete how to embroider guide.
If you already have a stitch in mind that you want to know how to do use our handy 'jump to' list below to skip to that part of the article.
If you are simply looking to expand your embroidery knowledge, you'll find a suggested project on each stitch, which will allow you to practice on a free embroidery project right here on Gathered.
undefined
23 types of must-know embroidery stitches
Jump to:
- Back stitch trellis
- Blanket stitch (surface)
- Bullion knot
- Chain stitch
- Colonial knot
- French knot
- Fly stitch
- Ladder stitch
- Lazy daisy
- Picot stitch
- Pistil stitch
- Rose stitch
- Satin stitch
- Scallop stitch
- Split Back Stitch
- Stem stitch
- Straight stitch
- Whipped back stitch
- Whipped spiders web stitch
- Woven wheel stitch
- Split Stitch
- Turkey Stitch
- Woven picot stitch
1. Back stitch trellis
- Project recommendation: Sausage dog embroidery pattern
Worked in backstitch, this needlework stitch is great for filling an area. Try stitching it on a diagonal for a true trellis look.
- Stitch a set of parallel lines of backstitch, keeping the stitch length as consistent as possible.
- Stitch another set of parallel lines of backstitch, perpendicular to the first, and with the ends of the embroidery stitches intersecting.
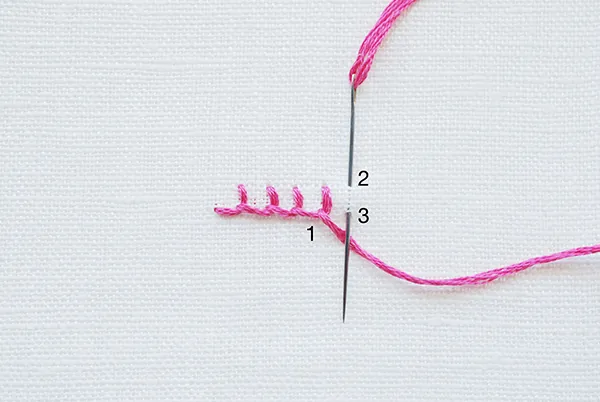
2. Blanket stitch (surface)
- Project recommendation: Bird embroidery pattern
This embroidery stitch is fun for decorative stitching or appliqué. Try to keep the spacing and stitch height consistent... or change it up to create a pattern!
- Come up at point 1.
- Go down at point 2 and come back up at point 3, keeping the needle over the working thread.
- Pull the thread to create a right angle.
How to do a blanket stitch
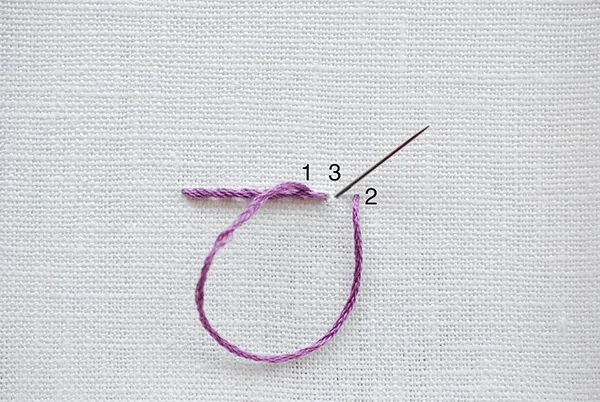
3. Bullion knot
- Project recommendation: Rose wall hanging
They are tricky at first, but with a little practice, bullion knots are useful for creating texture and beautiful flowers in your embroidery.
- Come up at point 1, then go down at point 2 and back up at point 1, keeping the needle through the fabric.
- Wrap the needle until the wrapping is as long as the space between points 1 and 2. If you don’t want the knot to lay flat against the fabric, wrap it a little more.
- Holding the wrapping with your non-dominant hand, carefully pull the needle through the wrapped thread.
- Go down at point 2 and pull the thread until the stitch lays well.
How to do Bullion knots
4. Chain stitch
- Project recommendation: bicycle embroidery pattern
This simple method of chain stitching is worked in reverse. It’s a great embroidery stitch for adding texture to your projects.
- Make a small straight embroidery stitch.
- Come up at point 1, slide the needle under the small straight stitch, and then go down at point 1.
- Come up at point 2, slide the needle under the previous stitch, and then go down at point 2.
How to do chain stitch
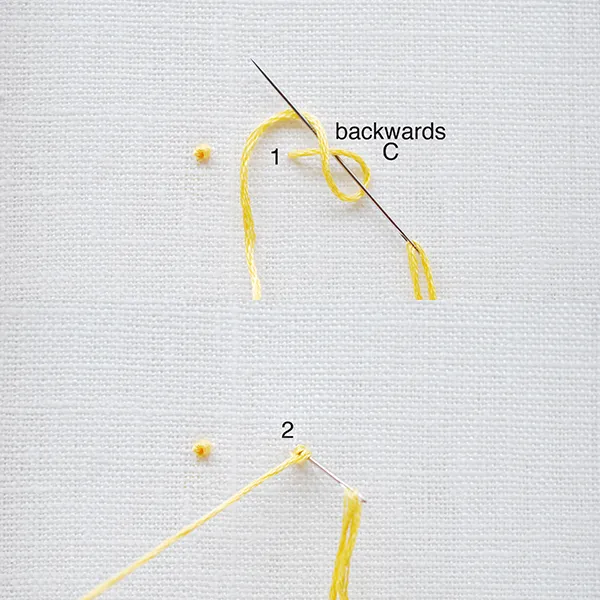
5. Colonial knot
- Recommended project: blossom embroidery pattern
If you find French knots tricky then try this alternative for creating eyes and other dotted details.
- Come up at point 1, form a backward C with the thread and place your needle over the C.
- Wrap the thread over and then under the point of the needle.
- While holding the working thread taut, bring the needle down at point 2 (next to point 1, but not the same hole) and pull slowly until the knot is formed.
How to do colonial knots
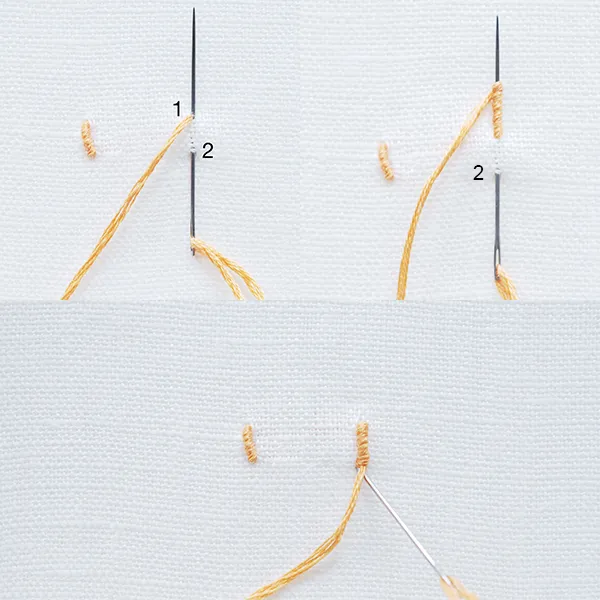
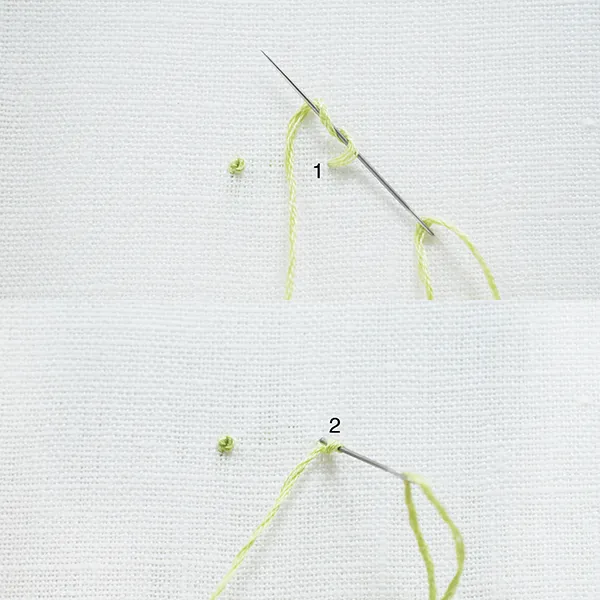
6. French knot stitch
- Recommended project: sunflower embroidery pattern
This is an embroidery stitch that everyone should learn because it’s so useful. The secret is to hold the working thread taut while you pull it through.
- Come up at point 1, then wrap the thread around the needle twice.
- Holding the working thread with your non-dominant hand, bring the needle down at point 2 (close to point 1, but not the same hole).
- Pull slowly until the knot is formed.
How to do French knots
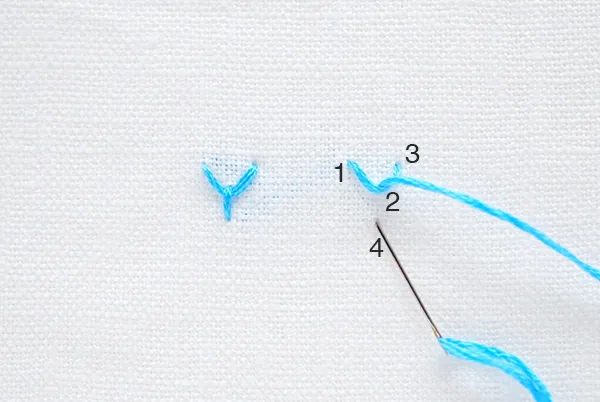
7. Fly stitch
- Recommended project: bunny embroidery pattern
This simple stitch can be worked as individual stitches or in a line.
- Come up at point 1, then go down at point 2, leaving the thread loose.
- Come up at point 3, catching the loop of thread, then pull to form a ‘V’.
- Go down at point 4.
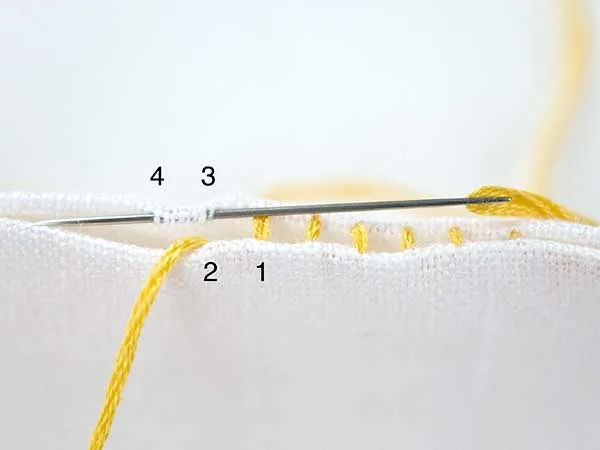
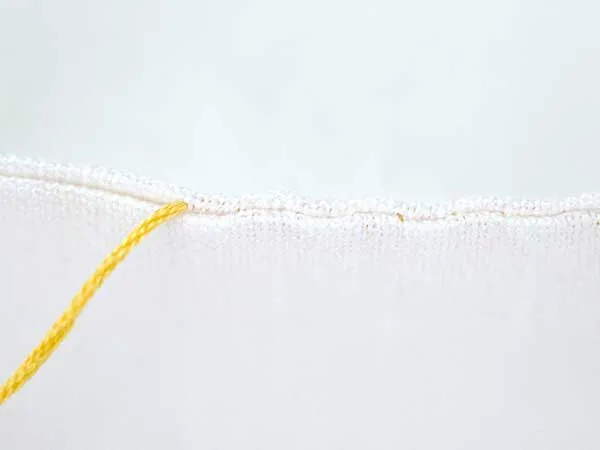
8. Ladder stitch
- Recommended project: Passport case
This embroidery stitch is useful for stitching seam openings closed as it creates a nearly invisible line of stitching! Use this version when the two sides of the seam are held together.
- Bring the needle out about 0.5mm below the fold on the inside of one side of the seam.
- On the opposite side of the seam, directly across from where the thread came out, go in at point 1 and back out at point 2.
- Go in at point 3 and back out at point 4.
- Work back and forth on each side of the seam, stitching about .5mm below the fold.
- Every few stitches, gently pull the thread to tighten the seam.
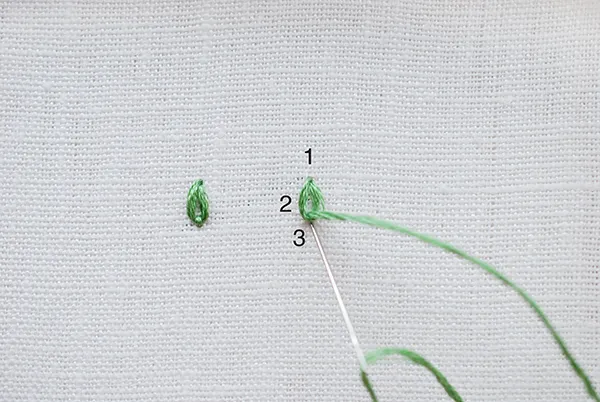
9. Lazy daisy
- Recommended project: Wildflower embroidery
Usually used for flower petals, this stitch is also ideal for embroidering tiny seeds.
- Come up at point 1, then go back down at point 1, leaving a small loop.
- Come up through the loop at point 2, then go down at point 3 (next to point 2, but not the same hole).
How to do lazy daisy stitch
Try an embroidery kit for beginners
A great way to get yourself familiar with embroidery is by trying a kit! An embroidery kit for beginners contains everything you need, and often has lots of tips and tricks for beginners.

10. Picot stitch
A picot stitch is a perfect choice to create dimensional flowers, leaves, feathers, and more in your embroidery. The base is anchored to the fabric, but the rest of the stitch is woven and free from the material.
- Place a sewing pin with a large head vertically through the fabric.
- Bring the needle up at point 1.
- Bring the working thread behind the head of the pin and go back down at point 2.
- Come back up at point 3 next to the pin and as centred between points 1 and 2 as possible.
- Bring the working thread behind the head of the pin then weave the needle under, over, and under the three vertical threads.
- Push the thread up to the top.
- Now from the side where the working thread comes out, weave the needle over, under, and over the vertical threads.
- Repeat, weaving back and forth, snugging the thread to the top each time.
- When the shape is filled, bring the needle to the back of the fabric.
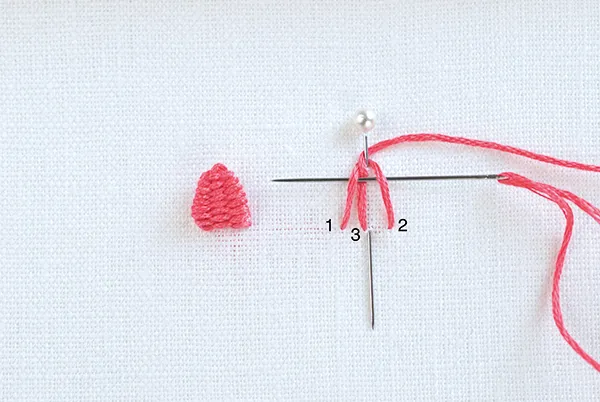
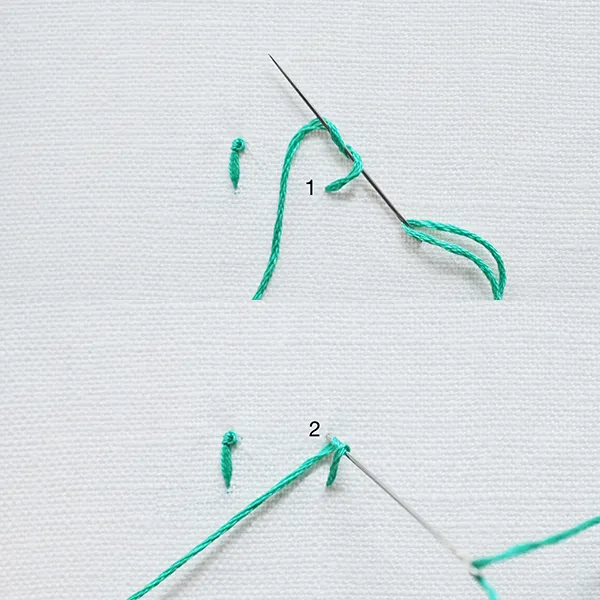
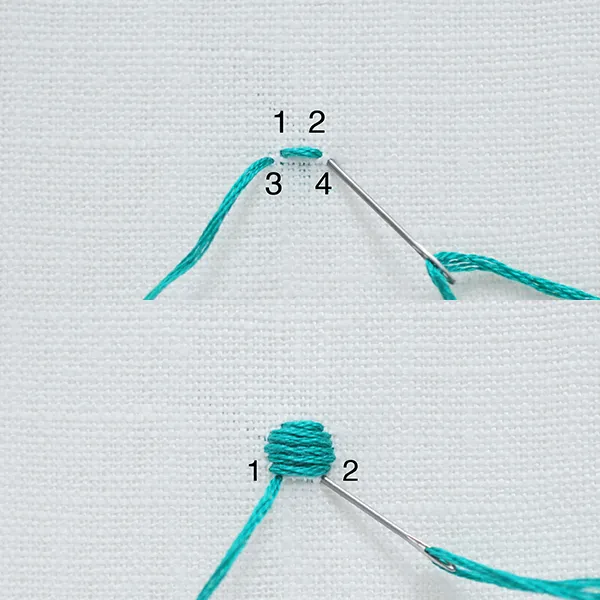
11. Pistil stitch
- Recommended project: Easy embroidered pincushion
Similar to a French knot, this stitch resembles the centre of a flower. You can vary the length, but be careful not to make them too long.
- Come up at point 1, then wrap the thread around the needle two times.
- Holding the working thread with your non-dominant hand, bring the needle down at point 2.
- Keep the wrapped thread taut around the needle and close to the fabric, then pull slowly until the knot is formed.
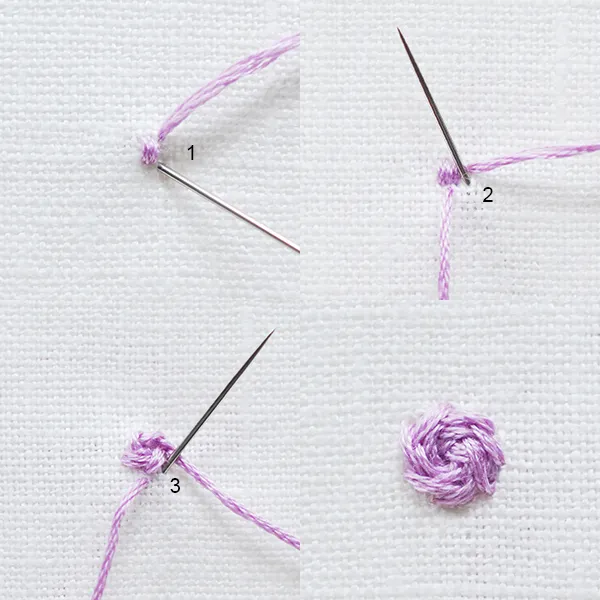
12. Rose stitch
- Start with three small parallel stitches to form the centre.
- Use stem stitch around the centre, working in circles and increasing the stitch length until the rose reaches the desired size.
- Experiment using materials such as yarn or ribbon.
13. Satin stitch
- Recommended project: Flowers embroidery pattern
When you want to fill an area with a smooth finish, this stitch is the ideal choice. It’s best worked in small areas, because if the stitches are too long, they may snag.
- Come up at point 1, then go down at point 2.
- Come up at point 3, then go down at point 4.
- Repeat. Always work the stitches across the area you’re filling, coming up on the opposite side where your needle went down.
How to do satin stitch
14. Scallop stitch
- Recommended project: Pineapple embroidery design
Similar to a lazy daisy, the scallop stitch makes it easy to add smiles to little stitched creatures.
- Come up at point 1, then go down at point 2, leaving the thread loose.
- Come up at point 3, catching the loop of the thread.
- Then go down at point 4 (next to point 3, but not the same hole).

15. Split backstitch
- Recommended project: free leaves embroidery pattern
A great embroidery stitch for working outlines. When you make the ‘split’ try to go through the fibres, and not just in between the strands of embroidery thread.
- Come up at point 1, then go down at point 2.
- Come up at point 3, splitting the previous stitch, then go down at point 4.
- Repeat.
Try machine embroidery
If you are looking to dip your toe into the world of machine embroidery, check out our detailed guide to beginner embroidery machines.
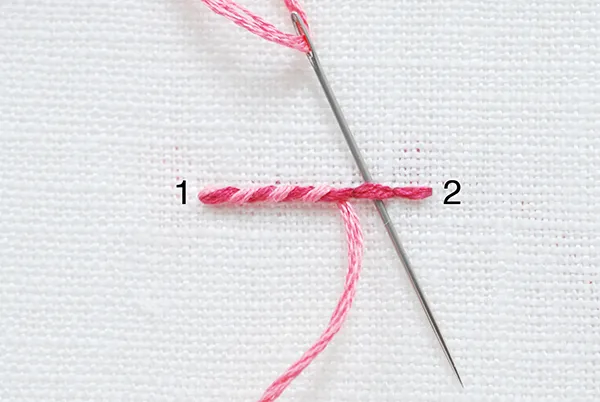
16. Stem stitch
- Recommended project: free thanksgiving embroidery pattern
Although it can take some practice, stem stitch is great for textured outlines.
- Come up from the back at point 1, then go down at point 2.
- Before pulling the stitch close to the fabric, come up at point 3 with the loose thread below the needle.
- Pull the thread taut, then repeat.
- Come up from the back at point 1, then go down at point 2.
- Before pulling the stitch close to the fabric, come up at point 3 with the loose thread below the needle.
- Pull the thread taut, then repeat.
How to do stem stitch
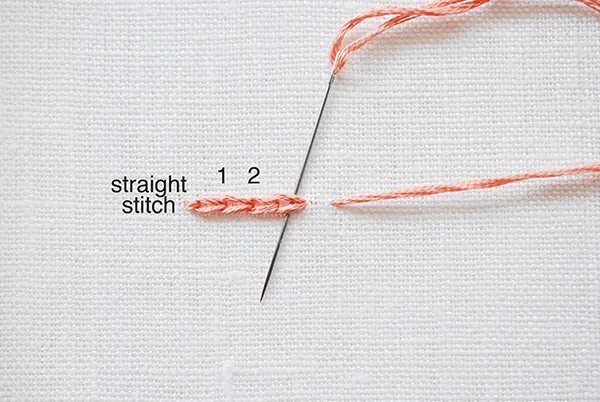
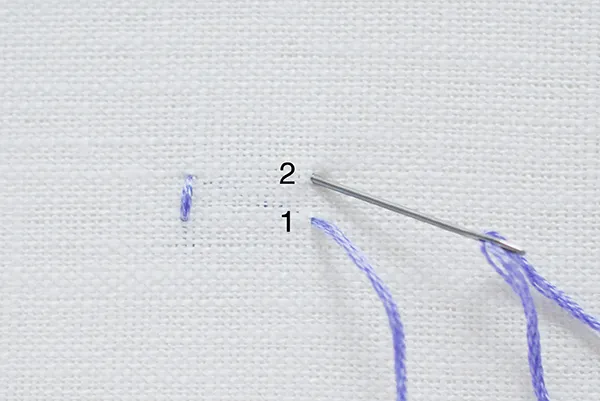
17. Straight stitch
- Recommended project: Sun embroidery
The simplest of stitches, the straight stitch can be grouped together or used alone.
- Come up at point 1, then go down at point 2.
- Repeat.
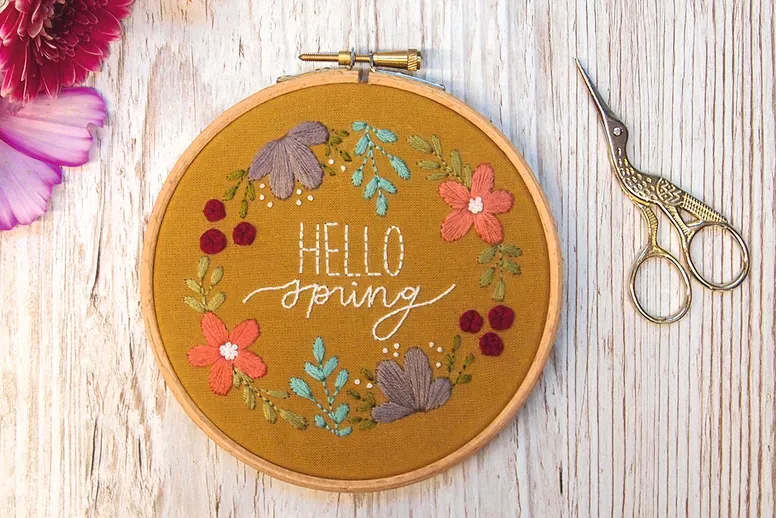
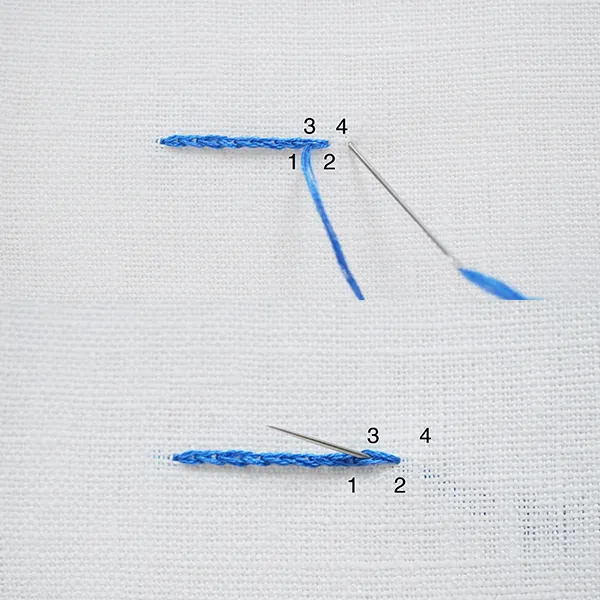
18. Whipped backstitch
- Recommended project: Spring embroidery hoop
This is a great way to embellish a line of backstitch, adding thickness, texture, or some extra colour.
- Start with a line of backstitch.
- Come up at point 1.
- Slide the needle under the first backstitch from the top down.
- Slide the needle under the next stitch from the top down. Repeat.
- Bring the needle down at point 2 when you reach the end of the line of backstitch.
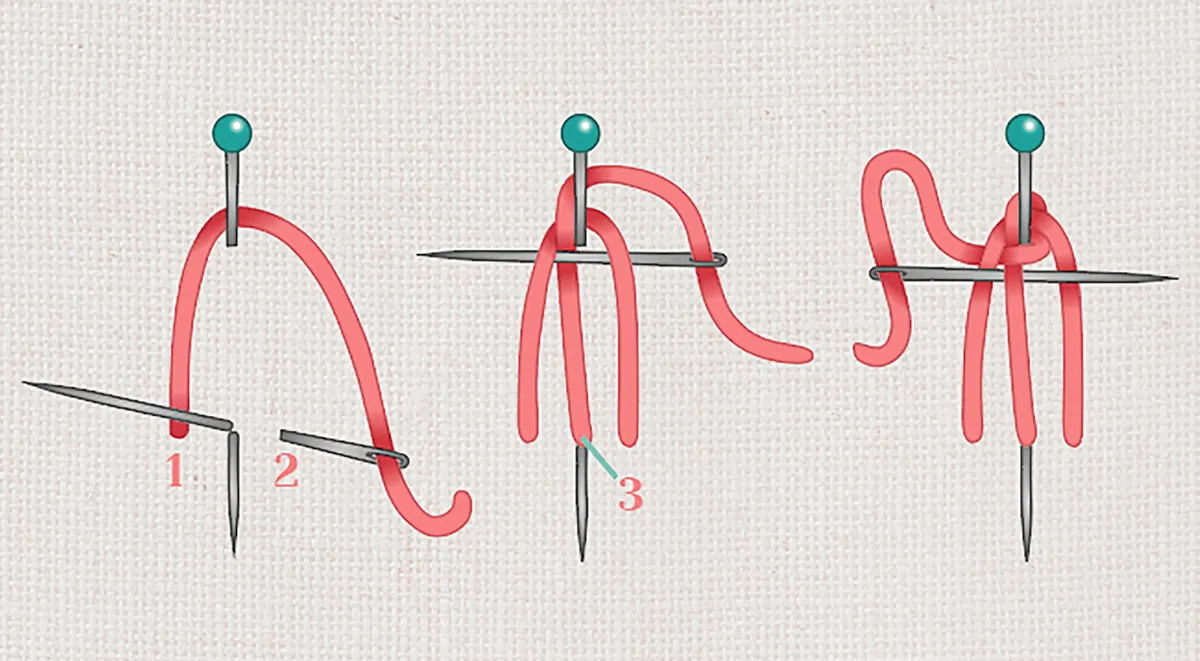
19. Whipped spider web
- Recommended project: Embroidered collar pattern
True to its name, this stitch does look like a spider web, but it also makes wonderful flower shapes.
- Start with a base of four crossed stitches, creating eight spokes.
- Come up close to the centre, between two spokes.
- Slide the needle under spokes 1 and 2 without going through the fabric.
- Bring the needle over spoke 2, then slide the needle under spokes 2 and 3.
- Continue around all of the spokes several times until the web is filled.
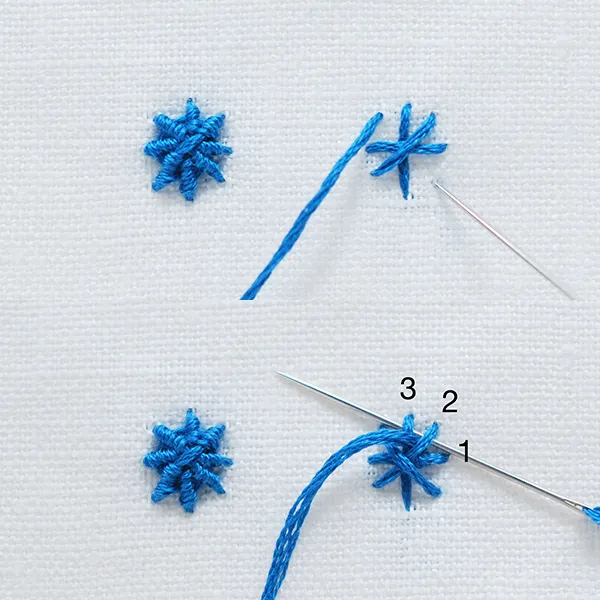
20. Woven wheel stitch
- Recommended project: DIY brooches tutorial
This woven embroidery stitch is easy to work with and creates stunning flowers that stand out from the material. It is usually started with five spokes but can be worked with more, as long as there is an odd number of spokes.
For a more dimensional stitch pack the weaving tight. For a more flat and open stitch, keep the woven thread looser.
- Using straight stitches of even length, form five spokes of the woven wheel. It should look a bit like a star.
- Bring the needle up close to the centre of the wheel.
- Pass the needle over one spoke and under the next.
- Pull the thread through so it is close to the centre.
- Pass the needle over the next spoke and under the one after that.
- Repeat, weaving the needle over and under the spokes around the wheel.
- When the wheel is full, bring the needle to the back of the fabric.

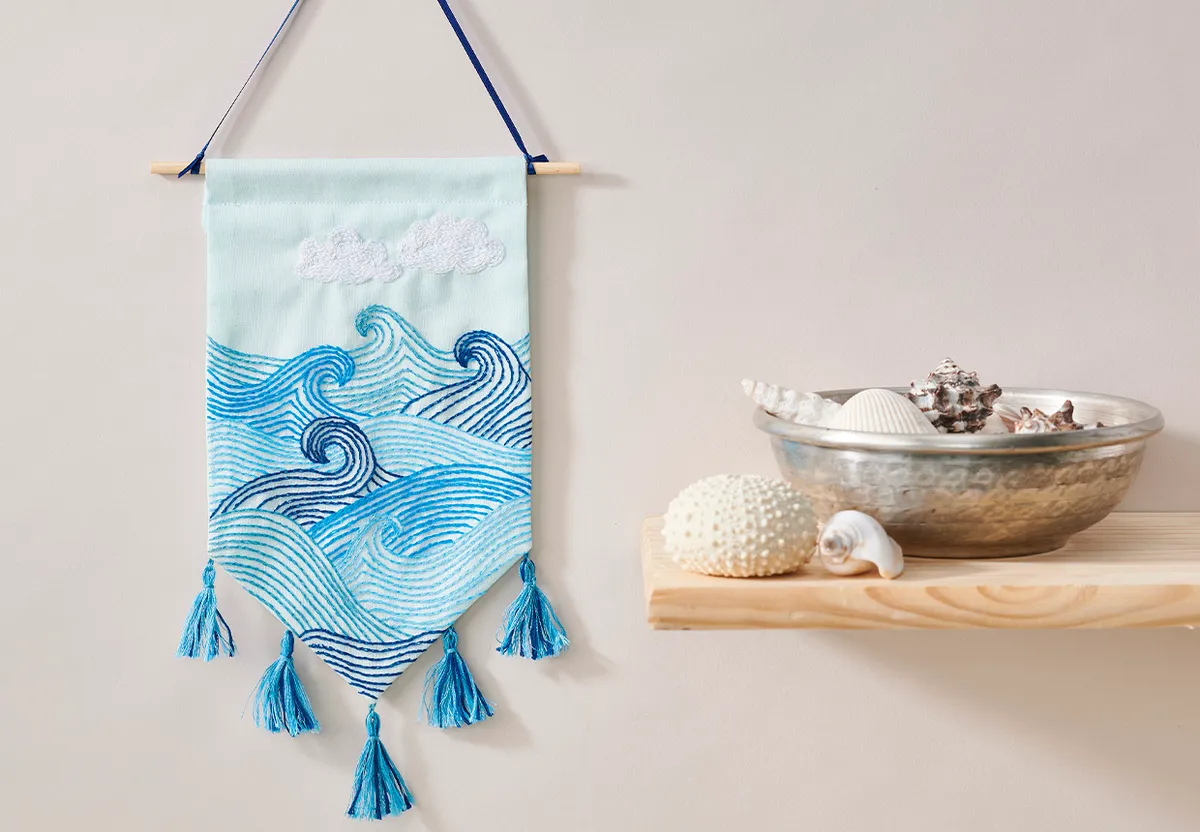
21. Split stitch
- Recommended project: Ocean banner project
Split stitch, as the name suggests, involves splitting the thread of the previous stitch and creates a similar appearance to that of chain stitch.
It’s brilliant for beginners to learn as it’s so simple and versatile – you can use it to outline a design or to fill an area with texture when you work it in dense rows.
22. Turkey stitch
- Recommended project: Botanical embroidery
- Leave 5cm of thread on top of the fabric
- Take the needle in at 1, out at 2, in at 3 and out at 1
- Push the needle back in at 4 and out at 3
- Don’t pull the thread all the way through; leave a loop on the front
- Continue in this way along the line, leaving a loop of thread each time
- When done, cut the loops to your desired fringe length.

23. Woven picot stitch
There are a few varieties of woven picot stitch, but the version explained here has three prongs, is attached to the fabric on one edge and extends out in a triangular shape. This stitch is perfect for working flower petals and leaves.
- Insert a pin through the picot tip and out at the base of the stitch. Bring your needle up through the fabric in the bottom left – in line with where the pin exits the fabric. Take the needle around the back of the pin and insert it bottom right. Then come up at the centre, just above the pin.
- Pull through, and move the working thread around the back of the pin.
- Take the needle under the first thread, over the second, and under the third at the top. Pull fairly tightly to bring the threads together.
- Reverse the direction from the other side, moving over, under, and over the thread. Pull to bring the threads together. Repeat steps 3 and 4 to fill the shape, and then remove the pin to reveal a complete woven picot stitch.
Put your new embroidery stitches skills to the test
As you may have noticed, we have assigned each stitch its own 'recommended project'. Each one is a free embroidery project which will help you to practice your new stitch!
Keep on practising your embroidery stitches
Once you've mastered the basic stitches, you'll be able to take on a wide range of projects! If you want to keep on expanding your knowledge, try to choose a project with a stitch that is new to you. Try these easy embroidery patterns.