All products were chosen independently by our editorial team. This review contains affiliate links and we may receive a commission for purchases made. Please read our affiliates FAQ page to find out more.

How to draw a bird

Learn how to draw this adorable garden bird, with our in-depth, easy-to-follow tutorial. We've split each section into manageable steps, so you can draw along at your own speed.

Try our magazines – get 6 issues from just £9.99!

Published: April 8, 2024 at 5:46 pm

Want to learn how to draw a bird? In this easy-to-follow guide, we’ll show you how to draw a bird step-by-step, so you can feel confident sketching birds! You’ll learn the basic structure of a bird, and how to build up the shape of the body, adding details and refining the shape as you go. From a few geometric shapes, you’ll learn how to bring your bird to life with simple drawing tools and a variety of techniques.

Birds have wonderfully delightful behaviour. They can entertain for hours, and there’s something to be said for getting away from it all for a few hours to enjoy a spot of birding. So next time, why not take a sketchbook along? Try your skills out with our tutorial, how to draw a bird, and take what you’ve learned out into the wild.

undefined

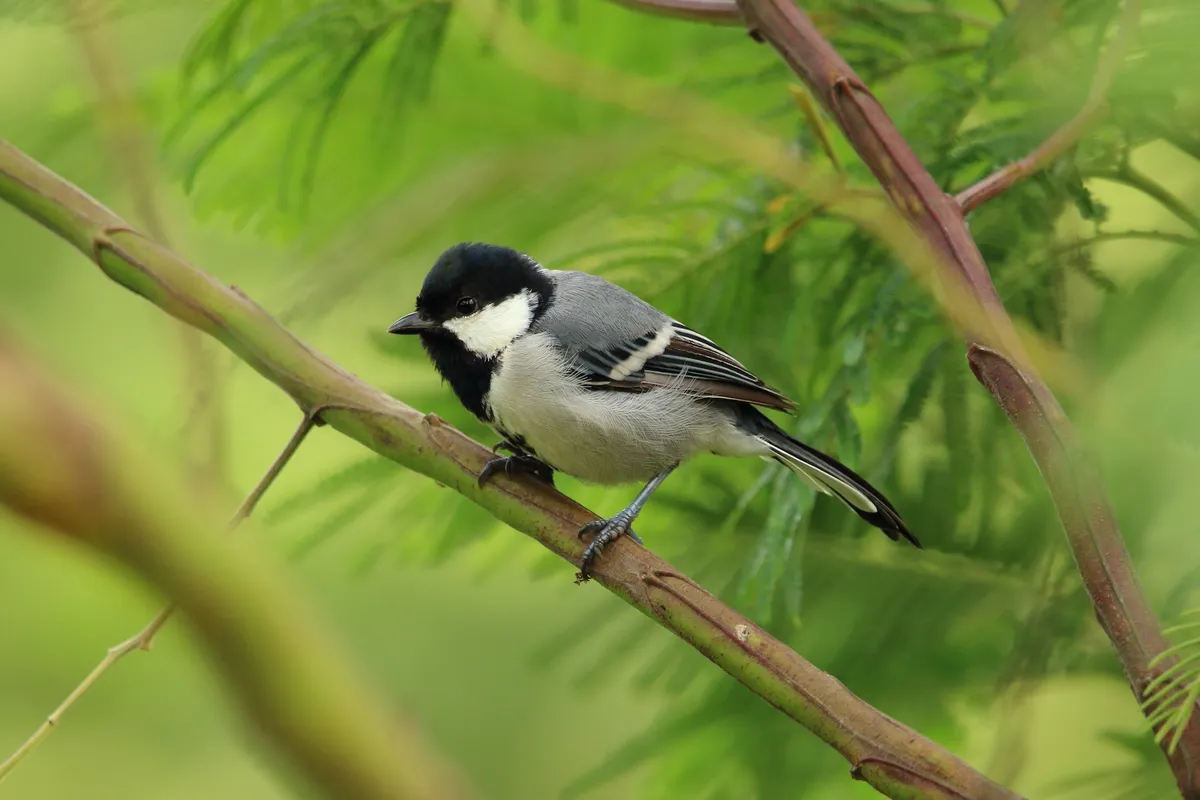
To draw birds convincingly, it’s a good idea to become familiar with their basic anatomy. You can do this by doing quick studies of birds from photographs, then working your way to making real-life observational sketches.

Sketching birds from life requires speed, so keep your drawings quick, and, if possible, observe them when they are relatively still, such as on a bird feeder. But if you’re keen to just get started, then you’ve come to the right place!

Learn how to draw a bird with our easy step-by-step tutorial!

In this tutorial, how to draw a bird, we take you from creating the basic geometric form, to building up the shape and finally adding details and texture. You’ll develop a system to quickly get the essential form of a bird down on paper, and learn to apply this formula to sketching other garden birds. Over time, and with practice, you’ll get better and find you can develop your own style.

Once you’ve got to grips with the basic form of a bird, as we show you in this tutorial, how to draw a bird, you can apply these techniques to other types of birds, too. The first step is to capture the angle of the body, and from there construct the rest of the sketch around these initial lines.

Birds, in general, are built using circles. But it’s easy to make your bird too round, so look for the angles where the different parts of the bird meet: head meets body, body meets tail etc. Once you’ve got to grips with this, then your bird will start taking shape.

If you love pencil drawing as much as we do here at Gathered, you might like to check out our pencil drawing for beginners and best drawing pencils guides for more expert tips and knowledge.

We’ve also got carefully curated step-by-step drawing projects, like how to draw a cat and how to draw a dog with artist Matt Breen, and this gorgeous how to draw a tree, by art editor Sarah Orme.

Image by Saketh Upadhya

Top tips for drawing birds

  • If you’re sketching from life, break down complicated scenes (for example, lots of branches or ruffled feathers) into simple shapes and patterns.
  • You don’t need to draw every line or feather on the bird, sometimes just a suggestion will be enough to capture the essence of a bird.
  • By using patterns of pencil strokes to fill in the feathers, as we've done here, you can cover a large area in a short time.
  • Start a (secret) messy sketchbook. Don’t feel like you must show it to anyone, and in it make quick, 30-second sketches of wild birds. Concentrate on shape and form, and with practice, you’ll find that drawing birds becomes quicker and easier. You’ll also be able to flip through it and see your progress!
  • The shape is the most important aspect when drawing birds. If your shape is accurate, then the bird will seem realistic, even without detail.
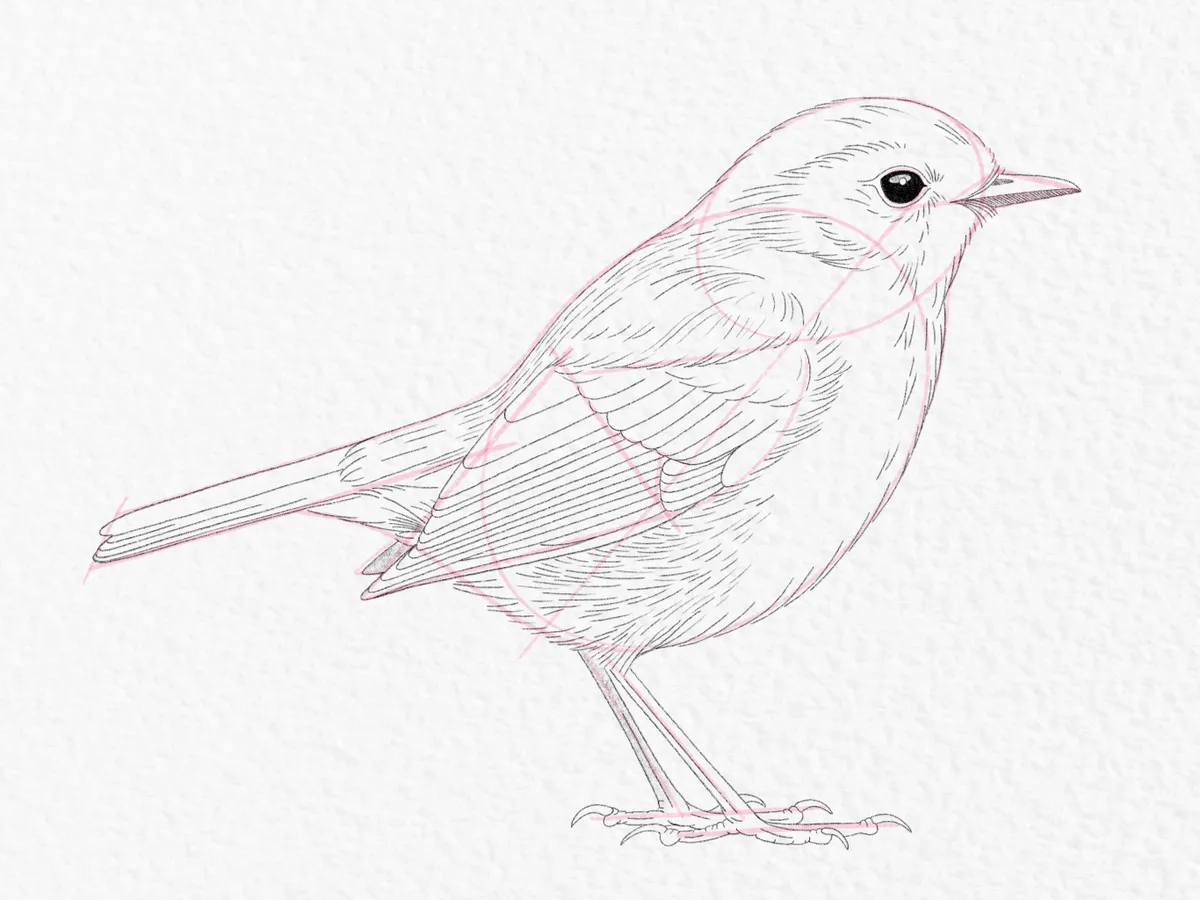
  • Before drawing markings on your bird, lightly outline the pertinent groups of feathers. These groups will help you give structure to the body, face, tail, and wings, and help you get the proportions of the markings right.
  • When sketching the body of the bird, add a centre line in the middle of the breast. This will help you maintain symmetry as you’re drawing the breast feathers.
  • When drawing the tail – the feathers overlap so that the middle feather is on top, then fan the feathers on either side. So, use this formula when drawing the bird's tail.
  • As Neil Buchanan says, when sketching from life (or photographs) draw what you see – not what you think you see!

We love seeing what you create, so don’t forget to share your art projects with us on Instagram, Facebook or Twitter, too!

How to draw a bird

Follow this tutorial to draw any garden bird! If you want to draw a specific garden bird, look at pictures of birds and tweak the proportions of the early geometric shapes as necessary, then continue to follow the tutorial as you build up the detail.

For example, long-tailed tits have, no surprises here, a longer tail, so for step 3 – take the tail out twice as long at a horizontal angle. They also have smaller heads and rounder bodies, so make the ovals in steps 1 and 2 more rounded. Clever, eh!

Let’s do another one. Wrens have flatter heads, so in step 2 make the head oval, flatter and more squat to the body. Wrens' tails stick up in the air, so instead of angling the tail down towards the floor, draw your tail lines (step 3) to be sticking up, at approximately a 45-degree angle. Ready to draw a bird?

For the purposes of this bird drawing tutorial, we have used red to show clearly where the construction lines are, then lightened them when adding the detail on top.

To draw a bird you will need:

~or~

You will need:

  • A pencil
  • Paper
  • Eraser

Step 1

Draw an oval at roughly a 45-degree angle and add a dividing line. Extend this dividing line a little way past the top of the oval. Where this line ends, is where the bird’s eye will sit.

How to draw a bird – Step 1

Step 2

Draw another, smaller oval, overlapping it with the first. Overlap them so that the head is approximately halfway over the body.

How to draw a bird – Step 2

Step 3

Next, add in construction lines for the tail and beak. For the beak, overlap it slightly with the line we drew in step 1 (this forms a notch and is where the eye will sit), and extend it out the same distance.

For the tail, position the line to start nearer the upper part of the body, not in the middle.

How to draw a bird – Step 3

Step 4

Add a parallel line above the initial tail line, then round off the angles between the shapes you drew in steps 1-3.

Draw a curved line from the lowest part of the body oval, to approximately halfway along the bottom of the tail to form the undertail.

How to draw a bird – Step 4

Step 5

Add two construction lines for the legs, parting them slightly towards the feet. Add a shorter line extending from the central body line, parallel (ish) to the tail. This will be the base of the wing.

Add a short line at the end of the tail, joining the two tail lines together.

How to draw a bird – Step 5

Step 6

Draw two parallel lines at the bottom of the legs, staggering them slightly – these will be the feet. For the beak, draw a simple triangle, making the top half thicker.

Then, using the initial wing construction line you drew in the last step, draw an isosceles triangle as shown.

How to draw a bird – Step 6

Step 7

Just a few more construction lines to go! Draw a rough circle in the notch you made in step 3 – this will be the eye.

Join up the beak by adding another triangle, lining it up with the initial beak construction line.

Draw a curve connecting the bottom of the head oval with the triangle you drew in step 6, roughly following the curve of the bird’s belly.

Next, add a diagonal line from the top corner of the wing, to where the central line meets the bird’s head.

Add a small triangle joining the centre-body-line, with the wing – this will help you position the wing feathers. Finally – add the tip of the second wing, peeping out behind the first.

How to draw a bird – Step 7

Step 8

It’s time to start adding in some details! Sketch over the construction lines and add a beak. Shade the bottom part of the beak and add a nostril at the top.

For the eye, don’t make it completely round – pinch it at the sides. Add some eyeliner, by adding a line (offset from the main eye), top and bottom of the eye.

Give the eye dimension by adding a highlight – a small circle with an oval behind.

How to draw a bird – Step 8b cropped

Step 9

Following the shape of the construction lines, start to draw in the body contours. Make light, sweeping strokes, following the shape of the body round, and down. Add some tufts around the beak and colour the eye in.

How to draw a bird – Step 9

Step 10

Continue following the shape of the body around the bird, using short lines to indicate ruffles. Make the ruffles longer at the top of the legs, and stop when you get to the base of the wing.

How to draw a bird – Step 10

Step 11

Add in some tail feathers. Draw a single feather on top of the tail, then add some parallel lines underneath this, to indicate that the tail feathers of the bird are stacked. Round the ends of the feathers.

How to draw a bird - Step 11 cropped

Step 12

Next, divide up the wing into feather groups. Join each line to meet the construction lines as shown.

How to draw a bird - Step 12 cropped

Step 13

Following the two lines that make up the top of the bird’s wing, add in a line of short, wispy, curved lines. Curve the lines downwards, like a bowl.

Add in a line of ruffles at the top using the same method, joining the two sides of the wing together.

How to draw a bird - Step 13 cropped

Step 14

Add in some individual feathers in the wing by drawing rounded check-marks. Try to keep the feathers more widely spaced at the top, evenly spaced in the middle, and thinly spaced at the bottom.

How to draw a bird - Step 14 cropped

Step 15

Finish off the wing by filling in the remaining spaces with parallel lines. Like the tail feathers, round the ends.

How to draw a bird - Step 15 cropped
How to draw a bird - Step 15

Step 16

Next, draw lines on either side of the leg construction lines. Add a small ‘C’ shape at the end of these lines – these are the bird’s ankles.

How to draw a bird - Step 16 cropped

Step 17

Draw the front foot. Birds have four toes, but when standing side-on (in profile) it’s difficult to see the fourth.

So, draw three toes, with a claw at the end of each one.

How to draw a bird - Step 17 cropped

Step 18

Roughly mirroring the front foot, draw a second foot behind the first. Add a line along the middle of each leg to indicate the bird’s leg muscles. Add some shading to the back leg, and the back wing-tip.

How to draw a bird - Step 18b cropped
How to draw a bird - Step 18b

Step 19

Add some feather lines around the bird’s tummy and along the bird’s back. Keep your lines loose, following the shape of the body.

Add a few feather lines around the eyes, going down the bird’s neck.

Add some feather lines at the top of the wing, curving them round to point towards the wingtip. You don’t need to add too many, just enough to suggest the feathers and to shape the bird.

How to draw a bird - Step 19

Step 20

Finally, erase your construction lines and enjoy your masterpiece.

If you have a scanner, here is a trick that's quite useful: draw your construction lines in red, scan into your computer, then drop out the red channel in RGB and poof! Your lines are gone.

Or, just draw them lightly by hand and erase them the old-fashioned way.

How to draw a bird - Step 20


Bird drawing is easy when you know how

We hope you’ve enjoyed this tutorial on how to draw a bird. Once you've mastered how to draw the basic structure of a bird and how to build up the shape, you'll be able to tackle any type of feathered friend, from skylarks to swans!

Looking for more animals to draw?

If you love animals as much as we do, we think you’ll love some of our other pencil drawing guides, so be sure to check out how to draw a cat by artist Matt Breen. 

Cat drawing