DIY felt Christmas wreath

Celebrate the 12 days of Christmas with Laura Howard's free, felt Christmas wreath tutorial. Make your own partridge in a pear tree!

Try 6 issues of your choice of craft magazine from just £9.99

Published: August 16, 2021 at 8:20 am

We all know the house isn’t properly prepped for Christmas until you’ve hung a gorgeously festive wreath on the door to welcome guests, or just catch the eye of passers-by. So grab your felt and some fancy embroidery threads, and spend a few cosy evenings putting together Laura Howard's DIY felt Christmas wreath which is complete with its very own sparkly partridge and pear wreath. There are loads of different felt techniques here to practice and to adapt into other projects – you could also just sew the hanging partridge and pear into individual felt Christmas decorations if you don’t want to make the whole wreath. We can just imagine a string of pearls and partridges hanging in your windows as some cute handmade Christmas bunting.

When stitching, use a third of each piece of metallic thread (so for six-stranded thread use two strands). For the black and brown thread, use half (so for six-stranded thread use three strands). Metallic thread can be tricky to work with, so cut shorter pieces than you’d normally use and take your time. We ordered our mini sequins from www.simplysequins.co.uk and found the polystyrene wreath at www.craftmill.co.uk. Check out our embroidery for beginners guide to learn all the stitches and head to our embroidery starter kit for everything you need to make your felt Christmas wreath.

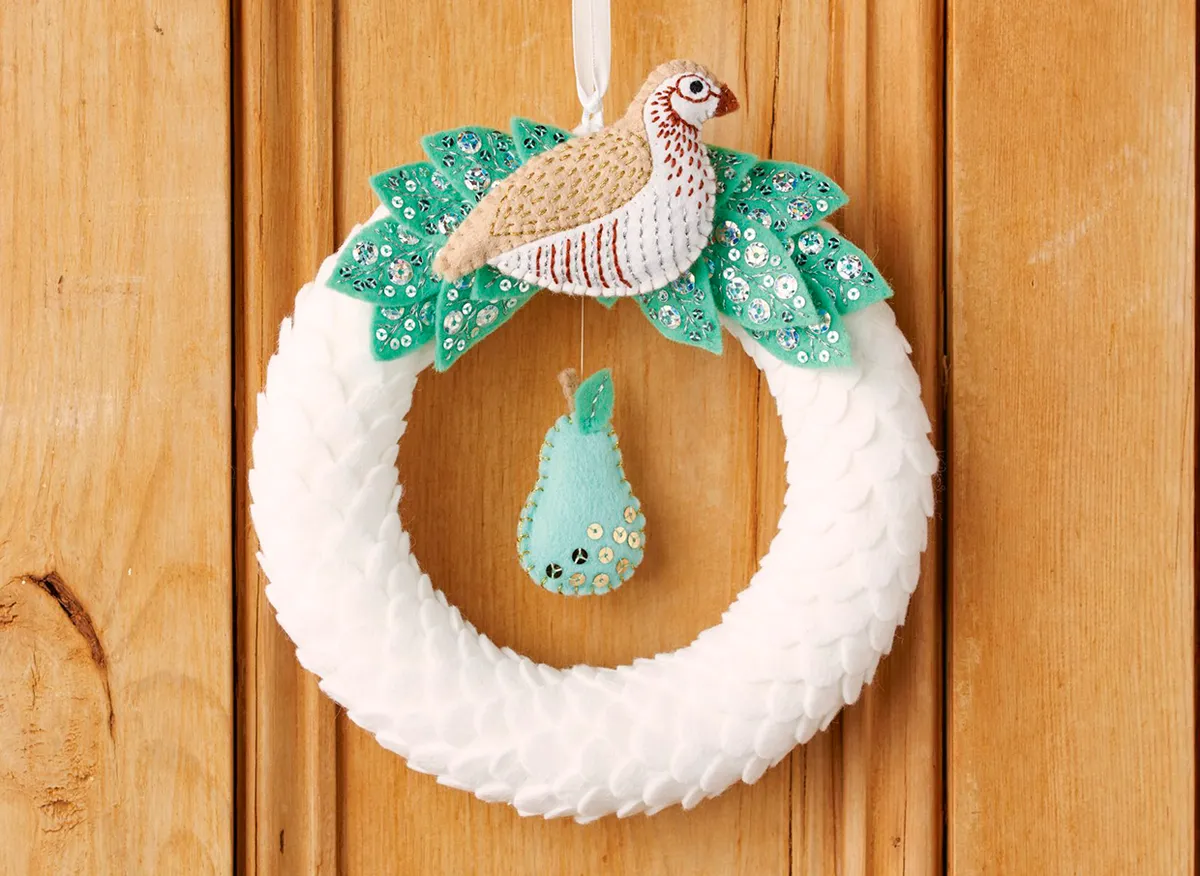
This felt Christmas wreath was created by Laura Howard for Mollie Makes magazine issue 59 – for more easy-make craft projects and creative inspiration, subscribe to Mollie or click here to find out more. Click to find the Mollie Makes issue 59 templates.

Materials

  • Polystyrene wreath base, 17cm (63⁄4")
  • White felt, approx. four 23 x 23cm (9 x 9") squares
  • Green felt, approx. 15 x 15cm (6 x 6")
  • Pale green felt, approx. 6 x 9cm (21⁄2 x 31⁄2")
  • Pale brown felt, approx. 13 x 19cm (5 x 71⁄2")
  • Small piece of brown felt
  • Matching sewing threads
  • Silver, gold, black and brown embroidery thread
  • White nylon thread (or other thin, strong thread)
  • Silver sequins (6mm wide)
  • Mini silver sequins (3mm wide)
  • Mini gold sequins (4mm wide)
  • 1m (1yrd) white ribbon, 5-10mm wide
  • Polyester stuffing
  • Glue gun and glue
  • Sewing needle and pins
  • Embroidery scissors
  • Sewing scissors
  • Air erasable fabric
  • marker (optional)
  • Mollie Makes issue 59 templates

DIY felt Christmas wreath

You will need:

  • Felt
  • Thread
  • Sequins

DIY felt Christmas wreath: Making the pears

Step 1

MMS_59_covproj_step2Use the templates to cut two pale green pears and one green mini leaf. Cut two pale brown stalk shapes (approximately 2 x 0.5cm). Embroidery scissors are great for cutting out small shapes.

Use clear sticky tape to hold templates to the felt to make it easier when cutting fiddly parts.

Step 2

MMS_59_covproj_step3 diy felt christmas wreathStitch along the leaf using running stitch and silver thread, sewing along then back, filling in the gaps to make a continuous line. Start and finish your stitching at the bottom of the leaf. Join the stalk pieces using blanket stitch and pale brown thread.Attach the stalk and leaf to the pear pieces using pale green thread. Sew the leaf with a few tiny stitches and the stalk with whip stitch (sewing into the felt not through it).

Step 3

MMS_59_covproj_step4 diy felt christmas wreath

Add mini gold sequins using pale green thread.

Step 4

MMS_59_covproj_step5 diy felt christmas wreath

Join the edges using blanket stitch. Start at the top, leaving a gap for stuffing. Stuff the pear lightly then sew up the gap.

DIY felt Christmas wreath: Making the partridge

Step 1

MMS_59_covproj_step6 diy felt christmas wreath

Use the templates to cut one white belly, one pale brown body, one pale brown wing and one brown beak. One by one, sew them to a backing piece of pale brown felt. Use whip stitch and matching threads and sew along the inside lines only.


Step 2

MMS_59_covproj_step7 diy felt christmas wreath

Cut out the partridge, then use it as a template to cut a backing shape from pale brown felt.

Step 3

MMS_59_covproj_step8 diy felt christmas wreath

Cut a white felt eye using the template. Sew to the bird using white whip stitches. Backstitch around the eye using brown embroidery thread, then sew a line from the beak to the partridge’s throat. Stitch this freehand or mark the line with an air-erasable fabric marker. Then sew small stitches along the line, as shown.


Step 4

MMS_59_covproj_step9 diy felt christmas wreath

Add more small brown stitches, then backstitch six curved lines, leaving space for Step 11.

Step 5

MMS_59_covproj_step11 diy felt christmas wreath

Stitch the eye using black embroidery thread, building up the shape from several tiny stitches. If you prefer, you can use a black bead or sequin instead.

Step 6

MMS_59_covproj_step12 diy felt christmas wreath

Use silver embroidery thread to backstitch more curved lines: between the brown lines and filling the white space. Use gold embroidery thread to backstitch around the wing (leaving the top unstitched) then decorate the wing with small stitches.

Blanket stitch the edges of the partridge with pale brown thread, leaving a small gap at the top. Stuff the bird lightly then sew up the gap.


DIY felt Christmas wreath: Making the leaves

Step 1

MMS_59_covproj_step13 diy felt christmas wreath

Cut four small, seven medium and four large green leaves, again using the templates. Add veins using silver embroidery thread and running stitch (see Step 2). Start and finish at the bottom of each leaf.

Step 2

MMS_59_covproj_step14 diy felt christmas wreath

Add silver sequins using green thread. Sew the larger sequins first, then fill in the gaps with mini sequins. Start and finish your stitching at the bottom of each leaf.

Making the felt Christmas wreath

Step 1

MMS_59_covproj_step16 diy felt christmas wreath

Use the template to cut lots of white scallop pieces (you’ll need 50-60). To save time you could enlarge the template to cut larger scallops, or cover the wreath using white yarn instead.

Attach the scallops one by one using the glue gun. Arrange them so they overlap as pictured and the base is completely hidden.

Step 2

MMS_59_covproj_step17 diy felt christmas wreath

Tie the white ribbon around the wreath where the scallops meet, knotting it securely. You can trim it when you hang the wreath.

Step 3

MMS_59_covproj_step18 diy felt christmas wreath

Using nylon thread, sew into the top of the pear – from the back and up between the leaf and stalk. Sew a small stitch (front to back) into the bottom of the ribbon tied round the wreath, then sew a few running stitches up the back. Pull the thread to adjust the pear’s position then sew a few small stitches to secure.

Step 4

MMS_59_covproj_step19 diy felt christmas wreath

Attach the leaves, using the images as a guide. Work outwards, adding a dot of glue to the bottom of each leaf. Finally, add the partridge, applying glue to the leaves then pressing the bird into position. Your felt Christmas wreath is complete!

We hope you enjoyed making Laura’s felt Christmas wreath project. Share a picture of your weaving bookmarks with us on Instagram using #molliemakers, and don’t forget to subscribe to Mollie Makes to get creative inspiration delivered to your door every month. For more Christmas crafts check out our free Christmas decoration crochet patterns and Christmas quilt patterns!

MMS_59_covproj_det02 diy felt christmas wreath

Make sure you also check out our free christmas knitting patterns and how to make a Christmas stocking tutorial. Happy Christmas!