Step 1

To make the loom, lie two pieces of wood horizontally on a flat surface – these will be the top and bottom. Measure and mark 0.5cm (¼") intervals across both pieces, then hammer in nails where marked, leaving 1cm (3/8“) of each nail exposed. Mark two 3cm (1¼") wide sections on the bottom of each piece, 4cm (15/8“) in from either end. Chisel a 1.5cm (5/8“) deep recess from the sections.
Step 2

Place the two remaining pieces of wood vertically into these recesses to form a square, then nail the wood together to secure.
Step 3

Knot Yarn A around the bottom left of the loom. To warp the loom, wind the yarn up and down around the nails, two at a time, and keeping it taut, until the warp is roughly 50cm (193/4“) wide. Knot at the bottom right corner to finish.
Step 4

Start with a section of tabby weaving. Thread the needle with a length of Yarn B, then weave it under, then over, alternative warp threads across the loom. Take it back across the loom in the opposite direction, this time weaving over the warps it went under, and under the warps it went over. Work two rows.
Step 5

Create the fringing using rya knots. Cut two 30cm (117/8“) lengths of Yarn B and fold in half. Lay the centre over the first two warp threads, then pass the left side under and around the left warp thread, and the right side under and around the right warp thread. Pull the yarn to the bottom of the loom, then tighten to knot. Repeat across the remaining warp threads.
Step 6

Trim the fringing into a point. Add another row of rya knots across the centre third of the warp using Yarn D, then trim to match the point below.
Step 7

Use tabby weaving in Yarn C to create a curved block of grey colour. Begin by working across all warps, then start each row of weaving further across to create an angle. Use your hands to move the weaving down the loom.
Step 8

Cut two 10cm (4") lengths of Yarn D and fold in half. Wrap the centre around the first warp thread, then pull the ends through the loop. Pull tightly to knot, and repeat across the remaining warp threads. Trim the ends to create a section of fluffy fringing.
Step 9
Work tabby weaving and Yarn E across the left of the loom, finishing with a single row across the width, above the fluffy fringing.
Step 10

Work a section of tabby weaving in Yarn F, eight rows high, covering the left two-thirds of the loom.
Step 11

Use Yarns A, E and H to make two pom poms. Tie onto the warp at the right of the Yarn F block.
Step 12

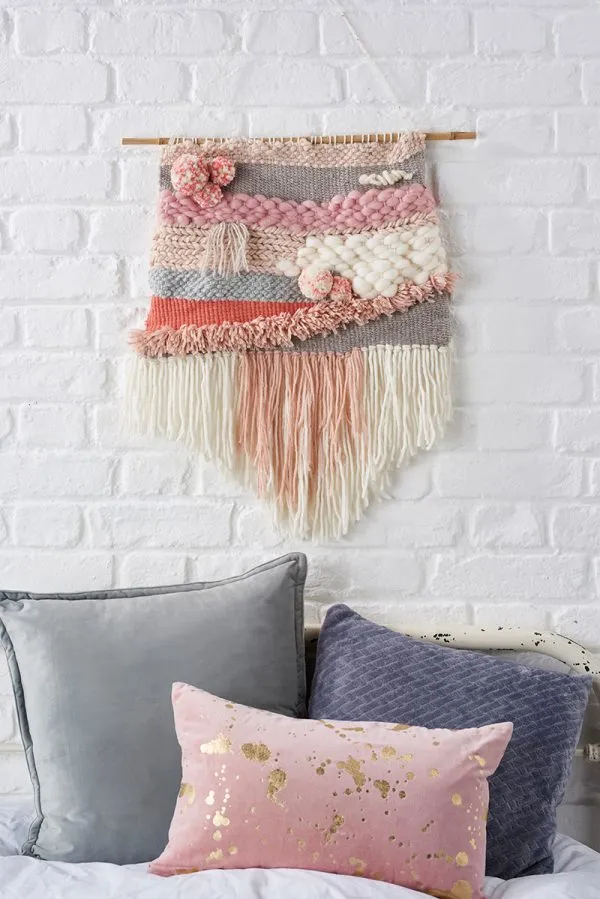
Use Yarn I and tabby weaving to add a section on the right of the loom, weaving under and over two strands at a time. Gently pull the roving away from the warp as you go to add texture, using the main image as a guide to placement.
Step 13

Next, add a section of sumak stitch. Weave a length of Yarn G under two warp threads and back over, then under the next three warp threads, and back over the last two. Work each consecutive row in the opposite direction, and work eight rows in total.
Step 14

Use Yarn C to add a small section of rya knots, again, using the image for placement. Add a section of tabby weaving in Yarn J above, then a small section of tabby weaving in Yarn C.
Step 15

Repeat Step 10 to make three pom poms and tie on the left of the loom. Tie a 10cm (4") piece of Yarn A around a warp thread on the right to make a loop, knotting at the back, then repeat 10 times.
Step 16
Add another section of tabby weaving in Yarn C, then a final section of tabby weaving in Yarn G.
Step 17

Weave in any loose ends at the back, then cut the warp threads 15cm (6") above the top row of weaving. Tie the ends together.
Step 18

Carefully pull the weaving off the bottom nails of the loom. Tie the top warp threads around the bamboo cane, then trim any excess thread. Tie a length of Yarn A to either end of the bamboo to hang.