Put a fresh twist on the geometric trend with these delicious-looking homewares in ice-cream shades. Our lampshade, plant pot and magazine files will make a lovely addition to summer shops.
Up your profit-making potential by selling in sets, and if you want to keep costs down, then make them in just two colours, leaving some areas blank so the natural wood or fabric shows through.
Don't have the right kind of paints? Did you know you can use acrylic paint on a wide range of surfaces? If you have a white primer, it's best to paint the primer on first for the brightest, most true-to-colour results, then paint acrylic paint over the top. Check out our round-up of the best acrylic paint sets or read up on our acrylic painting guide if you need a refresher.
Want to try chalk paints? Check out this handy guide to how to use chalk paint from our friends at YourHomeStyle.

You will need:
- Table lamp base and shade
- Wooden magazine files
- Plant pot
- Rust-oleum Painter's Touch pots of paint in Bright Yellow, Duck Egg Blue and Candy Pink
- Rust-oleum Chalky Finish Furniture Paint in Cocoa
- Tulip Soft Matte Fabric Paint in Yellow, Petal Pink, Cool Blue and Chocolate
- Paintbrushes in various thicknesses
- Dressmaker's chalk pencil
Size:
- Plant pot - 12 x 12cm (4.5 x 4.5in)
- Lamp shade - 23cm diameter x 16.5cm high (9 x 6½in)
- Magazine file holder - 25 x 10 x 31cm (9 x 4 x 12in)

How to make a geometric plant pot
Step 1
Trace the geometric pattern template onto a sheet of paper, then draw over the lines on the reverse of the paper using a soft pencil to get a thick line.
Tape this into position on the plant pot with the thick pencil lines facing in. Draw over the lines in pencil to transfer the pattern onto the plant pot.
Step 2
Start filling in one of the geometric blocks using the pots of paint. If you have an unsteady hand, then you might find it neater to mask off each section at a time to get a straight edge.
Fill in other areas in the same colour and leave to dry. Once dry, repeat this process for the other colours until the pattern is completely filled in.
How to make a geometric lampshade
Step 1
Trace the geometric pattern template onto a sheet of paper; the design needs to repeat, so trace it a few times. Tape the template to the inside of the lampshade so you can see the lines through the shade. Consider how the pattern will follow around the shade – you may need to overlap slightly. Draw over the printed lines using a chalk pencil to transfer the pattern onto the shade.
Step 2
Start filling in one of the geometric blocks using one of the tulip fabric paint colours. If you have an unsteady hand, then you might find it neater to mask off each section at a time to get a straight edge. Fill in other areas in the same colour and leave to dry. Once dry, repeat this process for the other colours until the pattern is completely filled in.
How to make geometric magazine files
Step 1
Trace the geometric pattern template onto a sheet of paper, then draw over the lines on the reverse of the paper using a soft pencil to get a thick line. Tape this into position on the front of the wooden magazine file, with the thick pencil lines facing inwards and the original template lines facing outwards. Draw over the lines in pencil to transfer the pattern onto the wood.
Step 2
Start filling in one of the geometric blocks using the pots of paint. If you have an unsteady hand, then you might find it neater to mask off each section at a time to get a straight edge. Fill in other areas in the same colour and leave to dry. Once dry, repeat this process for the other colours until the pattern is completely filled in.
Get creative with your geometric painting
Now that you've got a taste for it, why not try getting creative with your geometric painting projects. Create your own templates with just a ruler and pencil, or you can always use masking tape and freestyle a design as you go!
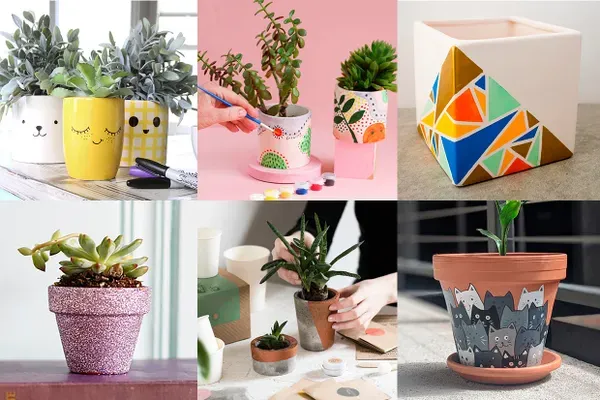
Even more plant pot painting
Looking for more ways to add your own custom paint decor? Then check out our pick of Plant pot painting ideas and get inspired!