Advertisement feature with The Soapery
Beginner’s guide to melt and pour soap making
Take your first steps into soap making by learning the melt and pour technique! Learn expert tips, stock up supplies and more.

Published:
Making your own soap at home is incredibly satisfying. You can use your beautiful DIY soaps at home or give them to loved ones as a wonderful handmade gift.
If you’re looking to get into soap making, melt and pour is a brilliant technique to help you take your first steps into this creative hobby.
You don’t need lots of supplies to get started and the process is simple enough that even children can get involved with adult supervision.
You can produce melt and pour soaps in vibrant colours, add your own fragrances or come up with your own inventive designs.
What is melt and pour soap?
The melt and pour soap making technique involves melting a ready-made base, so there’s no need to mess around with chemicals. You can then add your own fragrances, colours or other additives before pouring the soap mixture into a mould. The soap sets quickly and is ready to use after just a couple of hours.
Melt and pour soap is easier than other types of soap making, because the tricky part (mixing chemicals to create the soap) has already been done for you. This makes the process more straightforward and safer than other soap making methods.
If you were using the cold process soap or hot process soap methods, you would need to handle sodium hydroxide (lye). This is a caustic substance which is used to kickstart a chemical reaction called saponification, which transforms the raw ingredients into soap.
Lye can be very dangerous to your health, so you need to take safety precautions while using it. Fortunately you won’t need to worry about this while making melt and pour soap, but it’s important to know about it if you want to get into soap making!
What do you need to make melt and pour soap
Ready to start making your own beautiful soaps? Here’s what you’ll need to begin using the melt and pour technique at home.

Melt and pour soap base
Melt and pour soap bases are the main ingredient you’ll need for this technique. The soap base is essentially ready made soap, which just needs a few extra tweaks to turn it into something truly special.
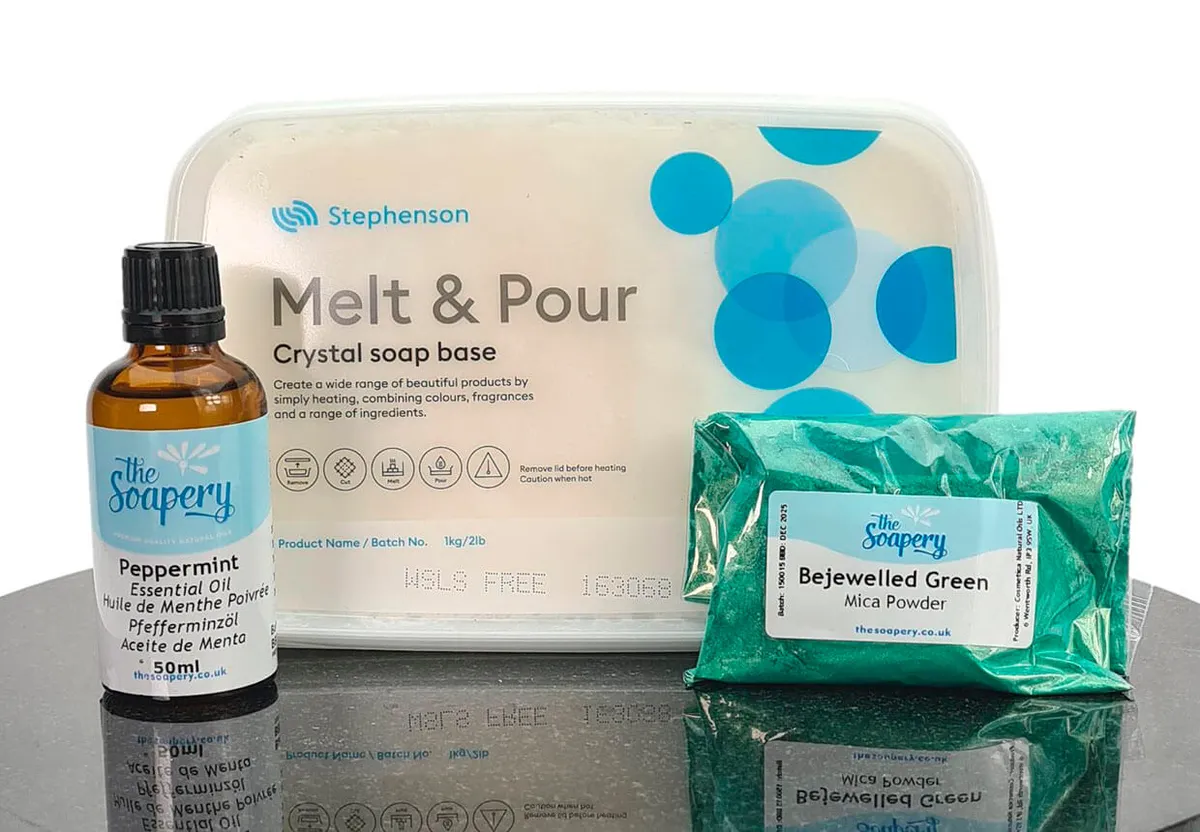
Some melt and pour soap bases come with additional skin-loving ingredients, such as this Stephenson Melt and Pour base, which includes moisturising argan oil.
The soap base you choose will depend on the recipe you’d like to make. For example, if you wanted to make African black melt and pour soap then you’d need to order an African black melt and pour soap base, which is specifically designed for that type of soap.
If keeping your soap fully organic is important to you, you’re in luck because organic melt and pour soap bases are available too.
- Order melt and pour soap bases from The Soapery.
Essential oils
Take your melt and pour soap to the next level by adding essential oils. Choosing the right essential oil can make your soap more appealing and improve your sense of wellbeing.
For example, lavender is known for its relaxing properties, while zesty lemon is an instant mood booster. Tea tree oil is believed to soothe irritated skin and combat acne. Meanwhile, peppermint oil brings a fresh scent and cooling properties to your soap.
Try using different combinations of oils in your melt and pour soaps to come up with your own original fragrances.
- Buy essential oils from The Soapery.
Mica powders
Bring colour and shine to your soaps by adding mica powders. Mica powders come in a range of dazzling shades, from Bejewelled Green to Fiery Red, so you can make soap in every imaginable colour. Mica powder also has a stunning natural shimmer and looks amazing when added to any melt and pour soap recipe.
When it comes to soap making, a little mica goes a long way, so it’s excellent value for money.
Look for mica powder that’s cosmetic grade, meaning that it’s safe to use on the skin. The vivid colours come from natural minerals, such as iron oxide or tin oxide. Poor quality mica powders use chemical dyes and are best avoided.
Top tip: try building up layers of colour in your soaps. You’ll need to wait around 90 minutes for each layer to cool before adding the next one. Simply spray the surface of the first layer with a little isopropyl alcohol and pour the next layer on top. This will help the two colours to bond together.
- Stock up on mica powders from The Soapery.
Soap making equipment
One of the joys of melt and pour soap making is that it doesn’t require lots of expensive tools. However, there are a few things which you will need:
- A microwave
- Chopping board and knife
- Heatproof bowl
- A mould (silicon cake moulds work well)
- Cling film
How to make melt and pour soap
This peppermint soap recipe is so refreshing! Bring some zing into your life by making a batch of minty melt and pour soap.
For this recipe, you will need:
You Will Need
- White melt and pour soap base (1kg)
- Peppermint essential oil (20ml)
- Bejewelled green mica powder (25g)
- A microwave
- Chopping board and knife
- Heatproof bowl
- A mould
Total time:
Step 1
Cutting up the soap base
Tip the soap base out onto a chopping board and cut it into small pieces, roughly 2cm x 2cm in size.

Step 2
Melting the base with quick blasts of heat
Add the soap base into a heatproof bowl and melt in the microwave using one minute bursts. If you don’t have a microwave, you can place the bowl over a pan of boiling water instead.
Step 3
Breaking up unwanted clumps
If you’re melting it in the microwave, the pieces of soap base will start to clump together, so break them up after each one minute burst. Be careful not to boil the soap base.
Step 4
Customising your recipe with colours and oils
Now it’s time for the fun part! Add your peppermint essential oil and green mica powder. Stir well until they are both fully combined with the soap base.

Step 5
How to mould your soap
Pour the soap into a mould. You can reuse the 1kg packaging as a mould, get creative with silicone cake moulds or make use of clean recycled plastic tubs. Leave to set for around 4-6 hours.

Step 6
Protecting and storing your finished soap
Remove from the mould and wrap in clingfilm – this prevents the soap bars from attracting water. Otherwise it looks like the soap is sweating!

Frequently asked questions about melt and pour soap making
Do you have a burning question about melt and pour soap making? Learn more about this fun technique by checking out these commonly asked questions:
Can you remelt melt and pour soap?
Yes, melt and pour soaps can be remelted and turned into new soaps. However, if you’ve used fragrances these can evaporate when the soap is reheated.
How long does it take melt and pour soap to set?
Melt and pour soap sets in 4-6 hours. Unlike other kinds of soap, they don’t need to be left to cure and are ready to use straight away.
How to make melt and pour soap lather more
Disappointed that your soap isn’t more foamy? Don’t worry, there are ways to fix that problem! Coconut oil can be added to melt and pour soap to improve the lather.
The Soapery recommends experimenting with your soap recipe and adding around 10g of coconut oil each time until you get the consistency that you want.
What can you add to melt and pour soap?
There are lots of ways to get creative with melt and pour soap. Mica powder and essential oils can be used to add colour and fragrance, but those aren’t the only things you can add!
Melt and pour soaps can also be customised with exfoliants (such as oats or coffee grounds), spices, dried flowers and even goat’s milk.
How long does melt and pour soap last?
Melt and pour soap has a shelf life of around 18 months, but this can vary depending on the ingredients used in the recipe.

Melt and pour soap problems
Melt and pour soap making is more straightforward than other types of soap making. However, there are still things which can go wrong during the process.
Here are a few common problems to keep an eye out for when whipping up your first batch:
Burning or overheating the soap base
It’s very easy to burn or overheat the soap base in the microwave. Make sure you only use short blasts of heat and don’t allow the mixture to boil.
If your soap base overheats, it may turn cloudy, which is a disaster if you’re trying to make a crystal clear bar of soap.
Sweating soap
Sometimes you’ll notice little beads of moisture on the surface of your soap. This is because melt and pour contains glycerin, which is a humectant. Humectants naturally attract moisture in the air, so your soap can look as though it’s sweating if it’s stored in a humid environment.
You can prevent sweating by wrapping your soap in plastic, such as clingfilm, to keep the moisture at bay.
My soap is too soft
If your soap is much softer than you would like, there are a few different potential causes: overheating, too much fragrance or too much oil or butter. It may also be too soft because your recipe contains too much moisture.
To make your soap firmer, you can try adding shea butter, cocoa butter or beeswax. Add a tablespoon of one of these per pound (0.45kg) of melt and pour soap. Another option is to introduce a tablespoon of stearic acid (again, one tablespoon per pound of soap is ideal).
Why melt and pour soap making is brilliant for beginners
Melt and pour is one of the most accessible soap making methods, because it requires very little equipment to get started. The process is also very easy to follow and even children can get involved with some grown-up assistance.
There are lots of creative ways to customise your melt and pour soap, from adding your own colours and fragrances to experimenting with interesting designs. The only limit is your imagination!
Soap making is an addictive hobby and you’ll soon be hooked on this simple technique, whether you’re making soaps for your home or as special gifts for loved ones.
Make a crafty bathroom accessory
Show off your gorgeous homemade soaps by making the perfect accessory to display them. Learn how to make your own DIY soap dish with Gathered.