Step 1
Hold the hook in your right hand, and both the yarn end and the working yarn in your left hand.

Move the hook under and over the yarn to wrap it around anticlockwise (so that the yarn goes around back of the hook, over the top to the front).
Always make sure you wrap your yarn around the hook in this direction.

Step 2
Pull the hook towards the slipknot, catching the yarn in the hook…

…and pulling it through the slipknot loop.

This forms your first chain (ch) stitch. Repeat steps 1 and 2 to form a length of chains.
Step 3
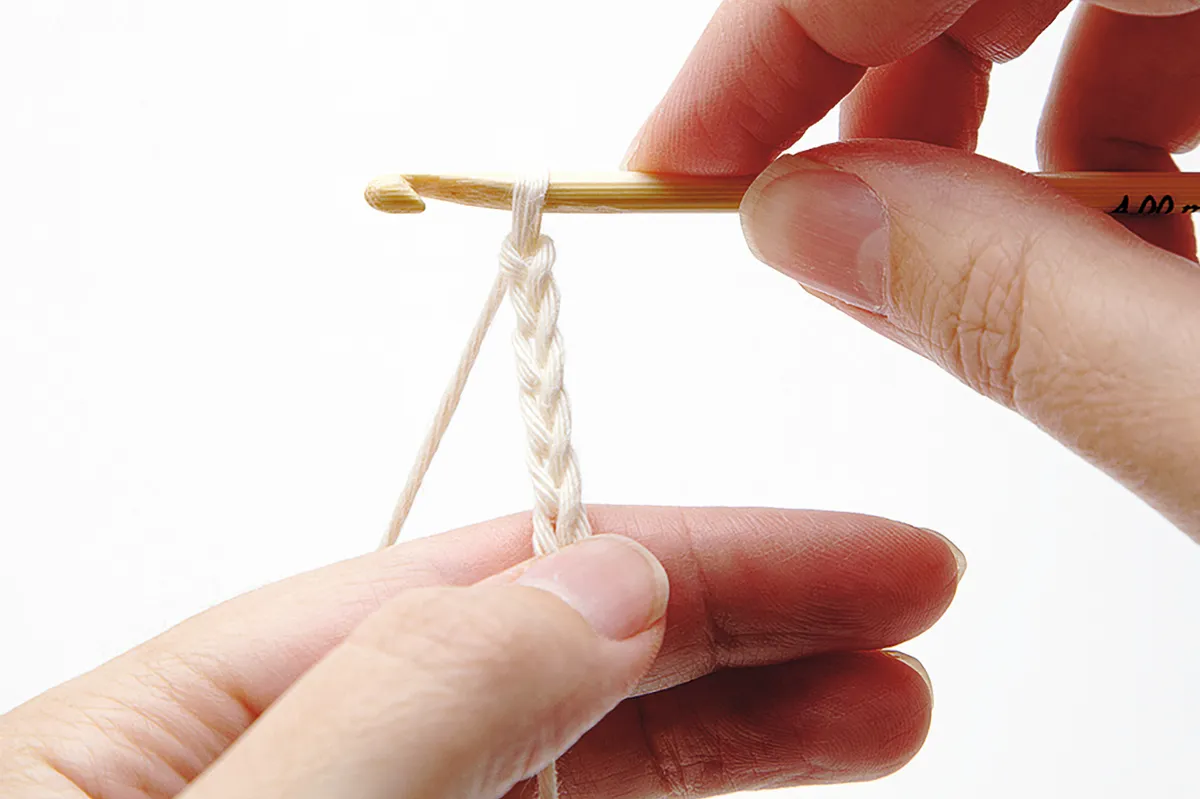
This is what your row of chains will look like. Hold the chain with your left hand near the hook, to keep the tension even. Keep going until you have the number of chains stated in your pattern.

How to count your chains and stitches
Whenever you are working from a pattern it will start off by telling you how many crochet chains to make.
Never count your first slipknot or the loop on the hook (called the working loop).
Make sure the chain is not twisted and that the front is facing you (so that you can see those sideways V shapes).

If you look at the image above, you can see how you count each chain (or V shape).
When you are working your first row of stitches into your crochet chains, the pattern will often say ‘double crochet in the second chain from hook’ or something similar, depending on the type of stitch being used.
For this example, we would make our first double crochet stitch in the chain marked as number two. The reason for this is that these skipped chains count as your turning chain, which sets the height of your first row of stitches.
Your next step in your crochet journey will be making your first proper stitches. We’d recommend you start by learning how to double crochet, and then move on to how to treble crochet.
When it comes to counting your stitches, this can be done in a similar way as counting your crochet chains – but it does depend on what stitches you are using.
For example, on shorter stitches such as double crochet stitches, your stitch will have a similar plait or V shape on the top of your stitch, so you can simply count these much like you would with chains

However, as you progress onto taller stitches such as treble crochet stitches, you will need to count your chains slightly differently.
You will still have plaits at the top of your stitches, but as taller stitches require more chains in the turning chain (and these will often count as a stitch too), it’s not quite as simple as counting the plaits.
Instead, it’s better to count the upright ‘stems’ of the stitch, like in the image below.

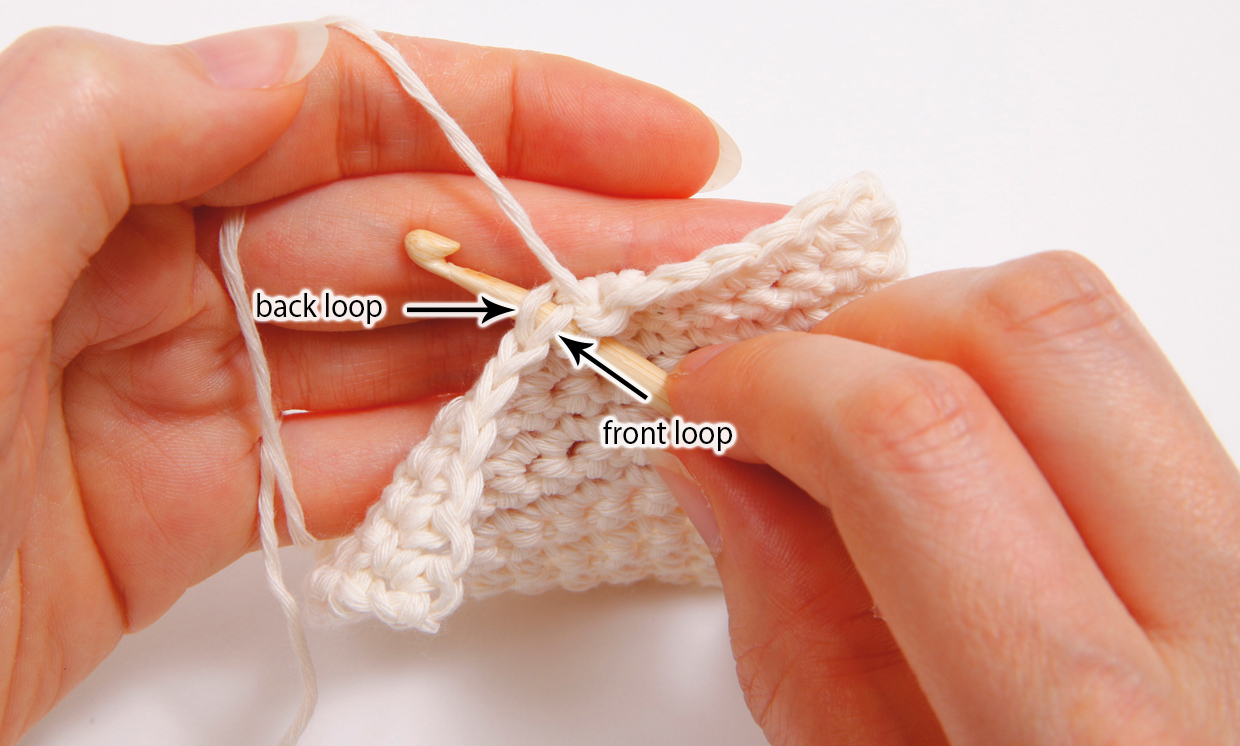
What are the front and back loops?
Sometimes you may be instructed to crochet into just a single specific loop rather than in two loops of the V-shape. You can find out more about this in our guide of how to crochet in the front and back loops
Different chain stitch crochet techniques
While the above method is the recommended way of learning how to start crochet chains, once you’ve got the hang of it there are a few other ways of making and working into your crochet chains.
Opposite the V-shape side of your chains is a row of bumps, and some patterns will call for you to insert your hook into specific loops of a chain or into these bumps on the back.
Working into just the ‘back bump’ of each chain can help to create a neater look along the bottom edge of your fabric – and you might even find it easier than going into the V’s.
Working into the bump of your crochet chains
Step 1
To start, make 10 chains (remember not to count the active loop on the hook).
Place this length so the plaited side is facing away from you – this is the ‘wrong’ side of the chain. Examine one chain and you’ll see that it’s made up of a top strand, a bottom strand and a central horizontal strand – this centre strand is the ‘back bump’ of the chain.
Now insert a stitch marker under the back bump of the 10th chain, which is the horizontal strand closest to the hook.

Step 2
Turn the chain over so the plaited ‘right’ side is facing you. Work one extra chain (this counts as the turning chain).
To start the first dc, we’re going to skip the first chain (the turning chain) and insert the hook into the back bump of the second chain from the hook – this is the chain with the stitch marker.

Step 3
You need to insert the hook under the back bump of the chain, which is where the stitch marker is placed, so let it guide you.
Your inserted hook should look like this.

Step 4
Now work yrh and pull the new loop of yarn through the chain (two loops on hook).
Use the hook to pull the loop up so it’s fairly loose and sits slightly away from the chain – if the loop is too tight then your dc stitch will be too tight.

Step 5
Work yrh and you’re going to pull this new loop through the two existing loops on the hook…

Step 6
Like this. Your first dc is finished!

Step 7
To work the next dc, tilt the chain towards you so you can see the back bumps. Insert your hook into the next empty bump.

Step 8
Work the dc stitch as before, repeating Steps 4-6.

Step 9
Continue to work a dc into each chain across the row, by repeating Steps 7-8. Take care not to twist the chain as you work. You should have 10 dc stitches, so count them to make sure.
Once you reach the end, you can remove the stitch marker.

Alternative chain stitch crochet technique
If you've learnt the basics of how to chain stitch and count your stitches, but find it a little tricky, then why not try Melissa Gomez’ chain stitch crochet technique.
She uses a variation of the long-tail knitting cast on – “I did a front to back yarn over, then a regular yarn over, and voila! I couldn’t believe how ‘breaking the rules’ in crochet could produce such a great new technique,” Melissa explains.

This clever technique creates a nice and stretchy foundation chain for you to work your rows into - some people find that their tension is tighter with chains than stitches, which can mean your work expands as you progress - not an issue with this stretchy chain!
It also creates a foundation chain that mimics normal double crochet (US single crochet) stitches, so if you're someone who has problems with your chains twisting or gets confused about where exactly to insert your hook in your starting chain, then this technique will make things a whole lot easier!

For a full guide to Melissa’s innovative technique check out her her handy tutorial video here!
Or check out Melissa’s quick overview of the technique’s steps below:
Melissa Gomez' Alternative chain stitch crochet technique
Step 1
To start your crochet chain, you'll need to estimate how long your chain will be - Melissa recommends allowing 1 inch per stitch plus an extra 6 inches.
It's better to overestimate than underestimate, you can always trim this down when you weave in your ends later.
Then make a slip knot on your crochet hook.
Step 2
To do this alternative chain technique, you're actually going to work with the LONG TAIL end of your yarn, as well as the usual ball end.
Unlike a normal chain, you're going to wrap your long tail end around the hook going from the front to the back (think anti-clockwise if you were looking directly at the tip of the hook).
Step 3
Now, grab your ball end of yarn, and do a normal yarn round hook (going clockwise from back to the front), you should now have 3 loops on your hook.
Step 4
Then pull that last loop you made (the one attached to the ball end of yarn) through the other two loops on your hook.
Step 5
Then simply repeat steps 2-4 for however many chains you need! You can use this technique for your turning chain for the next row too, then just work you next row as normal.
Once you’ve got your head around this fantastic new technique, your alternative chain also double us as a perfect Crochet I-Cord, and should look like this before weaving in those pesky ends:

You might be wondering how you actually start your crochet project once you’ve mastered this new starting chain method – well, Melissa’s covered that too!
This alternative foundation chain mimics a normal row of double crochet (US single crochet) stitches, so you just insert your hook under both loops (under the 'V') as you would on a standard crochet row!

If you're looking for more helpful crochet tutorials, then you can find loads of useful advice in our crochet for beginners guide!