How to crochet post stitches

Grab a hook and some yarn – we’ll show you how to work front post and back post stitches like a pro!

6 issues of Simply Crochet magazine for £14.99|Save 72%

Published: April 21, 2022 at 8:00 am

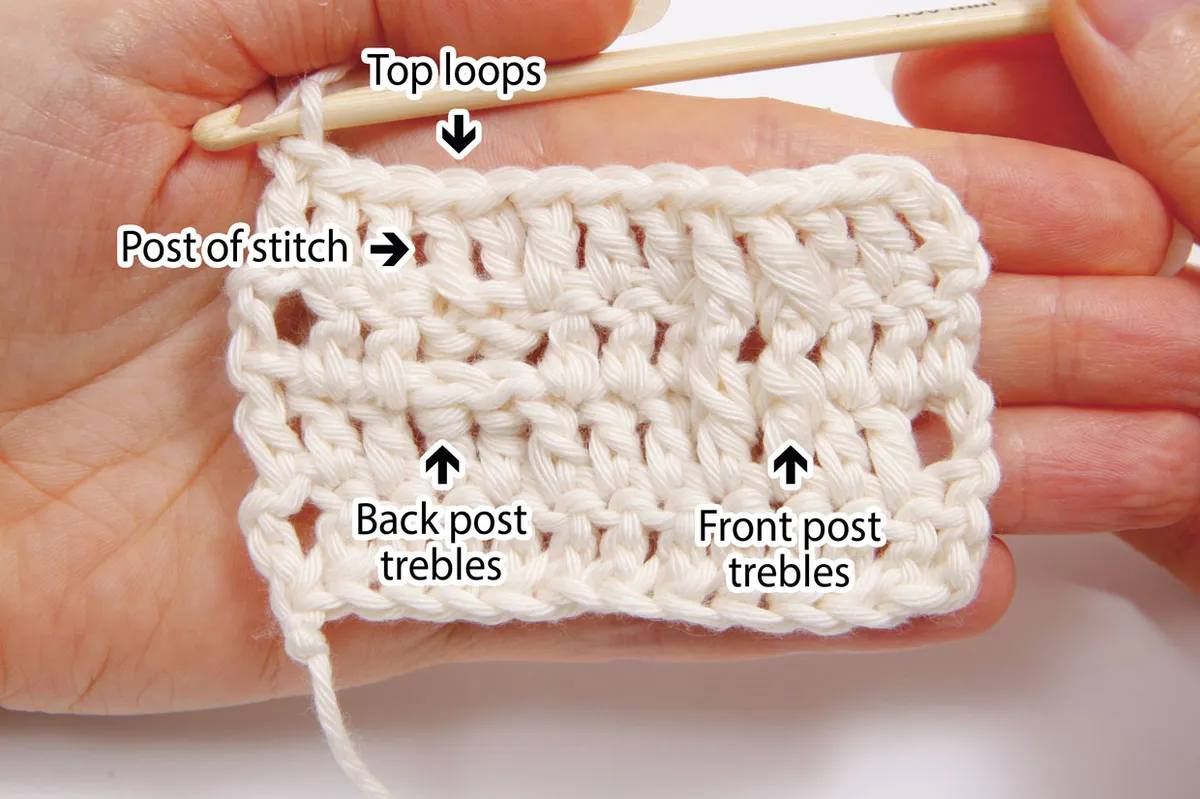
Working crochet post stitches is a great way to create interesting texture in your crochet fabric. They’re also an essential technique to learn if you want to crochet cables, basket weave stitch, make crochet ribbing and much more. With crochet post stitches, instead of working into the top two loops of the stitch on the row below, you work around the post of the stitch on the row below.

The post of a stitch is the vertical stem of the stitch, which sits just below the top loops of the stitch. You can either work a stitch around the front of a post to create a raised effect, or work around the back of the post, to create relief. The effect on the other side of the fabric is reversed.

Crochet post stitches can be worked in any stitch pattern, from half treble crochet to triple treble stitches (it is possible to make post stitches with UK double crochet stitches although it is pretty uncommon). The only difference in the technique when you’re working post stitches (in any stitch) is where you insert the hook. In this tutorial, we’ll show you how to work front post treble and back post treble stitches (remember that we use UK terminology, so in US terms these would be front post double crochet and back post double crochet stitches). You can use the same techniques to work front post crochet and back post crochet stitches using any stitch type.

If you’re not familiar with any of the abbreviations used in the tutorial, you can find everything you need to know in our Crochet Abbreviations and UK/US conversion guide. Check out our handy video tutorial on how to crochet post stitches, or keep reading for our step-by-step picture tutorial.

How to crochet front post trebles

(U.S terms Front post double crochet stitch)

To practise working front post crochet stitches, make a row of 13 treble stitches (ch15, turn, treble in 4th chain and each chain to end). Work a second row of plain trebles. On the third row, make the 3-ch turning-ch as usual and work a plain treble stitch into the next 2 stitches.

Step 1

Identify the post of the next stitch – this will be the fourth post from the right.

How_to_crochet_front_post_treble_step_01

Step 2

Then work yrh (as usual for a treble stitch) and prepare to insert your hook underneath the post of that fourth stitch.

How_to_crochet_front_post_treble_step_02

Step 3

Insert your hook into the front of the fabric, go around the back of the post of the stitch, and bring the hook out on the other side of the post of the stitch, at the front of the fabric

How_to_crochet_front_post_treble_step_03
How_to_crochet_front_post_treble_step_04

Step 4

Work yrh and carefully pull the loop of yarn out of the fabric – it should loop around the post of the stitch.

How_to_crochet_front_post_treble_step_05

Step 5

Once the loop is safely out of the fabric, you can work yarn round hook again, as you usually would for a treble stitch.

How_to_crochet_front_post_treble_step_06

Step 6

Now pull the yarn through the first 2 loops.

How_to_crochet_front_post_treble_step_07

Step 7

Yrh and pull the yarn through the remaining 2 loops

How_to_crochet_front_post_treble_step_08

Your front post treble crochet stitch (FPtr) will be complete and you’ll see how the stitch is raised up, compared to the rest of the fabric.

Work another front post treble crochet stitch (FPtr) around the next stitch, in the same way as before. You could now continue working more front post treble stitches across the row, until you’re happy with the technique. Or you can create a fabric that’s just like ours by working three plain treble stitches and then practice working back post treble stitches (as we’ll do to show you back post trebles below).

How to crochet back post trebles

(U.S terms Back post double crochet stitch)

Back post crochet stitches are worked in a similar way to front post stitches – the only difference is how you insert the hook into the fabric, around the post of the stitch on the row below.

Step 1

To work a back post treble crochet stitch, identify the post of the next stitch – this should be the 9th stitch in your fabric of 13 treble stitches.

How_to_crochet_back_post_treble_step_01

Step 2

Then work yrh (as usual for a treble stitch) and prepare to insert your hook around the post of that stitch, in the opposite way to before.

How_to_crochet_back_post_treble_step_02

Step 3

Insert the hook into the back of the fabric, take it around the front of the post of the stitch, and bring the hook out on the other side of the post, at the back of the fabric

How_to_crochet_back_post_treble_step_03

How_to_crochet_back_post_treble_step_04

Step 4

Work yrh and carefully pull the loop of yarn out of the fabric – it should loop around the post of the stitch.

How_to_crochet_back_post_treble_step_05

Step 5

Work yrh and pull the yarn through the first 2 loops.

How_to_crochet_back_post_treble_step_06

Step 6

Yrh and pull through the remaining 2 loops.

How_to_crochet_back_post_treble_step_07

Step 7

Your back post treble crochet stitch will be complete and you’ll see how the stitch sits in relief, compared to the rest of the fabric.

How_to_crochet_back_post_treble_step_08

Work a back post treble crochet stitch (BPtr) around the next stitch. Then work a plain treble into the last three stitches to complete the row. You’ll see how the front post crochet stitches are raised up and the back post crochet stitches are in relief. Turn your fabric over and you’ll see that on the back of the fabric, the back post crochet stitches are raised up and the front post crochet stitches are in relief. This is important to note because post stitches create different effects on the right side and wrong side of the fabric.

Just remember that front post crochet stitches are raised on the right side and in relief on the wrong side, while back post crochet stitches are in relief on the right side and raised up on the wrong side. So always check you’re working the right post stitch on the right row to create the effect you want.

To see how this works, turn your fabric and work the same row as before: Ch3, 2tr, 2FPtr, 3tr, 2BPtr, 3tr. On this row, you’ll be working front post trebles around the back post trebles of the previous row, and back post trebles around the front post trebles of the previous row. Once you finish the row, you’ll see that the effect of these stitches at the front of the fabric is the same as the previous row. Work more rows in the same way until you feel confident with the technique.

Once you’re happy that you can make front post crochet and back post crochet treble stitches, you can try working them in other stitch patterns, such as half treble or double treble. Experiment with all sorts of front post and back post stitches, to see what effects and textures you can create in your crochet fabric. Once you’ve mastered post stitches, it’ll open up a whole new world of textured crochet!

If you found this tutorial helpful, you might also be interested in learning how to crochet in the front and back loops and how to change colour in rows. And if you’re after yarn advice, check our guide to choosing the best yarn for crochet or our guide on how to substitute yarns!