How to join yarn in knitting

Weaving in yarn ends can be tedious! Faye Perriam-Reed shows how to join yarns in knitting to minimise the process

6 issues of The Knitter magazine for just £9.99|Save 79%

Published: August 20, 2021 at 11:47 am

In our sister masterclass, we examined ways to weave in yarn ends. In this post, we take a look at methods of joining in new yarn during your knitting, to leave you with fewer of those pesky threads to sew in when you’re finished!

One of the general ‘rules’ we’ve probably all heard is to never join in yarn in the middle of a row. But this theory doesn’t always work. What if you’re knitting in the round, for example, or your yarn breaks, or you’re happily knitting along until you come across one of those irritating little knots in your yarn?

Here, we suggest a few methods designed to neatly join in a new yarn while minimising sewing-up time. You'll find step by step guides to all three of these. We're showing short snippets under the introductions to the techniques below, but scroll lower for the full walkthrough guide for each how to join yarn in knitting step-by-step technique.

Looking for a crochet version? Check out our how to join yarn in crochet article.

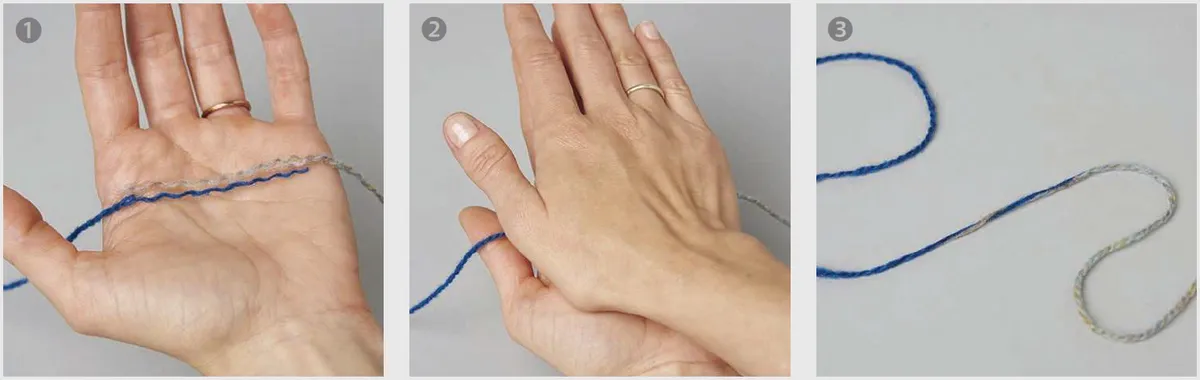
The Felted ends technique

One of our favourite techniques is to felt the ends of the yarn. Sometimes referred to as ‘spit-splicing’, the idea is to moisten both old and new ends of yarn (using whatever method you are most comfortable with - water or spit) and felt the two ends into one, by rubbing your palms together and creating friction. Note that this technique will only work with yarns that are at least 70% wool; acrylic and cotton will not felt.

How to join wool in knitting steps 1-3

The Russian join

This join can be a little fiddly, but once you’re finished the ends are quite well hidden. Unlike the felted ends technique, the Russian join can be used with any fibre, so it is a good choice if you are joining in the middle of a row with a yarn type that won’t felt, and you want to minimise the amount of sewing in to do at the end.

How to join yarn in knitting steps 4-6

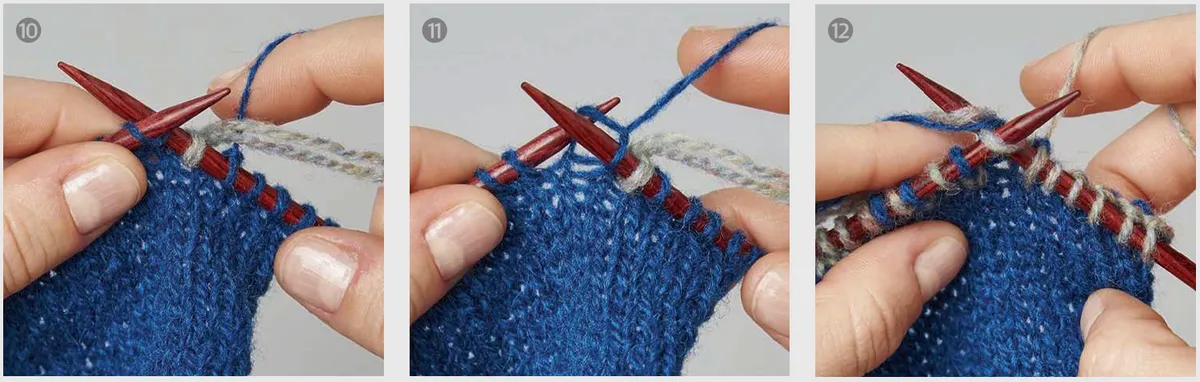
The Twined knitting join

We like this join, although it will still require a little sewing-in once you’re done. The idea is that you alternate knitting with the old and new yarns for a few stitches to help secure them during the weaving-in stage. By using the twined knitting technique, the yarns will be held neatly in place on the wrong side of the fabric.

How to join yarn in knitting steps 10-12

You will need:

  • Yarn
  • Tapestry needle

The felted ends technique

Step 1

To prepare the yarns, pull apart the plied ends and graduate the lengths of them over about 15cm. Moisten them slightly and lay both yarns across the palm of your hand in opposite directions.

how to join wool in knitting felt1


Step 2

Rub your palms together quickly to join the two yarns until you feel your hands begin to heat up. Keep checking the yarns and pulling them slightly to make sure they are securely joined.

how to join yarn in knitting felt2

Step 3

When the felting is complete, the two yarns will have joined seamlessly and you can continue knitting.

How to join yarn in knitting felt3

The Russian join

Step 1

Thread the end of a tapestry needle with the old yarn. Keeping hold of the tail, insert the tapestry needle into the yarn, a few centimetres along, going in between the threads. Try to keep the amount of threads either side of the needle even, if possible.

how to join wool in knitting russian1

Step 2

Twist yarn in the opposite way to the ply, moving the needle so the threads begin to ply around it. Continue this for a few centimetres. Pull the needle through the threads to fold it in on itself and remove the tapestry needle. The yarn may need a gently pull and a roll between your fingers to relax it.

how to join wool in knitting russian2

Step 3

Thread the tapestry needle with the new yarn.

how to join wool in knitting russian3

Step 4

After inserting it into the loop created in at the fold in the old yarn, repeat the process.

how to join wool in knitting russian4

Pull the yarns gently and give them a wiggle, before trimming the ends.

how to join wool in knitting russian5


The twinned knitting join

Step 1

When you come to the place you would like to join the yarn, with at least 30cm of old yarn remaining, insert the right needle into the next stitch, and instead of wrapping the old yarn around, take the new yarn with about 30cm folded over at the end, using the loop on the end as your new stitch, and bring this through to the right needle.

how to join wool in knitting twisted1


Step 2

Bring the old yarn up from underneath the new yarn (and yarn end) and knit the next stitch. Continue in this manner, always bringing the next yarn up from underneath the yarn previously used, to create a twist on the WS. After 5-10 stitches, continue in the new yarn only until you reach the end of the row. On the next row, alternate stitches again as before.

how to join wool in knitting twisted2 how to join wool in knitting twinned3

Step 3

After two rows of alternating stitches in this section, continue in the new yarn only, weaving in the ends as you go by knitting underneath them in every other stitch. Depending on how sticky your yarn is, you might also wish to duplicate stitch a few centimetres in when you’re finished.

how to join wool in knitting twinned4


We hope you’ve enjoyed exploring these three different techniques to help you join yarn in knitting for a clean and professional finish! Don’t forget to check out our other Knitting How to guides, like our how to cast off knitting or how to cable knit. Learn more techniques with our lace knitting and rib stitch knitting libraries, too. Try our free knitting patterns including our free toy dog knitting pattern and cactus knitting pattern, or treat yourself to a kit in our knitting kits round up.