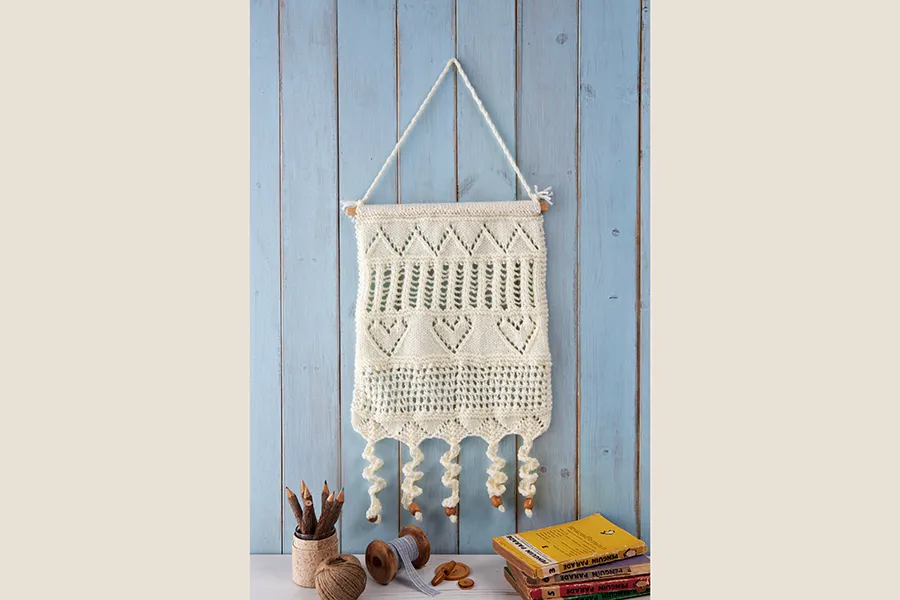
Spruce up your home for the new season with this knitted wall hanging, which would look gorgeous hung above a fireplace or over a bed. The sampler-style design means you can try out some different stitch patterns, and adventurous knitters could even add their own favourites to the mix. If you love lace, we think you’ll love this!
The key to making your Kitchener stitch look tidy when you attach the knitted wall hanging to the dowel is making sure the finished stitches are evenly sized. Every couple of inches, stop and use your tapestry needle to tighten up the stitches you’ve just made. With a bit of tinkering you won’t be able to see the join.
Scroll down for Sarah Murray's knitted wall hanging pattern, which was first published in Simply Knitting issue 138. Why not make it as a housewarming gift to welcome someone to their new home?
Add a rustic touch with wooden beads, or go with colourful ones to match your décor!
Simply Knitting magazine
To make this knitted wall hanging you will need:
- Stylecraft, Special Aran (100% acrylic, 100g/196m), 1 ball of Cream (1005)
- For yarn stockists contact Stylecraft
- 3 x 4mm knitting needles
- A pair of 4½mm knitting needles
- Spare lengths of yarn (approx 1m each) in a contrast colour
- A piece of dowel 10cm diameter, 30cm in length
- 5 beads
Knitted wall hanging pattern
Tension
Yarn knits as aran to this tension: 9 sts and 16 rows to measure 10x10cm (4x4in) over Mesh pattern using 4½mm needles
16 sts and 24 rows to measure 10x10cm (4x4in) over Heart Eyelet pattern, Zigzag pattern, Ladder pattern and stocking stitch using 4½mm needles
Size
The wall hanging is 32cm wide x 36cm long excluding tassels
Abbreviations
S2kpo Slip 2 sts together, K1, pass 2 slipped sts over
For a full list see our knitting abbreviations.
Knitted Wall Hanging
Cast on 61 sts, holding two 4mm needles together in your left hand, and using the 3rd needle to cast on over these needles as if they were one. This creates a slightly looser cast-on suitable for lace projects.
Lower border
Row 1 *K1, yo, K4, s2kpo, K4, yo; rep from * to last st, K1.
Row 2 *P2, K9, P1; rep from * to last st, P1.
Row 3 *K2, yo, K3, s2kpo, K3, yo, K1; rep from * to last st, K1.
Row 4 *P3, K7, P2; rep from * to last st, P1.
Row 5 *K3, yo, K2, s2kpo, K2, yo, K2; rep from * to last st, K1.
Row 6 *P4, K5, P3; rep from * to last st, P1.
Row 7 *K4, yo, K1, s2kpo, K1, yo, K3; rep from * to last st, K1.
Row 8 *P5, K3, P4; rep from * to last st, P1.
Row 9 *K5, yo, s2kpo, yo, K4; rep from * to last st, K1.
Rows 10–12 Knit.
Change to 4½mm needles.
Mesh panel
Row 1 K2, *yo, k2tog; rep from * to last 3 sts, yo, K3. [62 sts]
Row 2 K2, *K1, (K1, P1) into next st, pass 2 K sts over P st; rep from * to last 2 sts, K2. [33 sts]
Row 3 K2, *yo, K1; rep from * to last 2 sts, K2. [62 sts]
Rows 2 & 3 form Mesh pattern.
Rep Rows 2 & 3 until Mesh Panel measures 6cm, ending with Row 3.
Change to 4mm needles.
Next row Knit.
Rep last row twice more.
Next row K10, k2tog, *K8, k2tog; rep from * to last 10 sts, K10. [57 sts]
Change to 4½mm needles.
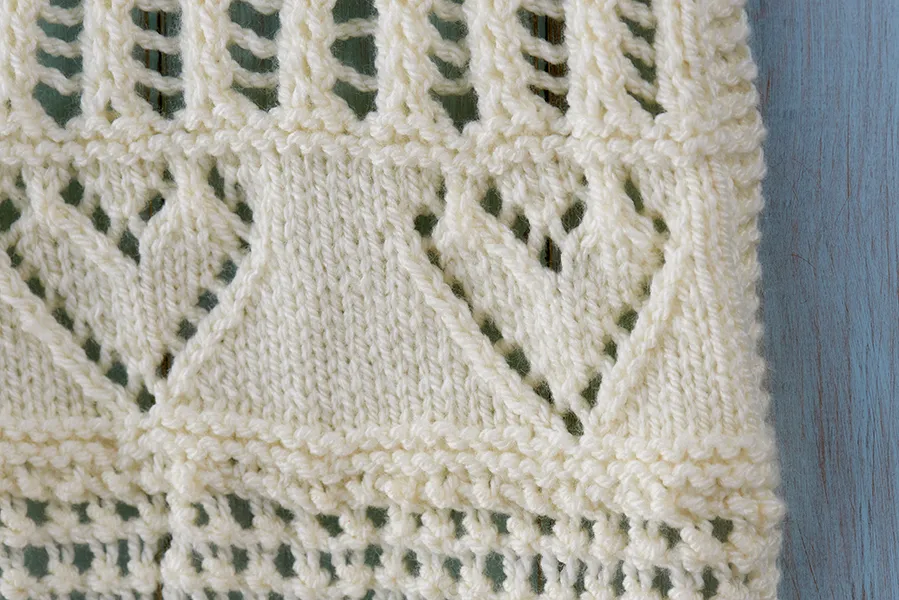
Heart panel
Row 1 K10, *yo, skpo, K16; rep from * to last 11 sts, yo, skpo, K9.
Row 2 and every alt row K2, P to last 2 sts, K2.
Row 3 K8, *k2tog, yo, K1, yo, skpo, K13; rep from * to last 13 sts, k2tog, yo, K1, yo, skpo, K8.
Row 5 K7, *k2tog, yo, K3, yo, skpo, K11; rep from * to last 14 sts, k2tog, yo, K3, yo, skpo, K7.
Row 7 K6, *k2tog, yo, K5, yo, skpo, K9; rep from * to last 15 sts, k2tog, yo, K5, yo, skpo, K6.
Row 9 K5, *k2tog, yo, K7, yo, skpo, K7; rep from * to last 16 sts, k2tog, yo, K7, yo, skpo, K5.
Row 11 K4, *k2tog, yo, K4, yo, skpo, K3, yo, skpo, K5; rep from * to last 17 sts, k2tog, yo, K4, yo, skpo, K3, yo, skpo, K4.
Row 13 K5, *(yo, skpo, K1, k2tog, yo, K1) twice, K6; rep from * to last 16 sts, (yo, skpo, K1, k2tog, yo, K1) twice, K3.
Row 15 K6, *(yo, s2kpo, yo, K3) twice, K6; rep from * to last 15 sts, (yo, s2kpo, yo, K3) twice, K3.
Row 16 K2, P to last 2 sts, K2.
Change to 4mm needles.
Next row Knit.
Rep last row twice more.
Next row *K13, k2tog; rep from * to last 12 sts, K12. [54 sts]
Change to 4½mm needles.
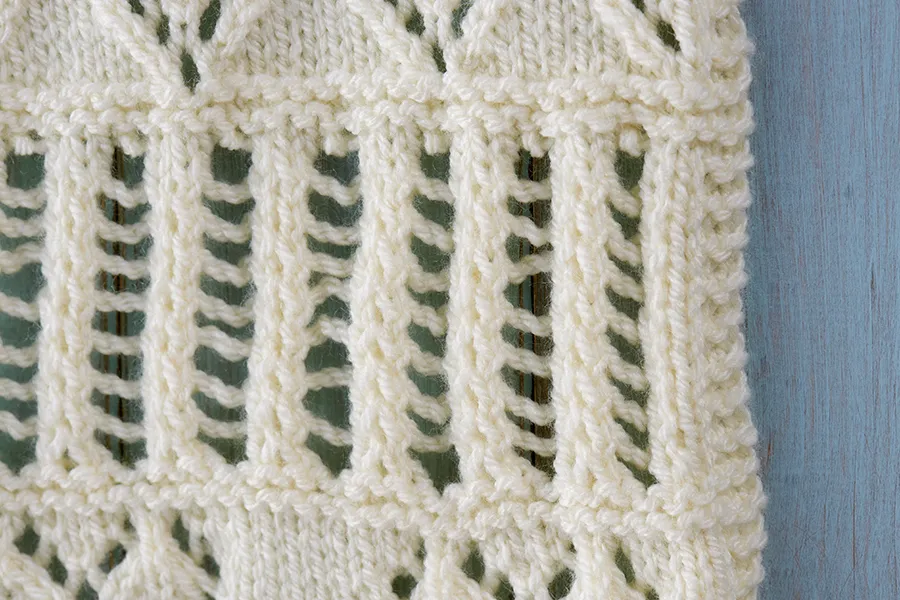
Ladder panel
Row 1 K3, *skpo, yo twice, k2tog; rep from * to last 3 sts, K3.
Row 2 K2, *P3, K1; rep from * to last 4 sts, P2, K2.
Rows 1 & 2 form Ladder pattern.
Rep Rows 1 & 2 until Ladder Panel measures 6cm, ending with Row 2 of pattern.
Change to 4mm needles.
Next row Knit.
Rep last row twice more.
Next row K27, M1, K27. [55 sts]
Change to 4½mm needles.
Zigzag panel
Row 1 K12, *yo, skpo, K8; rep from * to last 3 sts, K3.
Row 2 and every alt row Purl.
Row 3 K3, *yo, skpo, K5, k2tog, yo, K1; rep from * to last 2 sts, K2.
Row 5 K4, *yo, skpo, K3, k2tog, yo, K3; rep from * to last st, K1.
Row 7 K5, *yo, skpo, K1, k2tog, yo, K5; rep from * to end of row.
Row 9 K6, *yo, sl1, k2tog, psso, yo, K7; rep from * to last 9 sts, yo, sl1, k2tog, psso, yo, K6.
Row 11 K7, *yo, skpo, K8; rep from * to last 8 sts, yo, skpo, K6.
Row 12 Purl.
Change to 4mm needles.
Next row Knit.
Rep last row 3 times more.
Upper edging
Next row Kfb in every st. [110 sts]
Take a length of waste yarn, thread it into tapestry needle and thread it through all the odd numbered sts on LH needle. Take a second length of waste yarn and thread it through all the even numbered sts on LH needle. Slip all the sts off the knitting needle and separate the two sets of sts so that the odd numbered sts are at the back (ie towards the WS) of the work. Slip the odd numbered sts back onto the knitting needle so that the WS of the work is facing you (leave the even numbered sts on the spare length of yarn for now) and remove the waste yarn from the sts you are about to start working on. [55 sts]
Next row Knit.
Next row Purl.
Rep last 2 rows until edging is long enough to just cover the wooden dowel, ending with a K row. Break yarn, leaving a 2m length for grafting.
With the RS of the work facing you, slip the even numbered sts back onto a knitting needle from left to right (the points of the two knitting needles should be together with the needles held parallel). Remove the waste yarn from these sts. Hold the work with the RS facing, the long end should be hanging down at the back right of the work.
Now use Kitchener st to secure the knitting around the dowel as follows:
Step 1 Put needle knitwise into 1st st on front needle and sl st off needle.
Step 2 Put needle purlwise into next st on front needle and pull yarn through.
Step 3 Put needle purlwise into 1st st on back needle and sl st off needle.
Step 4 Put needle knitwise into next st on back needle and pull yarn through.
Rep steps 1-4 until all sts have been grafted. Fasten off.

Tassels (make 5)
Working lots of increases on a single row helps to give the tassels their spiral shape. Simply twist them up when they’re done, and then sew them onto the five points on the wall hanging’s base edge. Thread a wooden bead onto the end of each tassel and tie a knot at the bottom if necessary to stop the bead from falling off.
Cast on 20 sts, holding two 4mm needles together in your left hand, and using the 3rd needle to cast on over these needles as if they were one.
Row 1 K into front, then back, then front of each st. [60 sts]
Cast off purlwise.
Twist tassel into a spiral.
Hanging loop
Using 3 lengths of yarn, make a twisted cord approximately 40cm long. Attach to upper edging.
Make up the wall hanging
Sew in loose ends. Sew tassels onto points of lower edging. Thread a wooden bead onto the end of each tassel (if the hole in the bead is small enough the bead will stay in position, but if not the end of the tassel can be knotted). Sew hanging loop onto upper edging.
Download your free knitted wall hanging pattern
Get a PDF version of this fab lace pattern here: Knitted wall hanging PDF
Free easy knitting patterns
Ready to cast on something else? Take a look at our collection of easy-to-knit patterns for beginners and improvers, including: