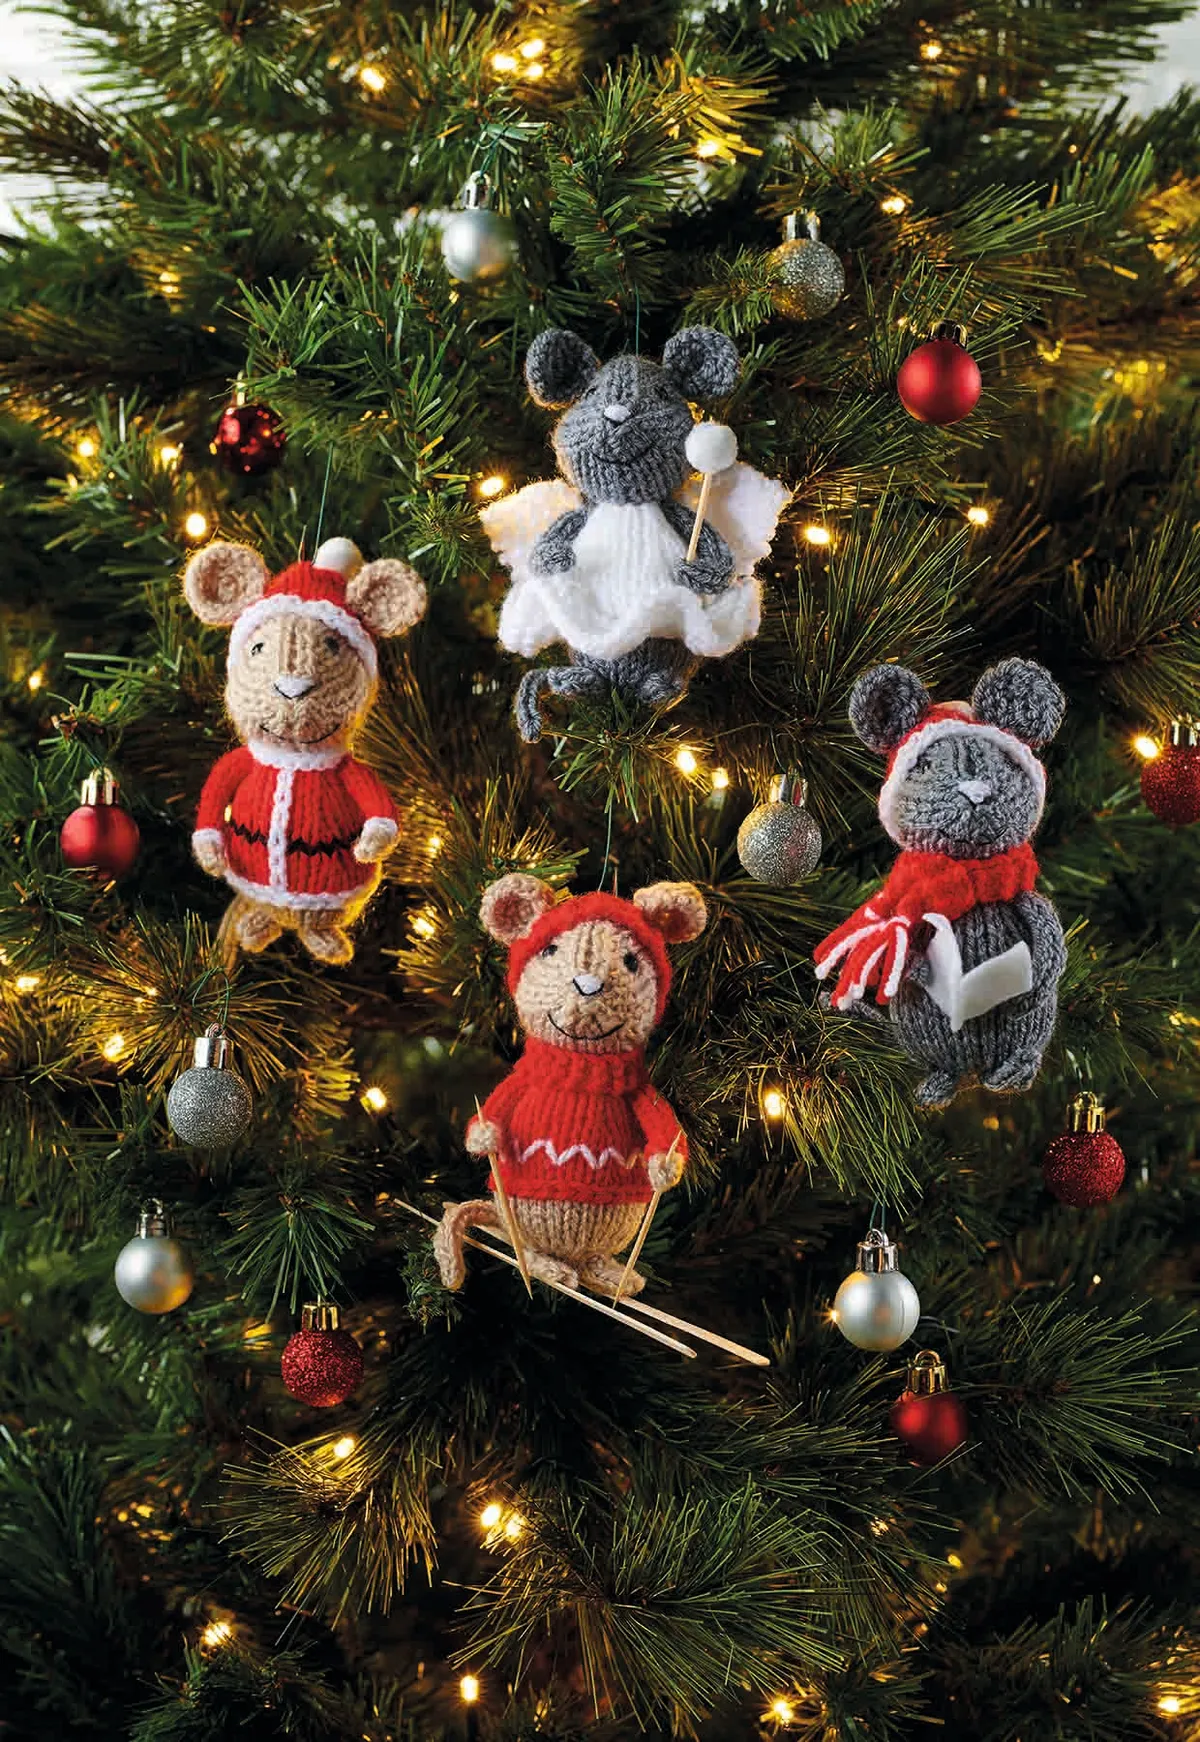
Step 1
Casting on the mouse’s head
Cast on 8 sts using 3.5mm needles.
Step 2
Increasing stitches to widen the mouse’s head
Row 1 and all following odd-numbered rows (WS) Purl.
Row 2 (RS) K1, (kfb) 6 times, K1. [14 sts]
Row 4 K1, (kfb) 12 times, K1. [26 sts]
Step 3
Working stocking stitch to grow the mouse’s head
Rows 5 to 11 Starting on a WS purl row, work in st st.
Step 4
Decreasing stitches to narrow the mouse’s head
Row 12 K5, k2tog, K4, k2tog, ssk, K4, ssk, K5. [22 sts]
Row 14 K4, k2tog, K3, k2tog, ssk, K3, ssk, K4. [18 sts]
Row 16 K3, k2tog, K2, k2tog, ssk, K2, ssk, K3. [14 sts]
Row 18 K2, k2tog, K1, k2tog, ssk, K1, ssk, K2. [10 sts]
Row 20 (K2tog) 5 times. [5 sts]
Step 5
Casting off the knitted mouse’s head
Break yarn and thread through rem sts. Pull tight to fasten.
Knitting the body of the basic mouse pattern
Step 1
Casting on the mouse’s body
Cast on 8 sts using 3.5mm needles.
Step 2
Increasing stitches to widen the mouse’s body
Row 1 and all following odd-numbered rows (WS) Purl.
Row 2 (RS) K1, (kfb) 6 times, K1. [14 sts]
Row 4 K1, (kfb) 12 times, K1. [26 sts]
Step 3
Working stocking stitch to grow the mouse’s body
Rows 5 to 11 Starting on a WS purl row, work in st st.
Step 4
Decreasing stitches to narrow at the mouse’s waist
Row 12 K3, ssk, K4, k2tog, K4, ssk, K4, k2tog, K3. [22 sts]
Step 5
Lengthening the mouse’s body with stocking stitch
Rows 13 to 15 Starting on a WS purl row, work in st st.
Step 6
Decreasing stitches to narrow towards the mouse’s bottom
Row 16 (K3, ssk, K3, k2tog) twice, K2. [18 sts]
Rows 17 to 19 Starting on a WS purl row, work in st st.
Row 20 (K2, ssk, K2, k2tog) twice, K2. [14 sts]
Rows 21 Purl.
Step 7
Casting off the mouse’s knitted body
Cast off.
Knitting the ears of the basic mouse pattern (make 2)
Step 1
Casting on the mouse’s ear
Cast on 16 sts using 3.5mm needles.
Step 2
Knitting a row to lengthen the mouse’s ear
Row 1 (WS) Knit.
Step 3
Decreasing stitches to make the ear shape
Row 2 (K2tog) 8 times. [8 sts]
Row 3 Knit.
Row 4 (K2tog) 4 times. [4 sts]
Step 4
Casting off the mouse’s ear
Break yarn and thread through rem sts. Pull tight to fasten.
Knitting the tail of the basic mouse pattern
Step 1
Casting on the mouse’s tail
Cast on 3 sts using 3.5mm DPNs.
Step 2
Work i-cord to lengthen the tail
Work i-cord for 16 rows.
Step 3
Casting off the knitted tail
Cast off.
Knitting the arms and feet of the basic mouse pattern
Step 1
Casting on the knitted arms
Cast on 4 sts using 3.5mm DPNs. Work i-cord for 12 rows. Cast off.
Casting on the knitted feet
Cast on 5 sts using 3.5mm DPNs.
Step 2
Work i-cord to lengthen the tail
Work i-cord for 3 rows.
Step 3
Casting off the knitted feet
Cast off.
Altering the basic mouse pattern to make a Santa Christmas mouse
Step 1

Changing the yarn in the basic mouse body pattern for the Santa suit
Follow the basic mouse knitting pattern to knit the body in the following shades:
Cast on using Yarn E.
Rows 1 to 8 Work in Yarn E.
Rows 9 to 12 Work in Yarn C.
Row 13 Work in Yarn A.
Rows 14 to 20 Work in Yarn C. Row 21 Work in Yarn B.
Cast off.
Step 2
Changing the yarn colours in the basic mouse arm pattern for the Santa suit
Follow the basic mouse knitting pattern to knit the arms in the following shades:
Cast on using Yarn E.
Work i-cord for 3 rows in Yarn E.
Rows 4 to 12 Work in Yarn C.
Cast off.
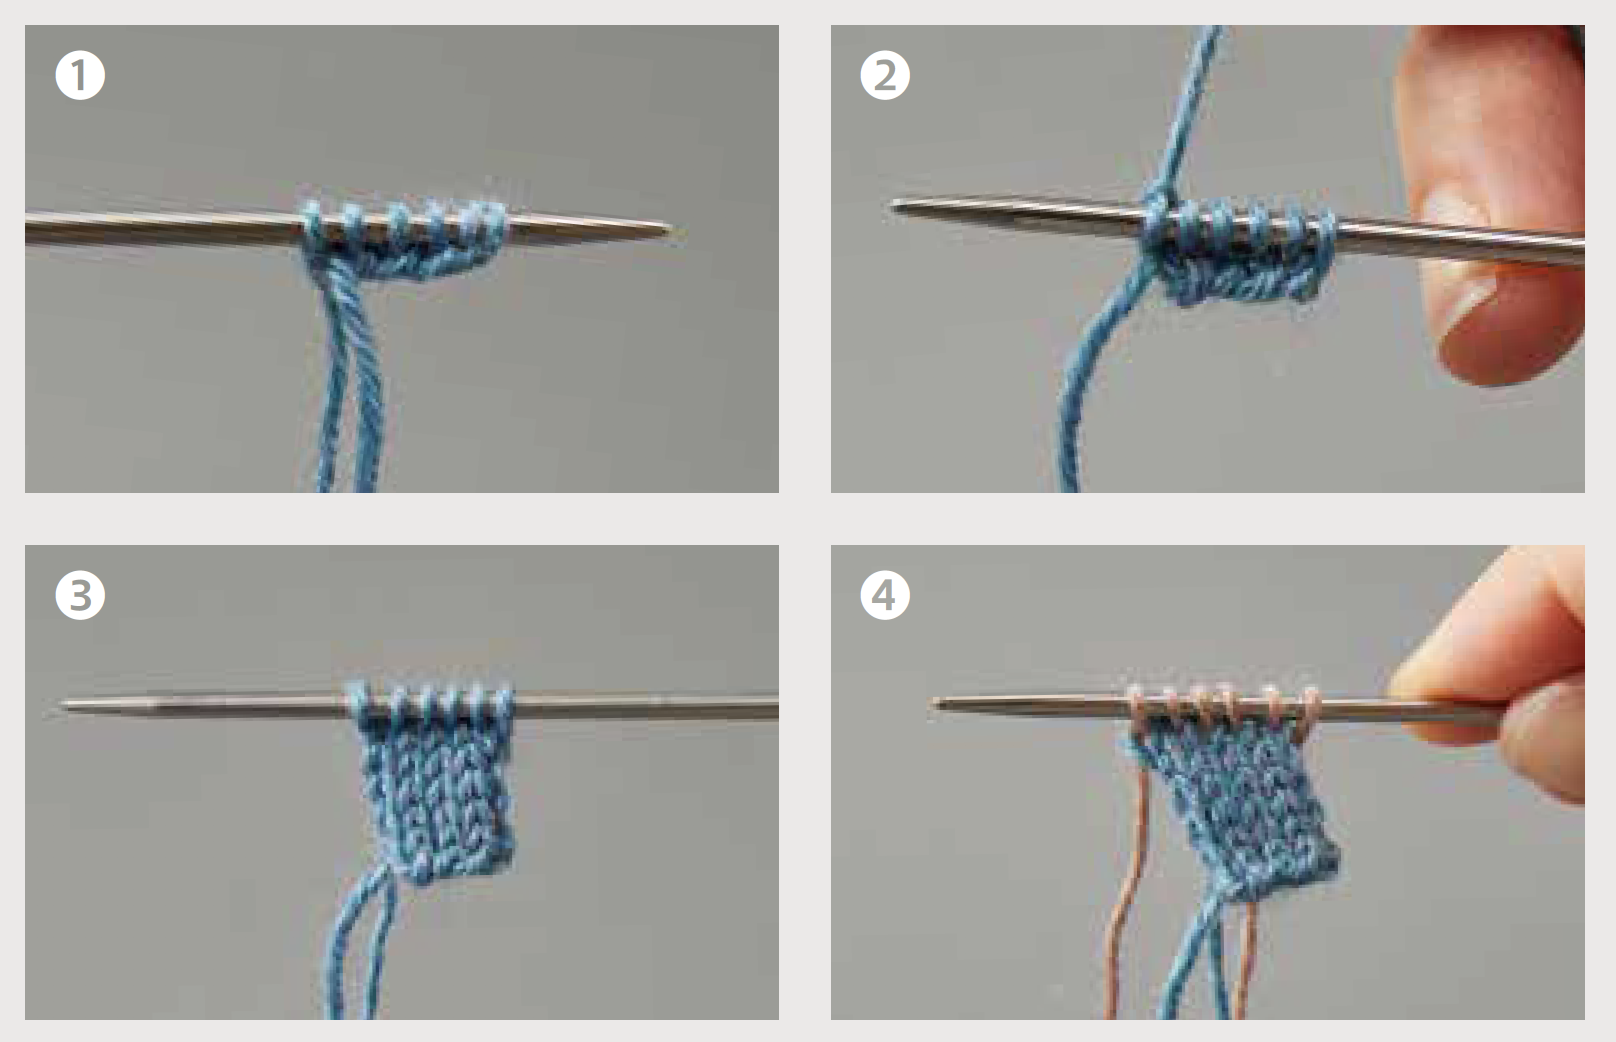
How to work an i-cord
You can knit an i-cord using double pointed needles. Cast on your stitches and knit one row. Slip the stitches to the other end of your needle and then knit again in the same direction.
For a step by step look at this technique, find instructions on how to knit an i-cord in Gathered's how to knit from the centre out guide.
Step 3
Knitting a Santa hat for the Christmas mouse
Cast on 28 sts using 3.5mm needles and Yarn B.
Row 1 (WS) Knit.
Break Yarn B and join Yarn C.
Rows 2 to 5 Starting on a RS knit row, work in st st.
Row 6 K1, k2tog, K4, (k2tog, K5) 3 times. [24 sts]
Row 7 and all foll odd-numbered rows Purl.
Row 8 K1, k2tog, K3, (k2tog, K4) 3 times. [20 sts]
Row 10 K1, k2tog, K2, (k2tog, K3) 3 times. [16 sts]
Row 12 K1, k2tog, K1, (k2tog, K2) 3 times. [12 sts]
Row 14 K1, k2tog, (k2tog, K1) 3 times. [8 sts]
Break yarn and thread through remaining stitches. Pull tight to fasten.
Step 4
Knitting a collar for the Santa suit
Cast on 19 sts using 3.5mm needles and Yarn B. Cast off.
Altering and adding to the basic mouse pattern to make a carol singer Christmas mouse
Step 1

Changing the yarn in the basic mouse knitting pattern
Follow the basic mouse knitting pattern in Yarn D.
Step 2
Knitting a hat for the carol singer mouse
Cast on 28 sts using 3.5mm needles and Yarn B.
Row 1 (WS) Knit.
Break Yarn B and join Yarn C.
Rows 2 to 5 Starting on a RS knit row, work in st st.
Row 6 K1, k2tog, K4, (k2tog, K5) 3 times. [24 sts]
Row 7 and all foll odd-numbered rows Purl.
Row 8 K1, k2tog, K3, (k2tog, K4) 3 times. [20 sts]
Row 10 K1, k2tog, K2, (k2tog, K3) 3 times. [16 sts]
Row 12 K1, k2tog, K1, (k2tog, K2) 3 times. [12 sts]
Row 14 K1, k2tog, (k2tog, K1) 3 times. [8 sts]
Break yarn and thread through rem sts. Pull tight to fasten.
Step 3
Knitting a scarf for the carol singer mouse
Cast on 3 sts using 3.5mm needles and Yarn C.
Row 1 Knit.
Repeat Row 1 until work measures 28cm.
Cast off.
Altering and adding to the basic mouse pattern to make a fairy Christmas mouse
Step 1

Changing the yarn in the basic mouse knitting pattern
Knit the head, ears, arms, feet and tail following the basic mouse knitting pattern in Yarn D.
Follow the basic mouse knitting pattern to knit the body in the following shades:
Cast on using Yarn D.
Rows 1 to 8 Work in Yarn D.
Rows 9 to 21 Work in Yarn B.
Cast off.
Step 2
Knitting the skirt for the fairy Christmas mouse
Cast on 78 sts using 3.5mm needles and Yarn B.
Rows 1 to 4 Knit.
Row 5 (K2tog, K1) 26 times. [52 sts]
Row 6 Knit.
Row 7 (K2tog) 26 times. [26 sts]
Cast off.
Step 3
Knitting the wings for the fairy Christmas mouse (make 2)
Cast on 3 sts using 3.5mm needles and Yarn B.
Row 1 and all foll odd-numbered rows Knit.
Row 2 (K1, yo) twice, K1. [5 sts]
Row 4 K1, yo, K3, yo, K1. [7 sts]
Row 6 K1, yo, K5, yo, K1. [9 sts]
Row 8 Knit.
Row 10 K1, k2tog, K3, k2tog, K1. [7 sts]
Row 12 K1, k2tog, K1, k2tog, K1. [5 sts]
Row 14 K1, sk2po, K1. [3 sts]
Row 16 Sk2po. [1 st]
Fasten off.

Altering and adding to the basic mouse pattern to make a skier Christmas mouse
Step 1
Changing the yarn in the basic mouse knitting pattern
Knit the head, ears, feet and tail in the basic mouse knitting pattern in Yarn D.
Step 2
Follow the basic mouse knitting pattern to knit the body in the foll shades:
Cast on using Yarn E.
Rows 1 to 8 Work in Yarn E.
Rows 9 to 21 Work in Yarn C.
Cast off.
Step 3
Follow the basic mouse knitting pattern to knit the arms in the following shades:
Cast on using Yarn E.
Work 3 rows of i-cord in Yarn E.
Rows 4 to 12 Work in Yarn C.
Cast off.
Step 4
Knitting a hat for the skiing Christmas mouse
Cast on 28 sts using 3.5mm needles and Yarn C.
Row 1 (WS) (K1, P1) 14 times.
Rows 2 to 3 Rep Row 1 twice more.
Row 4 Knit.
Row 5 and all following odd-numbered rows Purl.
Row 6 K1, (k2tog, K7) 3 times. [25 sts]
Row 8 K1, (k2tog, K1) 8 times. [17 sts]
Row 10 K1, (k2tog) 8 times. [9 sts]
Break yarn and thread through rem sts. Pull tight to fasten.
Step 5
Knitting a collar for the skiing Christmas mouse
Cast on 3 sts using 3.5mm needles and Yarn C.
Rows 1 to 28 Knit.
Cast off.
Sewing and assembling your Christmas mice knitting pattern
Step 1
Putting together the heads of the Christmas mice
Insert the toy safety eyes on the head on each side of the central decrease stitches. Sew the side edges together, stuffing as you sew. This seam runs down the centre underside of the head. Gather the cast-on stitches together at the back of the head.
Step 2
Embroidering the noses and mouths of the Christmas mice
With Yarn B and three small horizontal stitches, embroider the nose on the front of the head. With black stranded cotton, outline the nose in a V shape and embroider the mouth.
Step 3
Sewing up the bodies of the Christmas mice and attaching heads
Sew the side edges tog and gather the cast-on sts tog at the bottom. The seam runs down the centre back. Sew the neckline (cast-off edge) to the underside of the head.
Step 4
Attaching the arms of the Christmas mice
Sew the cast-off end to the top sides of the body.
Step 5
Attaching the feet of the Christmas mice
Sew the cast-off end to the bottom front of the body.
Step 6
Attaching the tails of the Christmas mice
Sew the cast-off end to the bottom back of the body.

Step 7
Sewing up the hats of the skiing, Santa and fairy mice
Sew the side edges together. Sew a pompom onto the top of each hat, place over the head and sew onto the head around the brim.
Step 8
Attaching the ears of the Christmas mice
Use the cast-off tail to sew the side edges tog to make a circle shape, then sew each ear to the head or to the hat if the character has a hat.
Things you’ll need to know when assembling the individual Christmas mice
Step 1
Finishing touches and yarn changes to use on the Santa mouse
Use Yarn B and chain stitch embroidery to add the jacket hem over the last Yarn E row of the body, up the centre front of the body, and the cuffs over the first Yarn E row on each arm. Wrap the collar around the neck and sew the ends together at the back.
Step 2
Finishing touches and yarn changes to use on the Carol singer mouse
Add 2cm-long tassels on each end of the Scarf in Yarns B and C. Wrap the scarf around the neck. For the hymn book, fold the felt fabric rectangle in half and use white cotton thread to sew a running stitch 3mm from the fold to create the book spine. With the cotton thread, sew the bottom corner of the hymn book onto the mouse’s hands.
Step 3
Finishing touches and yarn changes to use on the fairy mouse
Sew the side edges of the skirt tog, place over the body with the seam at the back and sew onto the first Yarn B row of the body. Sew the cast-on edge of each Wing onto the side of the Body behind each Arm. For the wand, glue a pompom onto one end of a cocktail stick. Push the other end of the cocktail stick through the mouse’s hand and glue in position.

Step 4
Finishing touches and yarn changes to use on the skiing mouse
Use Yarn C and chain stitch embroidery to add the sweater hem over the first Yarn C row of the body and for the cuffs over the first Yarn C row on each Arm. Use Yarn B to embroider a zigzag line around the bottom of the sweater. Wrap the collar around the neck and sew the cast-on/off edges tog at the back. Push a cocktail stick through each hand for the ski poles and glue in position. Glue the coffee stirrers onto the bottom of the feet for skis.