Essentials tips for starting cross stitch
Step 1 – Choose your project
Make sure you choose the right level for you – if you’ve never tried cross stitch before, it’s a good idea to start with kits or charts that are marked for beginners. Absolute beginners should choose a design without fractional stitches – look for a pattern that’s made up of whole stitches, with a bit of backstitch detail, and that isn’t too large, so you can try it out and see results quickly. For any terms you are not sure about, check out our cross stitch glossary
Step 2 – Gather your materials
Cross stitch kits come with all the fabric, needles and thread you’ll need to sew the design inside. If you have a cross stitch pattern only as opposed to a cross stitch kit, you’ll need to buy the materials you need. As a beginner, you should buy the recommended cross stitch fabric and the cross stitch thread listed in the key, but click these links to find out more about these and gain the confidence to adapt designs to different sizes and colours!
Before you start to stitch, sort out the threads into different shades and note which symbol they match on the chart. Many cross stitchers use a thread sorter for this, and pre-cut some lengths of each one to save time later on.

If you’re stitching from a counted cross stitch chart then you’ll also need to buy cross stitch fabric, cross stitch thread and cross stitch needles. The chart should say which fabrics the design is intended for. We recommend starting with aida fabric – it’s more beginner-friendly than evenweave or linen fabric. You can try those later! You’ll also see a list of the threads you need in the pattern's key.
See our guide below on how to separate your embroidery thread into individual strands.
Step 3 – Find the centre of the chart
We recommend always starting from the middle of the design. This is usually marked in some form (for example with arrows, a ‘0’ or triangles) around the edges of a chart. Look for this symbol on the key for the colour of thread you need, plus the number of strands. Thread your needle with the required strands this colour.
Step 4 – Find the centre of your fabric
Fold your fabric in half horizontally then open it out and fold it vertically – the point where the two creases cross points to the centre. This is the point where you should start cross stitching, starting from the middle of your cross stitch pattern. This ensures the design sits centrally on your fabric.
Step 5 – Get stitching!
You’ve now got all of the essentials on how to cross stitch and it’s time to make your first project! Follow our step by step guide to how to cross stitch above to start stitching.
You can also use the loop method to secure your thread to the fabric before starting – this only works when using a single strand of thread doubled over in the needle, creating a loop at one end. Make the first arm of your cross stitch as above, but leaving the looped end of thread hanging loose at the back of the fabric. Then pass the needle through the loop before completing the top arm.
To finish a thread, leave a thread tail of a minimum of 4cm (2in) on the back of the fabric, and catch it under a few nearby stitches to secure it, then trim all loose ends with embroidery scissors. We recommend finishing all the cross stitch in your design before you work the backstitch or add any French knots – see our video guide on How to do French knots.
Cross stitch patterns for beginners
When you are just starting out with cross stitch for beginners, it’s best to choose cross stitch patterns for beginners that use whole cross stitch and some backstitch for detail and definition. Try not to tackle cross stitch design with lots of fractional cross stitches or French knots. Below are some free cross stitch patterns for beginners you will find right here on Gathered.
Also check out our guide to some of the top easy cross stitch patterns.
Free lamb cross stitch pattern
Here’s another sweet design stitched entirely in whole cross stitch. Work the pattern to build up the shape and easily practice your counting.

Children’s cross stitch patterns
Not just for kids! These sweet woodland characters use while cross stitch with just a little backstitch.

Cats cross stitch patterns
Who could resist stitching one of these beautiful kitties!

Summer cross stitch patterns for men
Worked in whole cross stitch and backstitch. these simple summery motifs are great for beginners.
Challenge yourself to new cross stitch projects
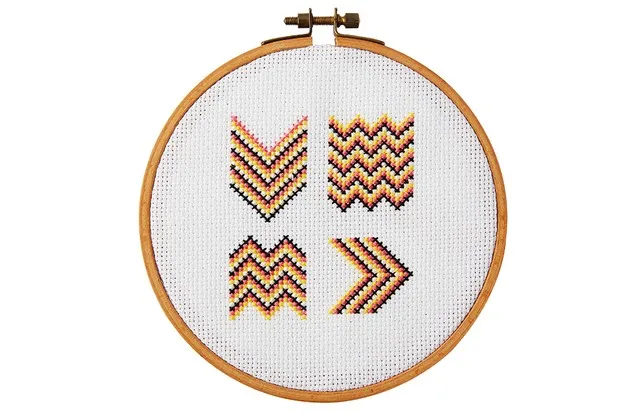
Cross stitch chevrons onto white linen fabric using your new skills for a modern graphic look! Cross stitch may be thought of as quite a traditional technique, but that doesn’t mean it can’t be used in a modern way. Bring this classic embroidery technique up to date by using it in unexpected ways, like we’ve done here with this stitched panel on crisp white linen – backed and framed with white cotton fabric to make a trendy cushion cover. It’s a creative way to incorporate graphic prints into a modern home.
If you enjoy contemporary cross stitch, take a look at our best modern cross stitch kits article.