How to make a cross stitch Rudolph tree decoration

Join in the festive stitching fun with a reindeer decoration for your Christmas tree, designed by Heather Nugent. We show you how to make the 3D bauble using the exclusive kit with your issue 325 (Nov 2022) of The World of Cross Stitching magazine.

6 issues of The World of Cross Stitching magazine for £9.99|Save 75%

Published: August 30, 2022 at 4:53 pm

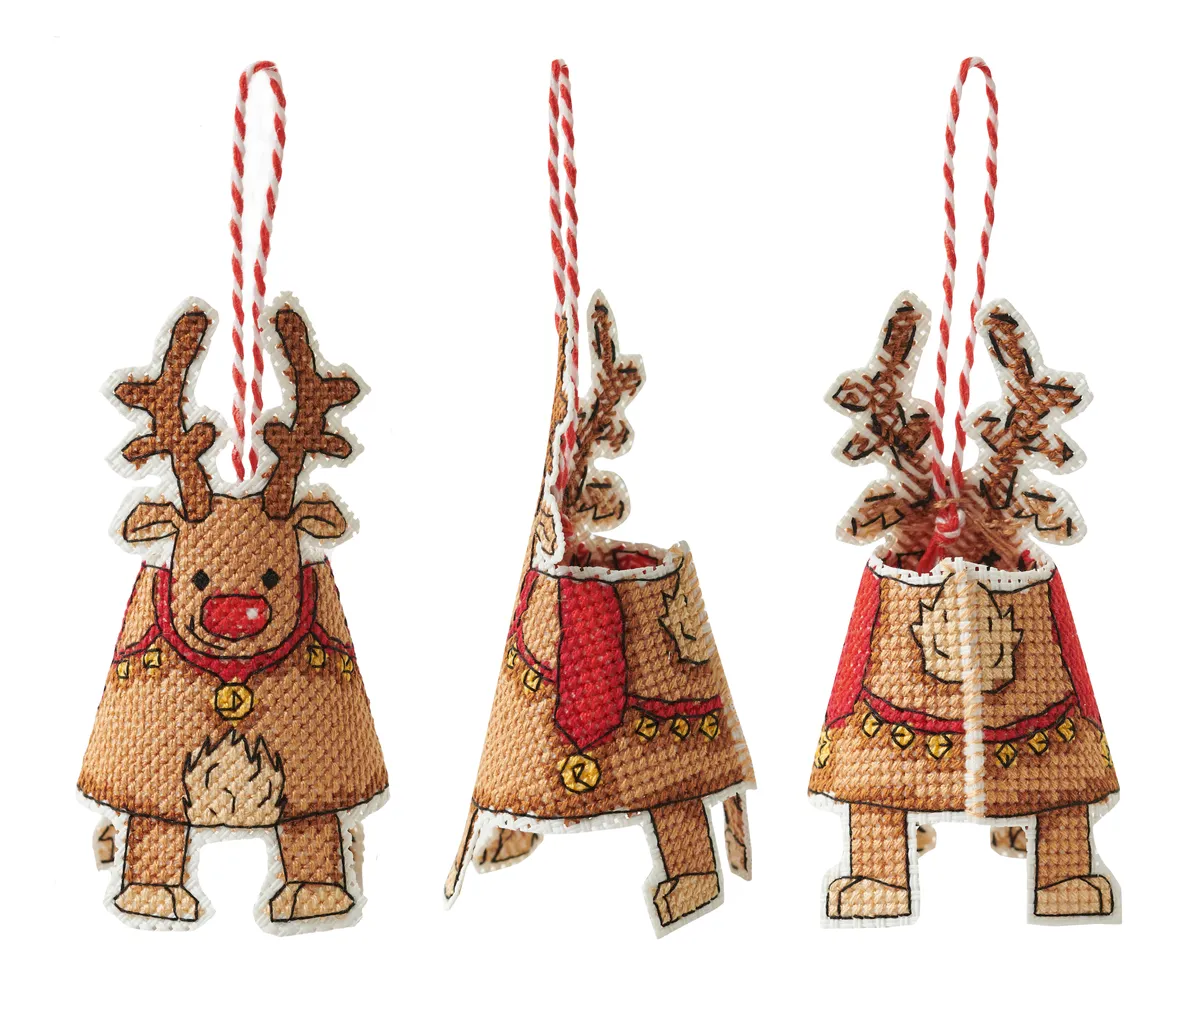
With Christmas on the way, your exclusive cross stitch gift with issue 325 (Nov 2022) of The World of Cross Stitching is a fantastic reindeer bauble kit. This project is perfect for beginners and you’ll have it stitched and ready to decorate your Christmas tree in no time!

We'll show you how to turn your stitching into a handmade 3D Christmas decoration for your tree. You’ll need the chart and all the materials from your kit listed below, plus a size 24 tapestry needle and scissors.

If you haven't yet created your cross stitch and want some advice or guidance on the best techniques, be sure to head over to our guide on how to cross stitch before you begin.

You will need:

  • 14-count plastic aida
  • Stranded cotton
  • Size 24 tapestry needle
  • Red baker’s twine
  • Scissors
  • Chart and key from The World of Cross Stitching magazine

Watch our video tutorial or scroll down to follow our step-by-step instructions.

Reindeer decoration cross stitch video tutorial:

You will need:

  • 14-count plastic aida
  • Stranded cotton
  • Baker's twine
  • Size 24 tapestry needle
  • Scissors

Total time:

12 hours (including cross stitch)

Step 1

Use a ruler to find the centre of the plastic aida and start stitching the centre of the design from there. You’ll find the chart with your kit in issue 325 (Nov 2022) of The World of Cross Stitching as well as a copy inside the magazine itself for digital readers.

Step 2

Once you’ve finished stitching, use sharp scissors to cut a small border around the edge of the stitched design, following the cutting line on the chart as a guide.

Step 3

Bend the plastic aida to line up the straight edges. Starting at the bottom of the reindeer’s body, use whipstitch to stitch the edges together using a coordinating thread colour.

Step 4

Create a loop with your baker’s twine and tie the ends together in a double knot. Attach to the back of the head, in between the antlers, with a few stitches to secure in place.

Step 5

Create a loop with your baker’s twine and tie the ends together in a double knot. Attach to the back of the head, in between the antlers, with a few stitches to secure in place.

Step 6

Now your 3D reindeer bauble decoration is ready hang on your Christmas tree!
reindeer tree decoration

If you loved making this reindeer cross stitch decoration, you’ll enjoy collecting and stitching the whole set of 3D baubles for your tree – find a friendly Santa (issue 288 (Christmas 2019), angelic angel (issue 301 (Christmas 2020)) and a cheeky elf (issue 314 (Special 2021)) of The World of Cross Stitching. Don’t worry if you missed out on any of these, you can still find the patterns in their digital editions available to download via their app. We also have an exclusive download version of the angel chart from issue 301 just for you. You can use perforated paper or plastic canvas in place of the plastic aida that came with the kits.

If want to get stuck into more festive cross stitch, there’s plenty of free projects available right here on Gathered. You can make even more fun 3D cross stitch decorations to adorn your Christmas tree and home this year. Want some other Christmas makes? Try these adorable gnome cross stitch bookmarks or personalise your Christmas cards with a handy free cross stitch alphabet. Keep your needles at the ready to stitch this amazing hand appliqué nativity scene too. You can also try these amazing 150 cross stitch patterns, where you’ll find something to suit all abilities.