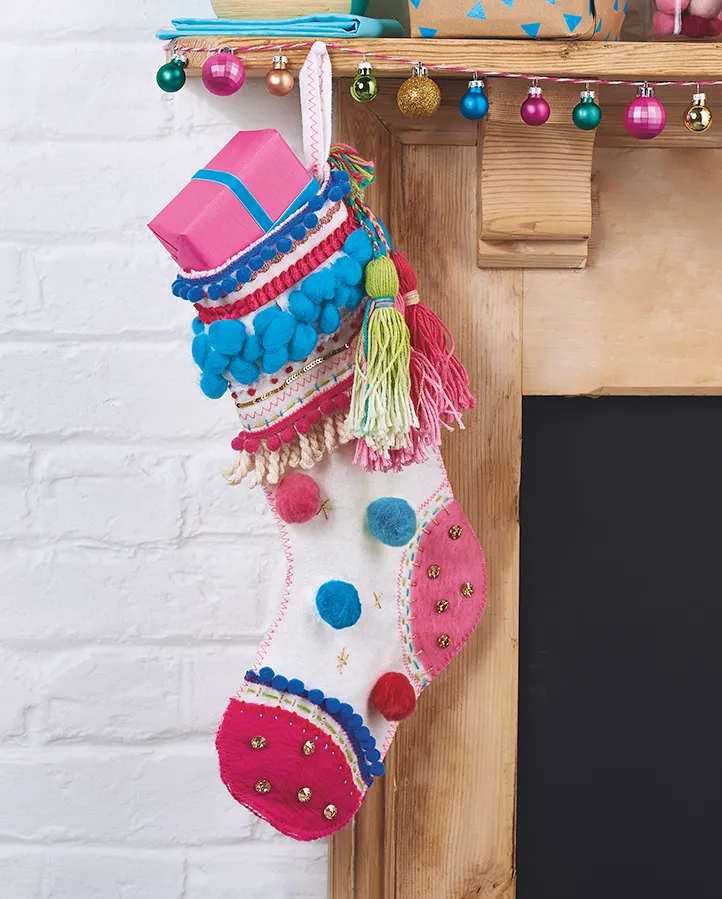
Step 1
Using the template (find the template in Mollie Makes project templates issue 85), cut two stocking shapes and one cuff from the white felt.
Step 2
Place one stocking right side (RS) up on the felting mat. Take a length of dark pink roving and spread it out over the toe area, shaping the right-hand edge to create a curve. Use the felting needle to secure the roving in place, pushing it down with quick motions to combine the fibres with the felt and create a solid layer. If any white felt is still showing, position another small piece of roving over the gap and repeat.
Step 3

Repeat Step 2 with light pink roving to felt the heel, this time, creating a rounded curve at the left-hand edge, as shown. Cut away the excess roving from the felt.
Step 4
Using zigzag stitch, add a pink border, 1cm (⅜") out from the roving at the heel. Position a length of blue pom pom trim 1cm (⅜") away from the roving at the toe, and sew with pink zigzag stitch.
Step 5

Drape a 20cm (7⅞") piece of light pink crochet yarn between the middle tines of a fork. Take a piece of light pink roving, roughly 3cm (1¼") thick and 18cm (7⅛") long, and wrap it around the fork prongs.
Step 6


Tie the yarn around the roving to make a bundle. Slip it off the fork and cut both sides open. Work the bundle into a pom pom, then trim to neaten, leaving the lengths of crochet yarn uncut. Repeat with different coloured roving and yarn to make five pom poms.
Step 7

Position the pom poms on the stocking, using the image as a guide to placement. Use the yarn tails to sew them in place.
Step 8

Decorate the white spaces between the pom poms by sewing star shapes in gold embroidery thread. Work a large straight stitch, roughly 2cm (¾") long, then sew a cross stitch over the top. Vary the lengths of the stitches on each one to give a twinkly effect.
Step 9

Next, embroider decorative borders around the roving at the heel. First, work a row of straight stitches in turquoise thread. Intersperse with gold stitches, worked at 90° angles, and going through the roving. Then, add a line of light green straight stitches in the area between the turquoise stitches and the pink zigzag stitch.
Step 10

Embroider more decorative borders around the roving at the toe. Work a long running stitch in light green thread between the pom pom trim and the roving, then intersperse it with short vertical stitches in gold. Add hand-sewn zigzag stitch in dark pink thread to the edge of the roving, then work a row of turquoise French knots on the roving, inside each V-shape.
Step 11

Sew five crystal gems to the roving on the heel using matching thread, then repeat with the toe.
Step 12
Pin the two stocking shapes with wrong sides (WS) together and use pink zigzag stitch to sew around the edges, leaving the top open.
Step 13


Lay the cuff RS up, then position a selection of trimmings along the length in rows, leaving a 5cm (2") wide gap across the centre for the roving. Sew the trimmings in place using pink thread.
Step 14

Fold the cuff fabric in half along the length. Make 1cm (⅜") cuts along the fold, then open out.
Step 15

Thread a large yarn needle with a 1cm (⅜") thick length of roving and, starting at one end of the cuff, weave it through the cuts in the felt. Don’t pull the roving too tightly, as the idea is to create texture. Work back along the cuff in the opposite direction, going under the cuts you went over, and over the cuts you went under. Thread the needle with more roving if you run out. Weave back across the cuff a third time.
Step 16

With the cuff RS up, pin it around the top of the stocking, aligning the top edges, and positioning the two short ends so they join at the back. Sew along the top edge using pink zigzag stitch.
Step 17

Pull the cuff up and away from the stocking, WS out. Manipulate the cuff so the two short edges sit with RS together and sew. Trim away any excess roving, then turn the cuff back down onto the stocking, with RS out.
Step 18

Cut three 30cm (11⅞") lengths of yarn. Lay an A6 piece of card horizontally on a flat surface and lay the yarn vertically across one end. Wrap yarn horizontally around the centre of the card, about 80 times in total, securing the cut pieces.
Step 19

Tie a double knot in the three lengths of yarn to hold the bundle together, then trim the ends. Take the bundle off the card. Cut three more 30cm (11⅞") lengths of yarn and wrap, then tie, around the bundle, 2cm (¾") down from the knot. Cut the yarn at the bottom of the loop to make a tassel, then plait the hanging cord. Repeat with different coloured yarn to create two more tassels, then sew them onto the top of the stocking at the right-hand seam.
Step 20
Cut a 10 x 1.5cm (4 x ⅝") piece of white felt. Sew zigzag stitch along the centre of the length, then fold in half across the width. Pin the short ends inside the top of the cuff at the right-hand seam, then sew to make a hanging tab.