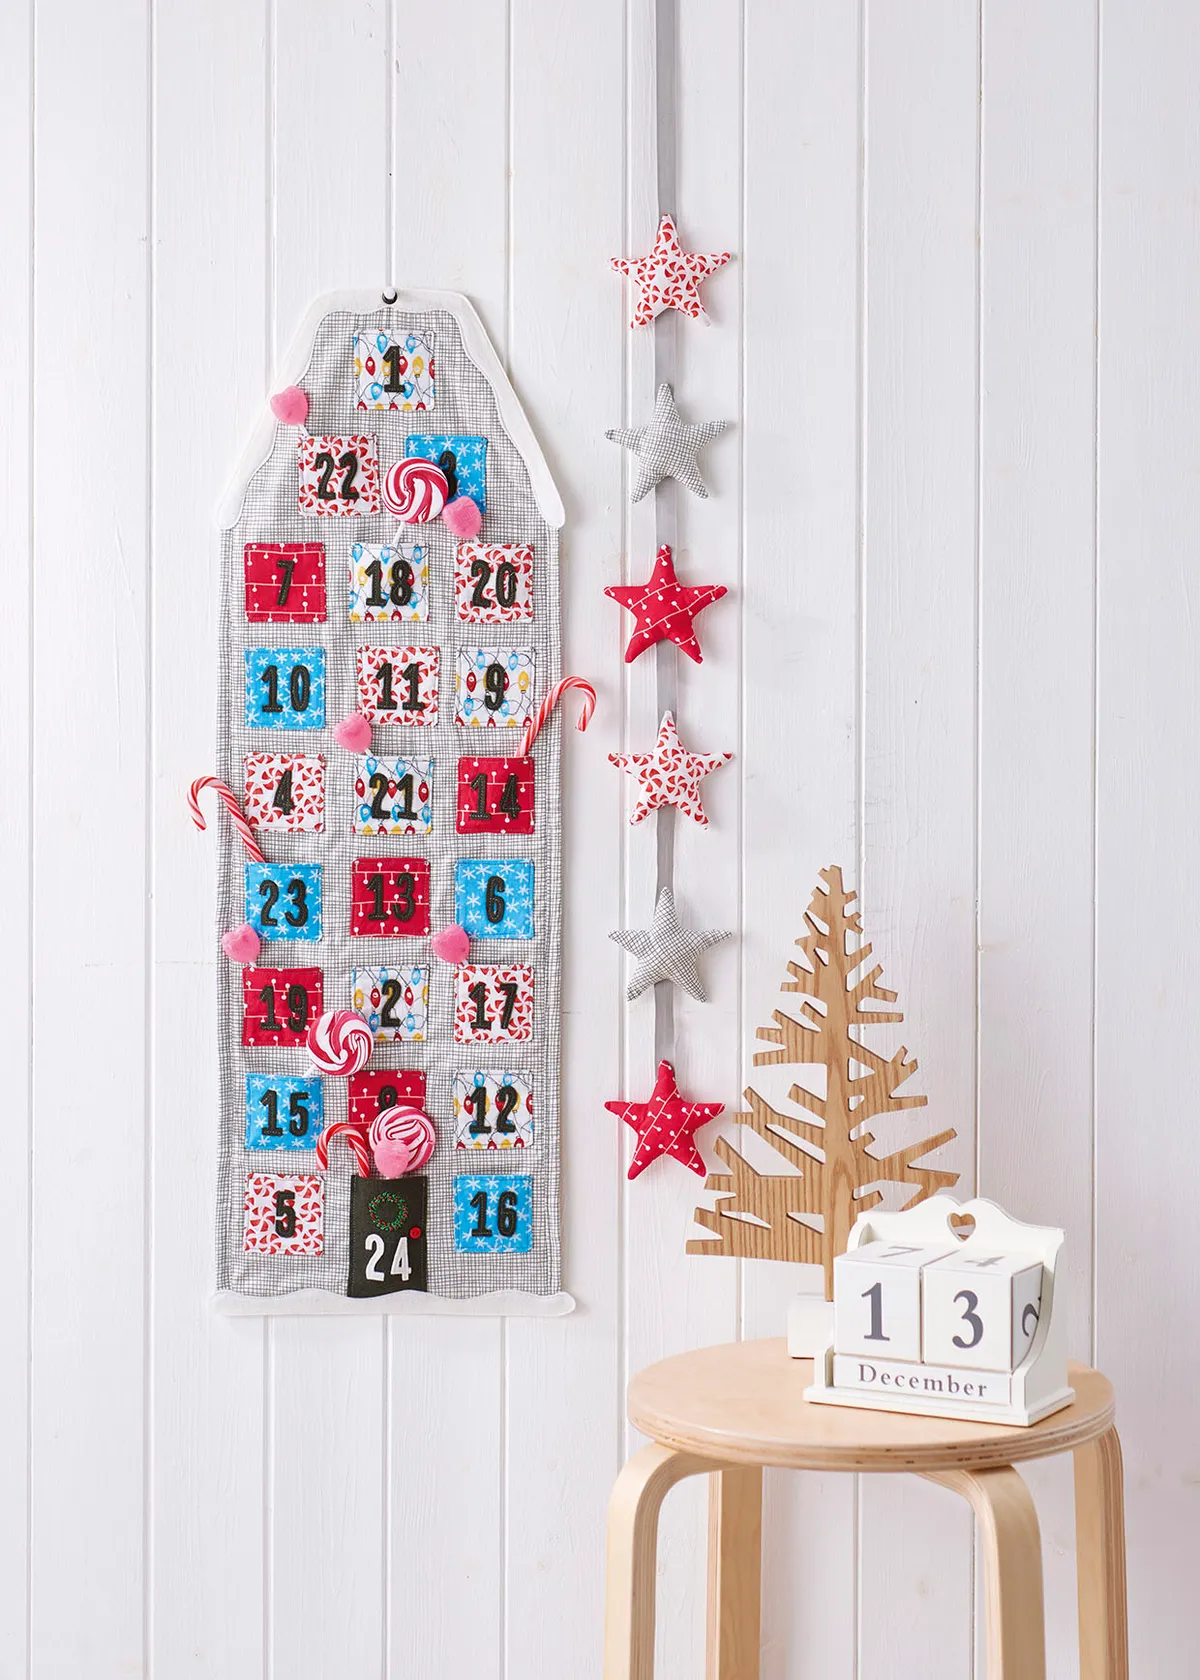
Cutting out the fabric
Step 1
Cut the main fabric into two pieces, 80x30cm (32x12in) each, for the front and back of the house.
Cut two binding strips 4x26cm (15⁄8x101⁄4in) each, for the dowel casing.
Step 2
For each window pocket cut two squares 9x9cm (35⁄8x35⁄8in). You need to cut 23 pockets so use a variety of fabrics to make them.
We used the house fabric to line the pockets but you can use the same fabrics for both the front and back of each pocket if you prefer.
Cutting out the felt
Step 1
Trace over all the numbers from the template then draw over the back of them so you have them traced in reverse.
Step 2
Place the bondaweb paper side up over the reversed numbers and trace over them.
Step 3
Iron the traced bondaweb to the felt, using charcoal for numbers 1-23 and white for number 24.
Cut out all the felt numbers along the traced lines then remove the paper backing.
Step 4
Trace the roof snow and ground snow from the template. You need to trace two of each of these onto the bondaweb but one should be the mirror image of the other so turn the traced snow over and trace the reverse for the second piece.
Press each of the snow pieces to the white felt and cut out then remove the paper backing.
Step 5
Cut a 10x6m (4×23⁄8in) rectangle of charcoal felt for the door.
Making the window pockets
Step 1
All the pockets are made in the same way and you can either appliqué the numbers on them so they are placed randomly or all in order.
Decide which fabric you want to go where and which numbers to place on them before you start making them.
Step 2
Lay the cut out felt numbers centrally on top of each piece of front pocket fabric and press into place.
Stitch your numbers in place carefully either by hand or machine.

Step 3
Take the front and back of two pocket fabrics and place them right sides (RS) together.
Stitch together all the way round the edge leaving a small gap along one side for turning.
Step 4
Clip corners then turn the pocket right sides out and press the turning gap under. Topstitch along the top edge of your pocket.

Making the door
Step 1
Press then stitch the white felt number 24 to the felt door piece following the positioning guide on the template.
Step 2
Draw a circle for the wreath on your door using white pencil.
Stitch around the circle using four strands of green stranded cotton in backstitch.
Stitch small lazy daisy stitches around the circle to form the wreath.
Stitch small red beads around the wreath to decorate.
Sew the small button into position for the doorknob.

Attaching the pockets
Step 1
Trace the outlines of the house (not including the snow) and cut it out.
Place the template centrally on the wrong side (WS) of one of the house fabric pieces, draw round it and cut it out.
Cut the other house fabric piece and the wadding to the same size using the template.
Step 2
Place one piece of cut out house fabric RS up and, following the template for positioning, place the windows and door onto the house measuring accurately to pin them into place so they run in straight lines.
Step 3
Stitch the pockets and door into place by topstitching just 2-3mm (1⁄16in) from the edge, down the sides and along the bottom.

Making the dowel casings
Step 1
Take the dowel casing fabric and turn all edges of each strip under by 1.5cm (5⁄8n) all the way round. Press.
Step 2
Pin one piece of casing to the back piece of the house 3cm (1¼in) up from the bottom and 1.5cm (5⁄8in) from both sides.
Machine stitch into place close to the edge almost all the way round, leaving one short end open.
Step 3
Repeat for the other casing strip but position this one 19cm (7½in) down from the top of the house’s roof.

Assembling the house
Step 1
Lay the house back with casing attached RS down with the wadding on top then the house front with pocket windows and door attached RS up on top, aligning all edges.
Step 2
Take one binding strip and place it RS together down one side of the house front matching raw edges.
Stitch in place all the way down the length of the house.
Step 3
Take the other strip and stitch down the other side of the house in the same way.

Step 4
Turn the binding strip over to the back of the house, turn the long edge to meet up with the line of machine stitching and top stitch into place.
Stitching the snow
Step 1
Take the roof snow pieces and place one over the top of the assembled house, bondaweb side down.
Place the other behind the back of the house, bondaweb side up following the template for the positioning and making sure they encase the cut edges of the house.
Press into place so they are bonded together.
Step 2
Topstitch the two snow pieces together all the way round close to the edge of the felt.
Bond and stitch the ground snow pieces to the bottom of the house in the same way.

Finishing off
Step 1
Cut the dowel in half then slip one length through each casing. Slip stitch the short side closed to hold them in place.
Step 2
Punch an eyelet in the top of the house in the centre of the roof and loop the ribbon through this ready to hang.