How to make paper Christmas decorations

Get your home ready for the holidays with these vintage paper Christmas decorations, easy to craft with our paper Christmas decoration templates and step-by-step guide

Published: January 13, 2020 at 11:01 am

The very best thing about paper Christmas decorations is that we have what we need to make them in our homes already – paper! These vintage paper Christmas decorations have been created by Angela Dodson to work with any paper or card you already have, combined with our paper Christmas decoration templates. Imagine how lovely these doves would look crafted out of newspaper for a really vintage paper Christmas decoration feel, or use a patterned paper you have in your stash or even upcycle old wrapping paper to add some colour and eco-craft credentials to your Christmas decor. Our paper Christmas decoration project includes instructions on how to make vintage bauble paper Christmas decorations, hanging doves paper Christmas decorations and a poinsettia ball paper Christmas decoration. You can also use the poinsettia shapes individually as tree decorations, or string them in chains for an alternative paper garland that steal the show from your average paper chain Christmas decoration! Happy Christmas crafting.

Decorative doves paper Christmas decorations

vintage paper christmas decoration doves

Make a dove paper Christmas decoration to hang on your tree, or string them vertically from a garland hanging. Our step-by-step guide shows you how to make a dove paper Christmas decoration with folded wings in flight (right), but we've included an alternative dove with flat wings (left) on our paper Christmas decorations templates. Angela has created a design that can easily be decorated to suit different colour schemes or even cut all the elements in white for a white-on-white effect.

To make dove paper Christmas decorations, you will need:

How to make a dove paper Christmas decoration

Step 1

Using the paper Christmas decorations templates, cut the following shapes for each dove

  • 2 x main body – white card
  • 2 x inner body layer – white card
  • 2 x large heart – white card
  • 2 x small heart – gold card
  • 6 x leaf shapes – green card

We've included suggestions for the colour of materials for each shape, but swap in other paper scraps and colours to make this project if you prefer!

Step 2

Using glitter glue, edge the 2 inner body layers to add sparkle to the outline, and leave to dry.

Step 3

When dry, adhere the inner body layers centrally onto the main body pieces, leave the tips of the tail and wing feathers unglued to allow them to be bent slightly with your fingers to give more dimension.

Step 4

Cover the beak section with a small piece of gold card and trim flush with body piece.

Step 5

For a folded wing, score along the wing line using a scoring board or gently crease with your fingers.

Step 6

Glue 2 leaf stalks to each of the body pieces. Layer up the gold heart and white heart and adhered in the centre of the leaf stalks, raising slightly with a foam pad if desired.

Step 7

Layer up 2 leaf pieces back to back to strengthen and glue in place behind the beak on 1 of the body pieces, create a loop of gold cord and adhere on the back of 1 of the body pieces, centrally behind the wing.

Step 8

Adhere the other side of the body in place, lining up carefully and pressing firmly all around to secure.

Step 9

To finish, add dark blue adhesive gems for eyes and crystal gems to decorate the tail pieces.

vintage Paper christmas decorations alternative dove

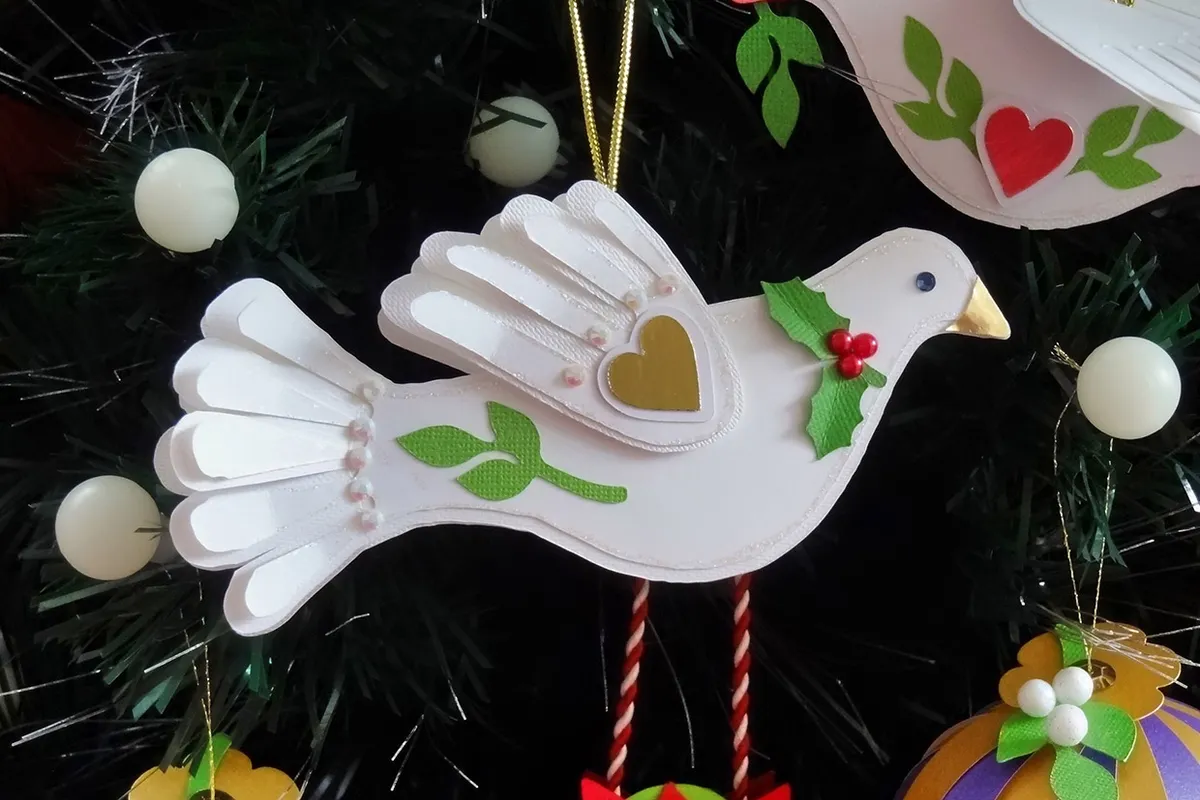
For the alternative Dove shape, simply create the dove as previous, but attach the separate wing and add the holly shapes to the neck area and the heart to the wing.

Angela Dodson

Poinsettia ball paper Christmas decoration

vintage paper christmas decoration poinsettia

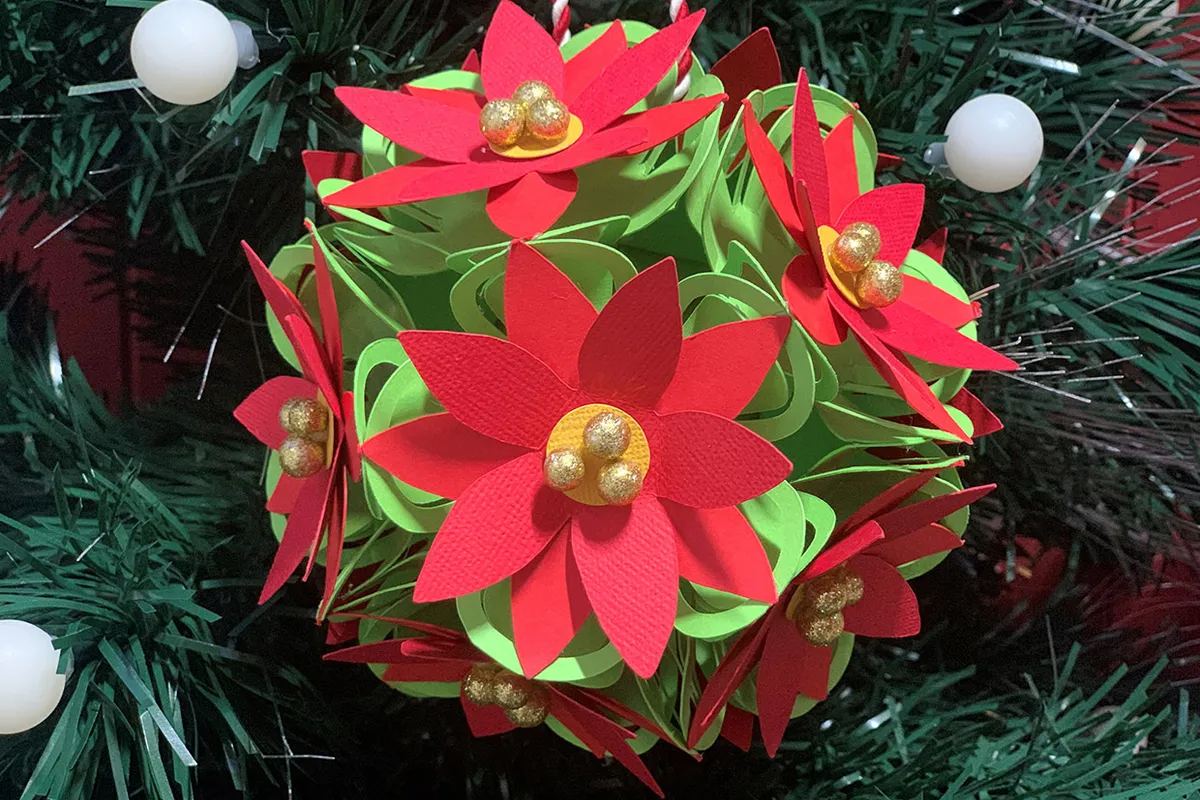
These sweet paper flowers can be glued together to make a brilliant 3D hanging ball, or string them as chains for alternative paper Christmas decoration garlands. You can use different colours to make a version for other seasons of the year. The shapes are simple enough to cut by hand using the templates, and the green connecting leaves can also be used and joined if you prefer not to have the loopy cut out parts, so it can be easily adapted. A glue gun is perfect for this project but it will also work with a good strong clear drying glue. If you prefer to use a glue, it will just take a little longer to put together – the glue gun is so much faster! To see which glue guns we like best, take a look at our Best glue gun article.

To make a poinsettia ball paper Christmas decoration, you will need:

How to make a poinsettia ball paper Christmas decoration

You will need:

  • Red, green and yellow card
  • Ribbon
  • Sequins

Step 1

vintage paper Christmas decorations step 1

Use the paper Christmas decoration templates to cut the following:

12 x large connecting flowers – green card

24 x layering flowers – red card

12 x flower centre – dark yellow card

Step 2

vintage paper christmas decorations step 2

Adhere 1 red flower on top of another, offsetting to create a layered flower

Step 3

vintage paper christmas decorations step 3

Repeat to create 12 layered flowers.

Step 4


vintage christmas decorations step 4

Take the green connecting flowers and bend up the outer looped edges towards you, and the solid petals downwards slightly, do this for all 12 green connecting flowers.

Step 5

vintage paper christmas decorations step 5

Take 1 layered red flower and place on top of a green connecting flower, glue 1 petal point of the lower red flower onto the centre of the green loop petal only.

Step 6

vintage paper Christmas decorations step 5a

Do this for all 5 red petals on the bottom layer of the flower, so each is attached to it’s green looped petal below.


Step 7

vintage paper christmas decorations step 6

Continue with the other flowers to create 12 pieces.

Step 8

vintage paper Christmas decorations 8

Take 6 of the flowers and turn upside down, place one in the centre and arrange the 5 other flowers around it so the solid green petals line up with a corresponding solid petal.

Step 9


paper christmas decorations step 9

Add glue to the end part of a green petal on the centre piece and glue a corresponding petal from another flower to it, lining up the petals, nipping together and bending to ensure they are secured. Continue to attach each flower to the centre flower.

Step 10

vintage

Now attach each of the flowers to it’s neighbouring flower using the side petals, continue until all 5 flowers are attached and the shape now resembles a half ball.

Step 11

vintage paper christmas decorations step 11

Repeat steps 8 to 10 with the remaining 6 flower pieces to create 2 half ball shapes.

Step 12

vintage paper christmas decorations step 12

Join the 2 half together in the same way as previously, simply glueing each petal to it’s corresponding petal on the other half.


Step 13

vintage

To finish, adhere a circle of yellow card and 3 small polystyrene balls, sequins or beads to each flower centre and thread with a cord or ribbon for hanging.

Vintage bauble paper Christmas decorations

vintage paper Christmas decorations baubles

These paper Christmas decorations are fun and simple enough to make using paper strips. The only issue is to ensure you use a lightweight paper and not a thicker pattern paper as that creates too much bulk and means the bauble paper Christmas decorations do not form the correct shape. They are light and can’t have too much in the way of decoration to weigh them down, so we opted for a single holly leaf or mistletoe sprig for the top cap of each. The berries are small, light polystyrene balls, coloured  with red marker for the holly berries. Beads, sequins or gems would work equally well.

To make the vintage bauble paper Christmas decoration you need:

  • Paper Christmas decoration templates
  • Gold, cream, pale blue, purple pearlescent paper
  • Green card
  • Paper straw
  • Adhesives
  • Mini polystrene balls, beads or gems, sequins
  • Gold thread & needle

How to make the vintage bauble paper Christmas decorations

Step 1

Use the paper Christmas decoration templates to cut the following for each bauble:

  • 9 x paper strips – gold pearlescent paper
  • 9 x paper strips – contrasting pearlescent paper
  • 2 x caps – gold pearlescent paper
  • 1 x leaf – green card

Step 2

Thread a needle with gold thread and double up, knotting to leave a few strands of gold thread to hang, pierce needle through centre of 1 of the cap pieces and gently push all the way through to thread it onto the end of the thread to sit on the knot.

Step 3

Thread the needle through the lower end of each paper strip in turn, (about half a centimetre from the end), alternating the colours as you go until all 18 strips are threaded.

Step 4

Cut a piece of paper straw approx 1.5” and thread the needle through it, it will sit on the threaded strips and become a spacer / support piece later.

Step 5

Now thread the other end of each paper strip back through the needle in turn, starting with the first strip and working your way through as before, they will spread out as you work to create a bauble shape.

Step 6

When you have finished threading all the strips, pull the thread so the bauble shape is supported by the paper straw inside and thread the needle through a sequin, tying to secure, don’t cut thread.

Step 7

To finish, glue a green holly or mistletoe leaf to the other gold cap piece and add 3 berries, pierce a hole in the cap with the needle and thread it onto the gold thread, followed by another gold sequin, secure in place with a gentle knot. Remove needle, tie ends of gold thread to create hanging loop.