Découpage is great fun, and anyone can do it! You don't need to be super neat when creating découpage items (although you can if you want to be), and découpage paper comes in such a huge array of patterns and colours, there is plenty to suit any style. In this article, we've put together a selection of easy découpage ideas, all you need to get started is some découpage paper, some PVA glue (or découpage glue), some white paint (acrylic is best) and something to découpage.
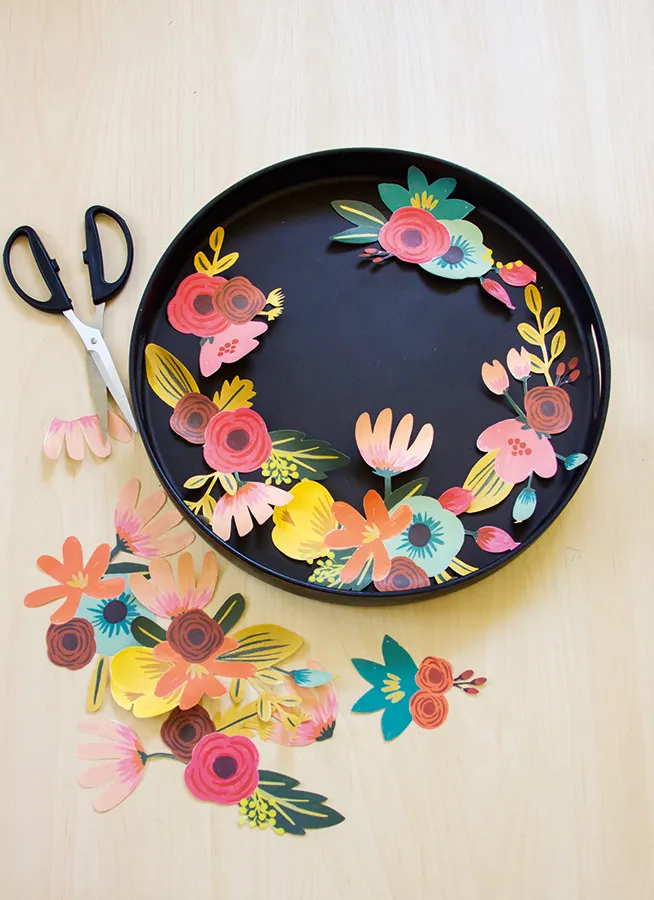
Check out our upcycling projects and papercraft projects for more creative projects. If you would like to know how to treat a wooden surface and how to découpage a table, check out our complete beginner's guide on how to decoupage, and we love this easy DIY découpage tray by Suzonne Stirling!
If you make any of these découpage ideas, don’t forget to share your projects with us on Facebook and Twitter, too - we love to see what you make!
Easy découpage ideas
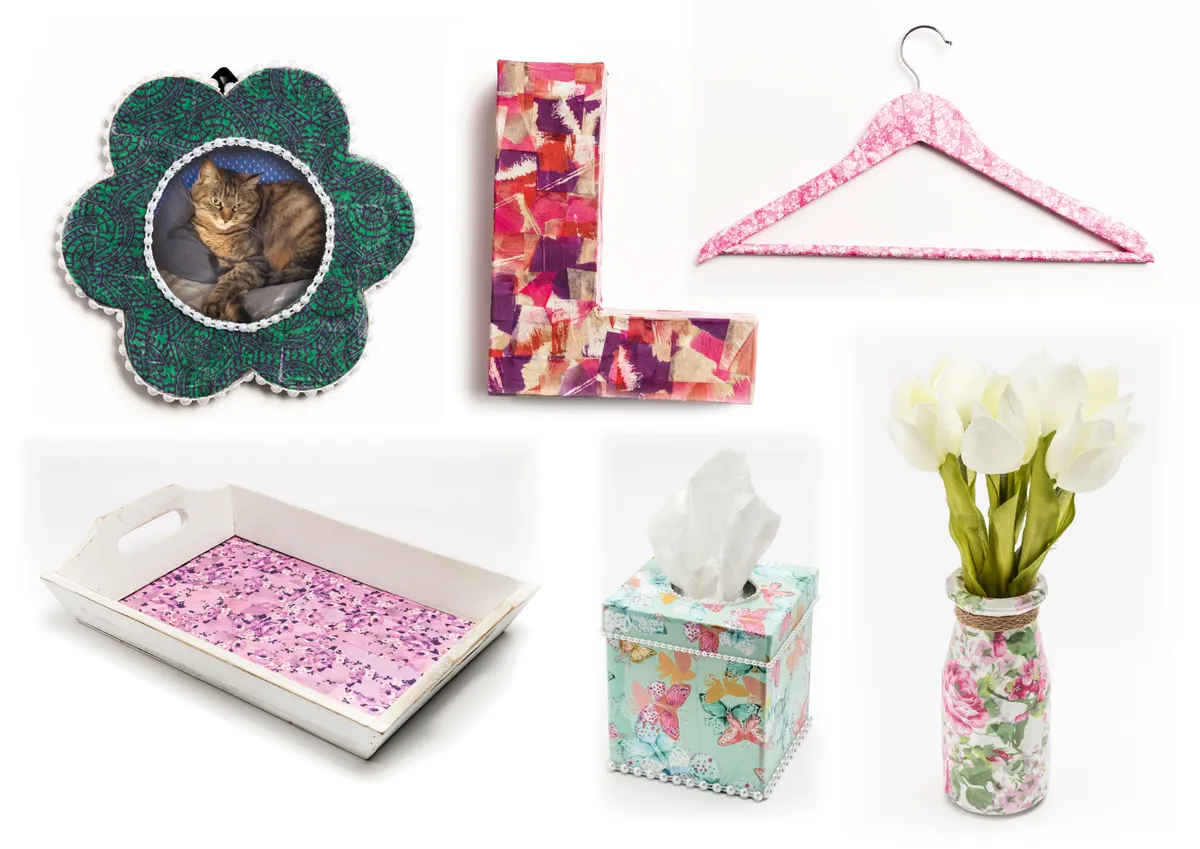
These découpage ideas have been designed by Hazel France and are ideal if you are looking for quick and easy découpage ideas - they won't take long to complete, so are a quick way to brighten up the home.
Découpage ideas: Photo frame

- Paint an old picture frame, or paper mâché picture frame with a coat of white acrylic paint or Gesso, and leave until thoroughly dry. The white undercoat will help the colours of the découpage paper to be more vibrant.
- Tear small pieces of découpage paper and stick them to the picture frame by painting on a layer of glue, then adding the paper on top followed by another layer of glue.
- When the frame is covered, add another layer of glue on top to ensure the paper is sealed.
- Once dry, attach pearl strings around the picture frame and the aperture. If you don't have pearl strings you could use adhesive pearls, ribbon, lengths of lace or even puffy paint!
- Find a picture to display in the photo frame!
Découpage ideas: Initial

- Tear the découpage papers into small pieces and stick to a paper mâché letter by painting on a layer of glue, then adding the paper on top followed by another layer of glue.
- When the letter has been covered, add a further layer of glue on top to ensure the paper is sealed.
- Make just one paper mâché letter - or why not go for initials or even a whole name? We love the idea of celebrating birthdays by decoupaging numbers.
How to découpage a glass bottle

- Paint a glass bottle with a coat of white acrylic paint or Gesso and leave until thoroughly dry.
- Cut various sized strips of découpage paper and stick them to the bottle by painting on a layer of glue, then adding the paper on top followed by another layer of glue. When the bottle has been covered, put a further layer of glue on top to ensure the paper is sealed.
- Once dry, add a length of jute ribbon around the neck of the bottle.
- Place faux flowers in the bottle for decoration.
Découpage ideas: Coat hanger

- Paint a wooden coat hanger with a coat of white acrylic paint or Gesso and leave until dry.
- Cut strips of découpage paper and stick to the hanger by painting on a layer of glue, then adding the paper on top followed by another layer of glue.
- When the hanger has been covered, put a further layer of glue on top to ensure the paper is sealed.
- Wait until fully dry before using to hang your clothes.
Découpage ideas: Tea tray

- Paint a tea tray with a coat of white acrylic paint or Gesso and leave until thoroughly dry.
- Once dry, sand around the edges to give a distressed finish.
- Cut small square pieces of découpage paper and stick them to the bottom of the tea tray, choosing whether or not you want to overlap them (it's down to personal preference - what look do you prefer?).
- Paint on a layer of glue, then add the paper on top followed by another layer of glue.
- When the tea tray has been covered, put a further layer of glue over the top to ensure the paper is sealed.
Découpage ideas: Tealight holder

- Paint an MDF tea light holder with a coat of white acrylic paint or Gesso and leave until dry.
- Measure and cut single sections of découpage papers for the top of the holder and the sides. Stick to the tealight holder by painting on a layer of glue, then adding the paper on top followed by another layer of glue.
- Leave to dry before cutting the holes for the tea lights.
- When the tea light holder has been covered, put a further layer of glue on top to ensure the paper is sealed.
Découpage ideas: Jewellery box

- Fussy cut some sections of découpage paper and stick to the box lid by painting on a layer of glue, then adding the paper on top followed by another layer of glue.
- Glue pearl strings around the lid.
- Attach some lace around the box base. If you don't have any lace - use ribbon!
- Apply adhesive pearls (we've gone for small pink flower embellishments) to the box base to finish.
Découpage ideas: Tissue box

- Paint an old tissue box, or paper mâché tissue box with a coat of white acrylic paint or Gesso and leave until dry. (Don't worry if the tissue box feels flimsy - by adding the découpage paper and glue it will firm up.)
- Measure and cut sections of découpage paper and stick to the tissue box by painting on a layer of glue, then adding the paper on top followed by another layer of glue.
- When the tissue box and lid are covered, put a further layer of glue on top to ensure the paper is sealed.
- Once dry, attach pearl strings to the lid, the lid opening and the bottom of the box.
Découpage ideas: Birthday card

- Attach a 140mm square of lilac colour card to a 150mm square black base card.
- Cut a 132mm square of white card and stamp or print a sentiment at the bottom. Draw faux stitching around the edge, then attach it to the base.
- Use the free decoupage birthday card template to make a small gift bag from some black card. Wrap some silver wire around a knitting needle to make a handle, bend and attach through two holes on the front of the bag. Decorate with small flower embellishments and attach to the base.
- Cut a small rectangle of découpage paper, scrunch it slightly, then glue it in the top of the gift bag.
Découpage ideas: Gift tag

- Cut a 60 x 120mm tag from of sturdy white card (cut a 60 x 120mm rectangle and just snip the top two corners off).
- Coat the tag with glue, and place the découpage paper on top followed by a further layer of glue.
- Once dry, trim off the excess paper.
- Stamp a sentiment onto a 60 x 30mm piece of white card and attach it to the bottom of the tag. Add a pearl string above and below the sentiment to accentuate it.
- Tie a piece of ribbon through the hole.
Loved these découpage projects? Check out our tutorial on how to découpage a table or why not test out your fussy cutting skills with this beautiful découpage tray.