DIY polar bear cards

These DIY polar bear cards offer a wintry alternative to traditional Christmas cards - there are four designs to inspire you, which will you choose?

Try our magazines – get 6 issues from just £9.99!

Published: November 1, 2021 at 6:43 am

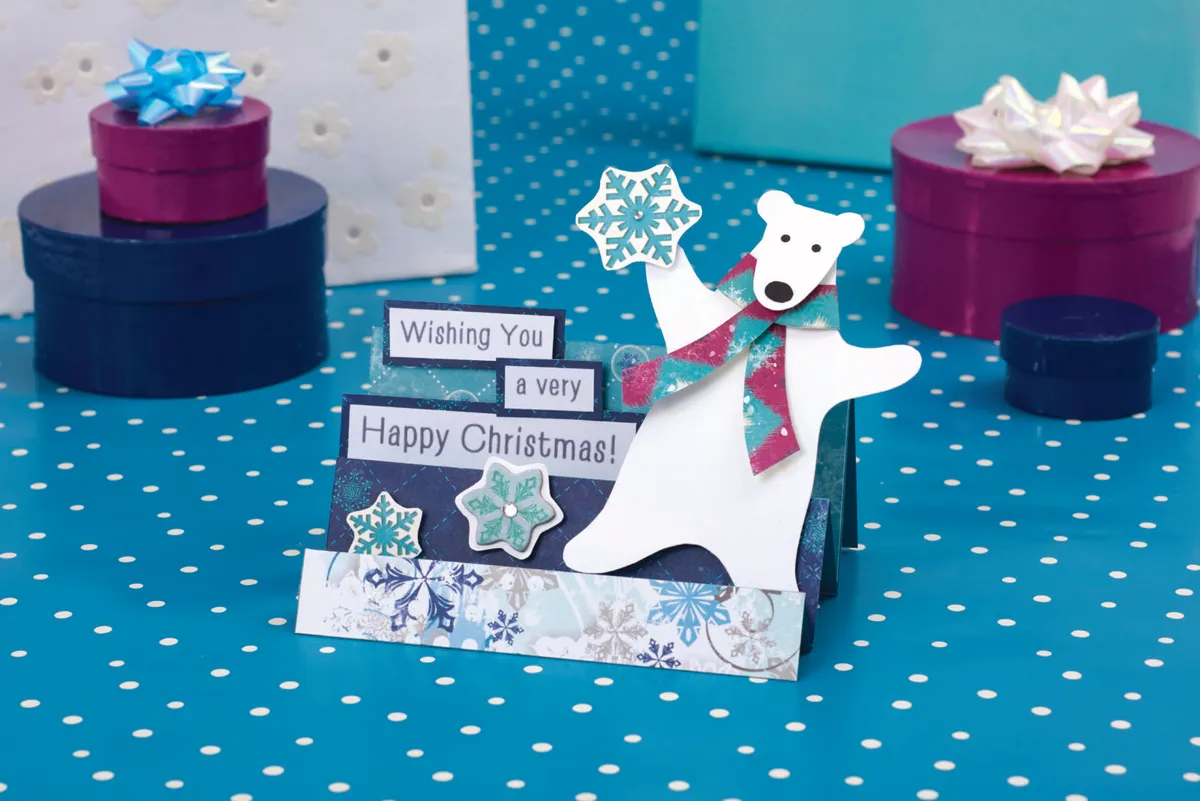
Make these fun polar bears using our free templates! Have fun dressing up your bears with some funky patterned scarves – you could try making matching hats and mittens for them as well.

Want some free patterned paper to make your polar bear cards? Take a look at our ever-growing collection of free patterned papers, there are lots to choose from and there are lots of different themes – we love these Northern Lights papers, or how about these White Christmas papers?

If you’re in a crafty mood, why not check out the best glue gun and best die-cutting machine. Thinking about buying a craft printer? Check out our review of the best printer for card making.

We love seeing what you make one of our projects, so don’t forget to share your cards and papercraft projects with us on Facebook and Twitter, too!

You will need:

Try these DIY polar bear cards

1. Zig zag polar bear card

How to make a DIY polar bear card

Step 1

Trace the polar bear template onto card then cut it out to make a template 16.5cm in length. The same outline can be photocopied to make templates in different sizes.

How to make a DIY polar bear card – step 1

Step 2

Place the polar bear template onto white card. As the head will be folded down, work out which side you would prefer the texture to show. Draw around the template then cut it out.

How to make a DIY polar bear card – step 2

Step 3

Score a straight line along the top of the body. Turn the card over, score the bottom of both ears and where the arms meet the body. Fold along the scored lines.

How to make a DIY polar bear card – step 3

Step 4

Cut out the three pieces for making the scarf. Glue the rounded piece across the neck, then stick the two longer pieces on top. Fix a sticky foam pad under the bear’s head.

How to make a DIY polar bear card – step 4

Step 5

Fold the head down onto the foam pad.

Cut out a black nose and glue it onto the face with eyes made using a small-sized punch or a black pen. Fix a snowflake on the bear’s paw.

How to make a DIY polar bear card – step 5

Step 6

Cut blue card to 15x28cm. Measure six strips – 7cm, 7cm, 4.5cm, 4.5cm, 2.5cm and 2.5cm. Score the first line, turn over and score the back, alternating each time. Fold the lines.

How to make a DIY polar bear card – step 6

Step 7

Measure and cut three strips of patterned paper to fit the card’s front-facing folds. Use a different paper for each strip to give the card more variation. Stick in position on the card.

How to make a DIY polar bear card – step 7

Step 8

Fix the bear onto the middle ‘peak’ with foam pads. Put a message onto the back peak (check it can be seen when the card stands up).

Add two snowflakes to the middle peak to finish. 

How to make a DIY polar bear card – step 8

More DIY polar bear cards!

2. Easy polar bear card

How to make a DIY polar bear card = easy polar bear card

A big bear with the arms up makes a friendly glove puppet-style character. You could add a speech bubble next to the head too.

3. Polar bear card: polar pals

How to make a DIY polar bear card – Polar Pals

Use a scaled-down template to make two small polar bears. A circle cut from background paper makes a handy frame shape.

4. Polar bear card: Jumping for joy

How to make a DIY polar bear card – jumping for joy

Placing the bear at an angle on the background creates a feeling of movement. Use large embellishments like the chipboard snowflake for a stronger design.


We hope you enjoyed this inspiration for polar bear cards. If you are looking for more polar bear inspiration, take a look at these chocolate coin cards (there’s a polar bear card!), or this gorgeous polar bear knitting pattern.