Woodland children's quilt pattern

Keep kids snug and spark their imaginations with Laura Pritchard’s Scandi, woodland children's quilt pattern.

Try 6 issues of your choice of craft magazine from just £9.99

Published: March 23, 2021 at 10:04 am

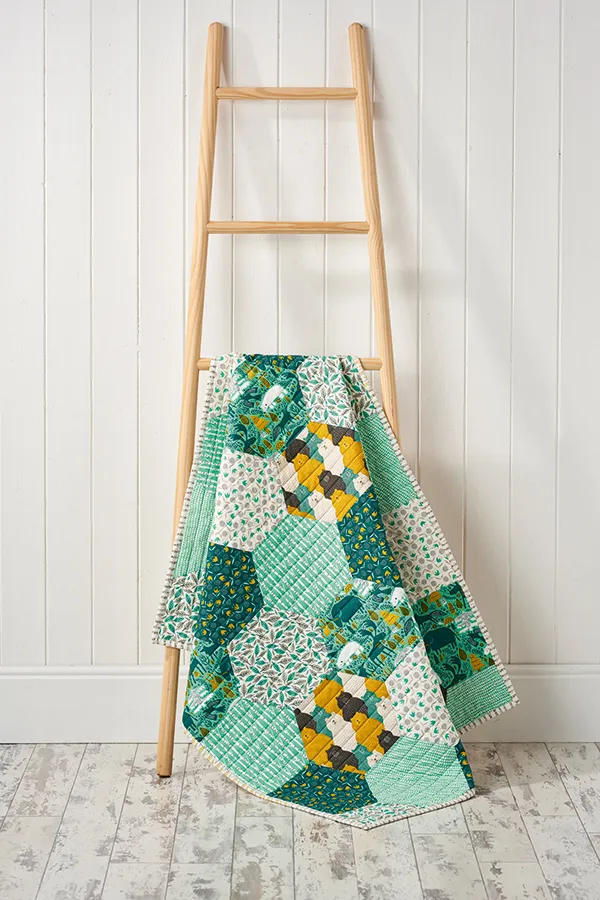
If the thought of sewing a gorgeous heirloom quilt has always appealed, this mini version for kids is a fun starting point. And, they’ll love the fact it doubles up as an instant woodland den.

The smaller size makes for an easy way to get to grips with techniques such as joining hexies and adding binding, plus you’ll finally have an excuse to use those fat quarters you’ve got squirrelled away.

This project was created by Laura Pritchard for Mollie Makes magazine. For more easy-make craft projects and creative inspiration, subscribe to Mollie or click here to find out more.

Materials

  • Download the templates for this project from issue 84
  • One fat quarter each of Moda Fabrics Big Sky by Annie Brady in Montana in Azure (Fabric A), Tulip in Azure (Fabric B), Leaf in Azure (Fabric C), Grizzly (Fabric D), Dot in Azure (Fabric E) and Birch in Azure (Fabric F)
  • Two fat quarters of Moda Fabrics Big Sky by Annie Brady Tulip in Teal (Fabric G)
  • Backing fabric, 1m (393/8")
  • Binding fabric, 50cm (193⁄4")
  • Matching sewing thread
  • Wadding, 85 x 105cm (331⁄2 x 413/8")
  • Cardboard
  • Rotary cutter
  • Cutting mat
  • Fabric marker

Children's quilt pattern

childrens quilt pattern

If you're new to quilting then make sure you head to our quilting for beginners guide!

You will need:

  • Fabric
  • Sewing machine
  • Thread

Step 1

childrens quilt pattern step01Using the template, cut a hexagon shape from cardboard. Trim the raw edges from all the fat quarters. Cut four hexagons each from Fabrics A-F, and five hexagons from Fabric G. Be sure to cut all the hexagons in the same direction on the fabric.

Step 2

childrens quilt pattern step03

Pierce the dots on the template with a pin, then use it to mark a dot on the back of each hexagon through the holes. This will mark on the 0.5cm (1⁄4") seam allowance.

Step 3

childrens quilt pattern step05

Cut the hexagons in Fabrics B, C, E and G in half horizontally, from point to point. Lay out the whole hexagons in five columns of five, using the guide opposite for placement, then add the half hexagons to the top and bottom rows to create flat edges.

Step 4

childrens quilt pattern step06

Take two whole hexagons from the top left corner of the layout and, with right sides (RS) together and edges aligned, pin.

Step 5

childrens quilt pattern step07

Sew along one edge, starting with the needle in one dot, and going no further than the opposite dot, backstitching to secure the thread. Open out, then continue to add the rest of the hexagons to the column in the same way. Repeat with the remaining four columns.

Step 6

childrens quilt pattern step08

To join the columns together, align the side of one hexagon column with another. With RS together, pin one hexagon edge and sew from dot to dot, securing the ends with backstitch. Open up and line up the next two edges, folding the previous hexagon in half to get them to meet correctly. Pin and sew, taking care not to sew past the dot, or the fabric will pucker

Step 7

childrens quilt pattern step09

Continue to join the columns as per Step 6 until the quilt top is complete. Press the seams on the wrong side (WS) of the quilt top, then turn over and press the RS.

Step 8

childrens quilt pattern step10

Using the quilt top as a template, cut a piece of backing fabric measuring 10cm (4") larger than the quilt top on all sides. Lay it RS side down, then place the wadding on top, and add the quilt top RS up. Pin all three layers together, then quilt by stitching straight lines 2.5cm (1") apart, using a walking foot. Trim the quilt edges.

Step 9

childrens quilt pattern step12

Cut the binding fabric into five 6.5cm (23/8") x width of fabric strips. Place two strips with RS together and sew along one short end to join, then add the remaining strips in the same way to make one long length of binding. Press open the seams, then fold in half along the length with WS together and press.

Step 10

Starting 20cm (77/8") in from one end of the binding, and at the middle of one quilt edge, pin the binding to the back of the quilt with RS together, aligning the raw edges. Sew using a 0.5cm (1⁄4") seam, stopping 0.5cm (1⁄4") in from the first corner.

Step 11

childrens quilt pattern step13
childrens quilt pattern step14

Rotate the quilt to prepare for the next edge. Fold the binding upwards so the raw edge is in line with the quilt edge, then hold in place with your finger. Fold the binding directly down, aligning the fold with the top edge of the quilt. Pin in place. Continue sewing the binding to the next edge of the quilt as per Step 10, repeating Step 11 on all three remaining corners.

Step 12

childrens quilt pattern step15

Trim the two ends of the binding so they overlap by 0.5cm (1⁄4"). With RS together, sew, press the seam open, then sew the rest of the binding with a 0.5cm (1⁄4") seam. Fold the binding over to the front of the quilt, keeping the raw edge tucked under, then top stitch the folded edge of the binding to finish.

We hope you enjoyed making Laura’s project. Share a picture of your children’s quilt pattern with us on Instagram using #molliemakers, and don’t forget to subscribe to Mollie Makes to get creative inspiration delivered to your door every month! We also have plenty more  beginners quilting patterns right here on Gathered for you to make.

childrens quilt pattern LauraPritchard

Laura Pritchard

Laura has been sewing since she was a child, and quilting for most of her adult life. She always has a project on the go, but when she’s not working with fabric, you’ll find her poring over interior design blogs, or chilling with her two cats and three chickens.