All products were chosen independently by our editorial team. This review contains affiliate links and we may receive a commission for purchases made. Please read our affiliates FAQ page to find out more.

DIY Honey Bee Patchwork Banner

Paper Piece some bright honey bees and a cheery sentiment to bring a little buzz to your home décor with Susi Bellingham's patchwork bee banner

Try 6 issues of Love Patchwork & Quilting magazine for £9.99| SAVE 76%

Published: May 3, 2021 at 3:06 pm

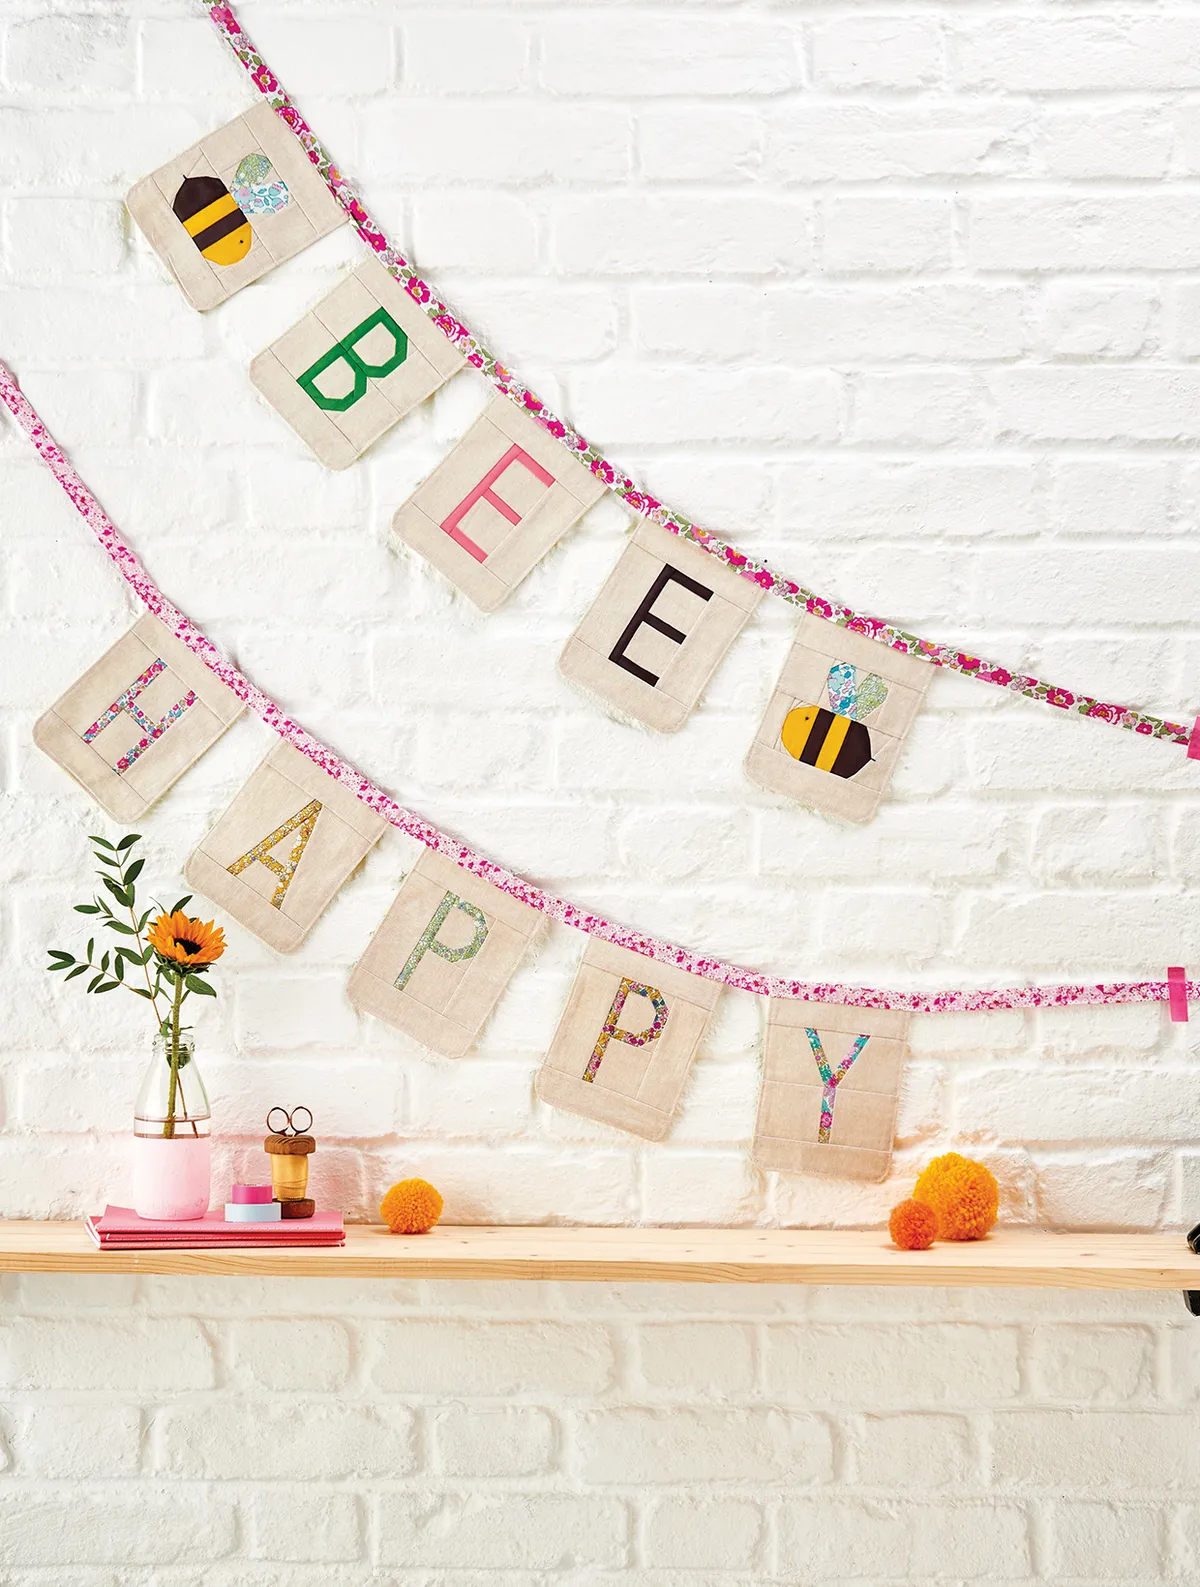
Practise your patchwork skills and sew up some sweet bunting with our free guide to how to make Bee bunting! We've got a free template below, and step by step instructions for how to make your very own honey bee wall hanging. You can adjust this project to customise it for your occasion – stitch extra flags to make your bunting double sided or longer, or back it with a sweet print! Your finished garland would make a lovely wedding or party decoration, or sew it to brighten up a plain wall of your home.

The letters and bees in this project are made using a technique called foundation paper piecing. It's a magical method where you sew tiny scraps of fabric to a paper template (using our free download below) to create intricate patterns and shapes from patchwork. It's one of our favourite ways to use up fabric scraps. If you're new to FPP, see our guide to how to do foundation paper piecing and we'll talk you through it. Once you've caught the FPP bug, you might also like these free foundation paper piecing patterns.

You'll find it helps if you cut out your pieces as you work, using a generous ½in seam allowance. Then trim the seam allowances back after sewing each line. If you want to make a larger quilt, you could easily adjust our free bee paper piecing template below to make a full size honey bee quilt pattern with lots of smaller bee quilt blocks.

This project was designed by Susi Bellingham for Love Patchwork & Quilting magazine. See more of Susi's work on her website tinytoffeedesigns.blogspot.de

Project supplies

  • Assorted scraps for bees and letters
  • Background fabric: ½yd
  • Backing fabric: ½yd
  • Binding fabric: two (2) 2½in x 42in strips
  • Dark blue embroidery thread
  • Sewing machine (see our guide to the best sewing machines for quilting)

Fabrics used

Free honey bee patchwork templates

Download our free Bee Foundation paper piecing templates (PDF)

You'll need to download one (1) copy each of

  • Letter templates B (Section A and B)
  • H, A and Y (Section A and B)
  • Left and Right Bee templates (Section A and B)

Plus Two (2) copies each of the Letter templates E and P

Finished size

42in per strip of bunting

Notes

  • Seam allowances are ¼in, unless otherwise noted.
  • Press seams to the side, unless otherwise instructed.
  • FPP = Foundation Paper Piecing.
  • FPP templates include seam allowances around the outer edge only.
  • For FPP, set your stitch length to 1.5.
  • Fabrics supplied by Alice Caroline (alicecaroline.co.uk) and Sew Hot (sewhot.co.uk)

Honey Bee bunting tutorial

How to make honey bee quilt pattern bunting

You will need:

  • Fabric (See fabric requirements)
  • Embroidery Thread (Dark blue)
  • Sewing machine
  • Paper

Cutting out

Step 1

Using the template as a guide, cut the fabric pieces for each section of the FPP template, making sure the pieces will be at least 1/4in larger than the section they will cover, all the way around.

Piecing the bees

Step 1

Foundation Paper Piece Section A as follows. Place the fabric piece for Section 1A right side up on the unprinted side of the template against the section. Ensure that the fabric covers the whole section, plus at least ¼in all around. Pin in place.

Step 2

Place the Section 2A fabric piece right side down on top of the Section 1A piece, matching up raw edges on the side where Sections 1 and 2 will be joined and making sure that when folded back along the seam line, Section 2 will be covered by the fabric plus at least ¼in all around. Pin in place.

Step 3

Turn the template over to the printed side and stitch along the marked line between Sections 1 and 2, backstitching at the beginning and end of the seam.

Fold the template away from the seam and trim to ¼in. Fold the template back, turn the work to the fabric side, flip Section 2 open and then press

Step 4

Continue working in this way to piece the remaining sections on the FPP template, in numerical order. Trim along the dotted seam allowance line.

Step 5

Repeat steps 2–5 to piece each of the template B Sections 1–10. Pin together completed Sections A and B, carefully matching points. Return your stitch length to its normal length for piecing. Sew the pinned Sections A and B together. Remove the paper from back of the bunting flag and press the seam open.

Piecing the letters

Step 1

Follow the method outlined in steps 2–6 to FPP each of your letter bunting panels. Make one of letters B, H, A and Y, and two of E and P.

DIY Patchwork banner detail

Assembling the bunting flags

Step 1

Add any embroidered details to your bunting flags. Susi embroidered the bees’ eyes with French knots, and made a bee sting with a simple
running stitch.

Honey bee patchwork pattern

Step 2

Using the outer edge of one of your completed bunting flags as a template, cut the pieces from your backing fabric. Lay one on top of a pieced bunting flag, right sides together (Fig A). Sew around the edges, leaving the top edge open for turning.

Bunting Flags Figure A
Figure A

Step 3

Clip notches in the curved section of the seam and trim the seam allowance near the top (Fig B).

Bunting Flags Figure B
Figure B

Turn right side out and press. Topstitch around the sewn edges with a /in seam allowance. Repeat steps 9–10 with all of your bunting flags (Fig C).

Bunting Flags Figure C
Figure C

Finishing the bunting

Step 1

If you want one long strip of binding, join the strips together end-to-end, using diagonal seams. Otherwise keep your two binding strips separate. Press the seams open and trim any dog ears. Fold the binding strips in half lengthways, wrong sides together, and press. Fold
the edges in to meet the centre fold and press again.

Step 2

Find the middle of your binding strips by folding in half and finger pressing. Arrange your bunting flags across the binding strips, starting in the centre and working outwards on either side, taking care to leave approx. 1½in between each bunting flag.

Step 3

Insert the top of each flag inside the binding fold and pin in place. Topstitch along the binding strips with a 18in seam allowance to secure your
flags in place.

Bumble Bee Banner DIY