When we first featured Gracey Larson's Gingerbread Quilt we threw a Christmas quiltalong to celebrate. We fell in love with it so much that now we're bringing you this bonus mini quilt pattern – get ready for some scrumptious sewing.
Piece together simple shapes to sew this fun festive mini quilt filled with sweet details. Gracey Larson has designed this sweet quilted hanging for Love Patchwork & Quilting magazine and it's the perfect way to sew a modern seasonal quilt to add a home-made touch to your Christmas traditions. One of our favourite things about this quilt pattern (apart from the fact it makes us want to watch Elf and eat gumdrops as we make it) is that it's traditionally pieced – so you don't need to be a pro quilter to be able to make the quilt blocks in the design – it's surprisingly easy to sew for confident beginners.
This mini quilt is the latest addition to our quilting patterns collection – it's a small-scale version of a larger row-by-row design that we first featured back in issue 66, and some of our favourite quilt designers joined us for a Quilt Along last Autumn.
If you're new to quilting, check out our quilting for beginners guide and tutorial for how to bind a quilt. Scroll down for more on the original full-sized quilt or find Gracey's step by step guide to how to make a Gingerbread Christmas mini quilt below.
Throughout piecing, you will need to make Corner Square Triangles (CSTs). To sew a CST, place a square in the corner of a fabric piece, RST, as instructed. Draw a diagonal line on the wrong side of the square, referring carefully to figures for direction. Sew along the diagonal line. Trim the seam allowance to ¼in and press the piece open to complete.
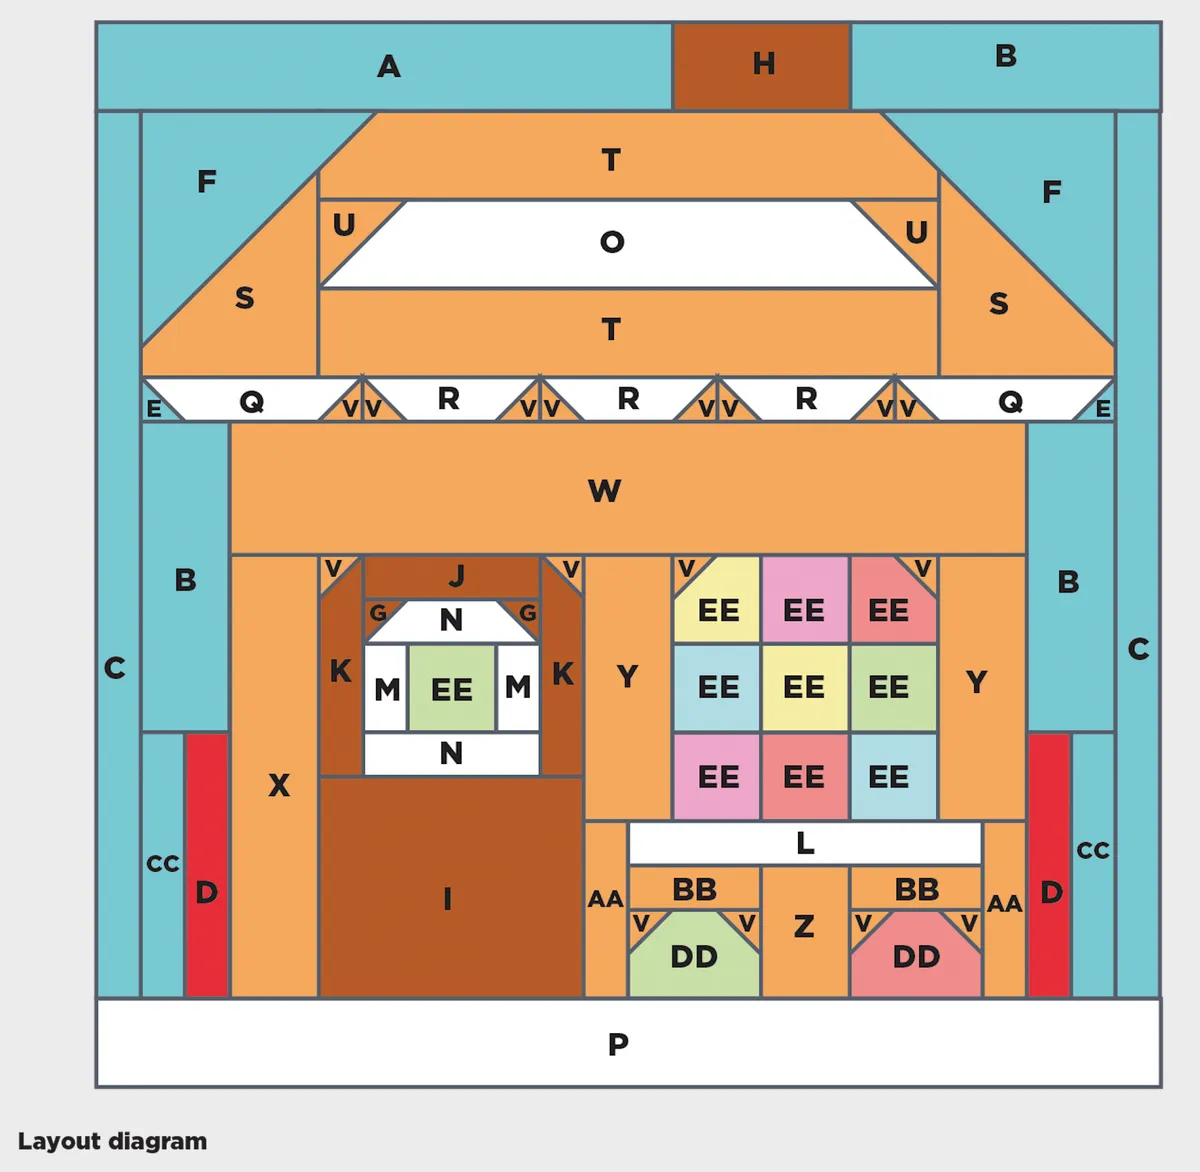
Piecing the gingerbread house block
Step 1
Join A to the left side of H and join B to the right side of H to form the chimney unit (Fig 1).
Figure 1
Step 2
Join a U CST to the top left and top right corners of O, referring to the CST instructions above. Join T to the top and bottom of O. Join S to the left and right sides of O. Join an F CST to the top two corners (Fig 2).
Step 3
Join an E CST to the bottom left corner of Q. Join a V CST to the bottom right corner of Q. Repeat these steps on the opposite corners of the remaining Q piece. Add V CSTs to both bottom corners of each R piece. Join into one strip, aligning the QSTs as shown (Fig 3).
Step 4
Join the units from the last two steps to form the roof (Fig 4).
Step 5
Join M to either side of EE. Join N to the top and bottom, then join a G CST to the top two corners (Fig 5). Join J to the top, and K to either side. Add a V CST to the top two corners (Fig 6).
Step 6
Join I to the bottom of the unit. Then join X to the left side to complete the door (Fig 7).
Step 7
Join the remaining nine EE pieces in three rows of three. Join the three rows, then add V CSTs to the top two corners. Join Y to either side (Fig 8).
Step 8
Join a V CST to the top left and top right corners of each DD piece. Join BB to the top of each DD piece. Join the two units with Z in between. Join L to the top, then join AA to either side (Fig 9)
Step 9
Join the units from the last two steps, then join the door to the left side. Join W to the top to form the house unit (Fig 10).
Step 10
Join each CC piece to a DD piece along the long edges. Join a B piece to the top of each one, making sure to form two mirror image units (Fig 11). Join these to either side of the house unit.
Step 11
Join the house unit to the bottom of the roof unit. Join C to either side. Join the chimney unit to the top, and join P to the bottom to form the finished quilt top.
Quilting and finishing
Step 1
Press the quilt top and backing well. Make a quilt sandwich by placing the backing fabric right side down, the batting on top, then place the quilt top centrally and right side up. Baste the layers together using your preferred method.
Step 2
Quilt as desired. Annie (search Annie Leighs Sew Happy on Facebook) quilted straight lines vertically, horizontally and diagonally through the middle of each row. Trim off the excess batting and backing fabric and square up the quilt.
Step 3
Sew the binding strips together end-to-end using diagonal seams. Press the seams open. Fold in half lengthways, wrong sides together, and press.
Step 4
Sew the binding to the right side of the quilt, creating a neat mitre at each corner. Fold the binding over to the back of the quilt and hand stitch in place to finish.
Where can I get this quilt pattern?
If you haven’t seen it before, here’s Gracie’s original Gingerbread House Quilt; a row-by-row design made up of a collection of super cute quilt blocks. They’re all traditionally pieced so very beginner friendly. Follow the hashtag #gingerbreadqal to keep up to date with everyones’ versions of this quilt.
If you want to make the full project, find our complete instructions for how to sew your own Gingerbread Quilt in our issue 66 of Love Patchwork & Quilting magazine, which is still available as a digital issue.
Master of all things ridiculously cute, Gracey designs sweet patchwork blocks using traditional piecing methods. She designs and sells her own quilt patterns, as well as fabric for Riley Blake Designs. Her quilts have been regularly featured in Love Patchwork & Quilting magazine. She released her first book, Patchwork Picnic, with Martingale in 2019, featuring 30 simple-to-piece quilt blocks to sew, inspired by the outdoors. See more of her work on her website burlapandblossompatterns.blogspot.com
This website is owned and published by Our Media Ltd. www.ourmedia.co.uk