How to make a Christmas patchwork cushion

Feeling the pressure to whip up something stitched this year? How about our quick patchwork cushion by Judith Dahmen?

Try 6 issues of Love Patchwork & Quilting magazine for £9.99| SAVE 76%

Published: December 8, 2020 at 8:09 am

Good news people! You don't need weeks of prep to whip up this quick Christmas patchwork cushion? We'll show you how to create a home-sewn touch of magic to your Christmas decor, step by step. And if you were thinking of something a little larger scale, why not try Judith's matching Christmas trees quilt pattern? Rummage in your fabric stash for scraps of reds, greens and low volume blenders and we're here to help you transform your offcuts into clever Christmas tree cushions. The Christmas tree on the front of this Christmas cushion cover is sewn together using a technique called Foundation Paper Piecing. If you haven't come across this method before it's a clever way of sewing shapes neatly together on to a paper template.

We think of it as quilter's witchcraft in the best possible way! Check out our Beginners guide to Foundation Paper Piecing to learn the ropes. For more festive fun, head to our round up of our favourite Christmas quilt patterns or try our Christmas Tree Skirt Pattern. And for more festive quilt inspiration, how about this free snowflake quilt block pattern?

How to make a Christmas patchwork cushion

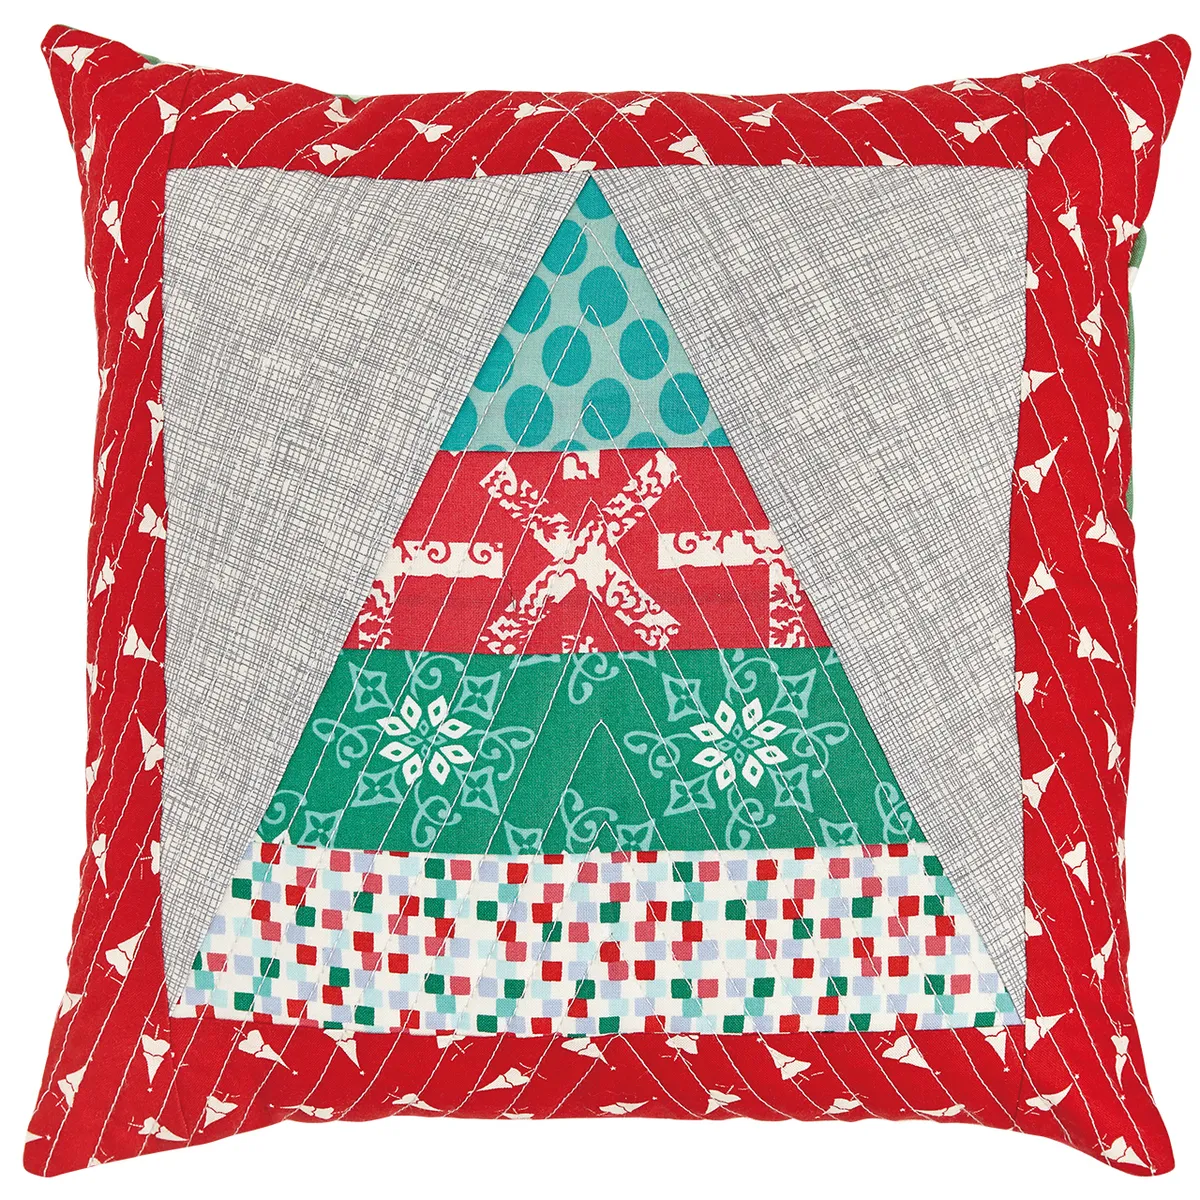
How to make a Christmas tree patchwork cushion.

This patchwork pattern was designed by Judith Dahmen and was first published in Love Patchwork & Quilting magazine.

Fabric requirements

  • Four (4) print fabrics (see Step 1)
  • Background fabric for the block, one (1) fat quarter
  • Border fabric, one (1) fat quarter
  • Contrast fabric for cushion back, two (2) pieces 8in x 14in
  • Fabric for zip cover/flap – 3½in x 14in

Finished size

13in square approx

Notes

  • Download our Free Christmas Quilt Pattern
  • All seam allowances are ¼in unless otherwise stated.
  • Press all fabrics before cutting.
  • WOF = width of fabric.
  • Shorten your stitch length for foundation paper piecing
  • Fabric for this project was kindly supplied by The Village Haberdashery

You will need:

  • Cotton fabric (For the tree block, background, border and cushion back)
  • Zip (14in long)
  • Batting (15in square)
  • Medium-weight iron-on interfacing (Two (2) pieces – 8in x 14in plus one (1) piece 3½in x 14in)
  • Cushion pad (12in square)

Cutting out

Step 1

From the print fabrics cut the following:

  • Print 1: one (1) 3in x 10in strip, to cover section 1.
  • Print 2: one (1) 3in x 8in strip, to cover section 2.
  • Print 3: one (1) 3in x 6in strip, to cover section 3.
  • Print 4: one (1) 3½in x 4in strip, to cover section 4.

Step 2

From background fabric for the blocks cut two (2) pieces 6in x 10¾in (to cover section 5 and section 6).

Step 3

From the border fabric cut the following.

  • Two (2) strips 2¾in x 9½in.
  • Two (2) strips 2¾in x 14in.

Preparing the cushion front

Step 1

Make the tree block as described in our Christmas Tree Quilt Pattern – in the Foundation paper piecing the blocks section, Steps 1-8. Remove the paper from the block.

Step 2

Sew the shorter border strips to the top and bottom of the block, and press seams outwards. Sew the longer border strips to the sides of the block, and press seams outwards. Trim to 14in square.

Step 3

Baste the batting onto the back of the patchwork and then quilt as desired. Trim away excess batting.

Inserting the zip

Step 1

Fuse the pieces of interfacing to the wrong side of the two pieces of fabrics for the cushion back, and to the zip cover/flap piece.

Step 2

Take the zip cover/flap piece and press it in half along the length, wrong sides facing.

Step 3

Take one of the 8in x 14in back pieces and place it right side up. Place the folded cover/flap piece on top, aligning the lower raw edges. Now place the zip on top, wrong side down, aligning its lower edge with the raw fabric edges (Fig a).

How to make a Christmas patchwork cushion Fig A

Figure A

Step 4

Pin the layers together and then stitch through all layers ¼in away from the raw edges. Using a zip foot on your machine will help here. Pause in your machining (with the needle in the down position) to move the zip pull out of the way as necessary. Press the seam open and then, working from the right side, topstitch along the backing piece, about 18in away from the seam (Fig b).

How to make a Christmas patchwork cushion Fig B

Figure B

Step 5

Place the sewn unit right side up, with the zip flap folded away from the zip. Position the other back piece on top, right side down, with its raw edge aligned with the zip edge. Sew together and press the seam. Working from the right side, topstitch along the backing piece, as before (Fig c).

How to make a Christmas patchwork cushion Fig C

Assembling your DIY Christmas cushion cover

Step 1

To finish, place the front and back cushion pieces right sides together. Trim the back piece to the same size as the front piece. Make sure the zip is open and the flap folded down to cover the zip.

Step 2

Sew all around the edge with a ½in seam allowance. Clip the corners, turn the cushion through the open zip to the right side and press the seam. Insert a cushion pad and you’re done!

How to make a Christmas patchwork cushion

Like this guide to how to make a Christmas patchwork cushion?

Why not make a whole quilt to match? Head over to our Free Christmas Trees Quilt Pattern by Judith Dahmen and Love Patchwork & Quilting.

Free Christmas Tree quilt pattern