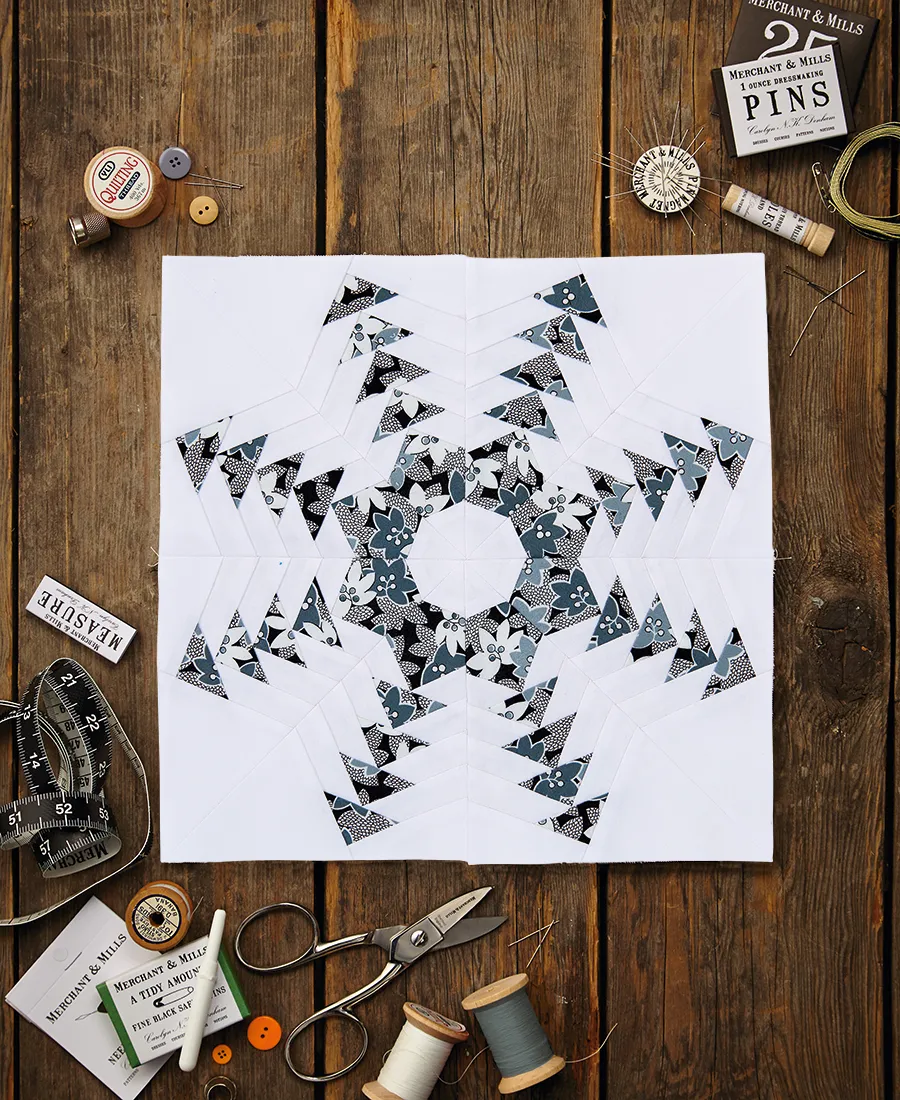
All products were chosen independently by our editorial team. This review contains affiliate links and we may receive a commission for purchases made. Please read our affiliates FAQ page to find out more.

Free snowflake quilt block pattern

Make a beautiful snowflakes quilt using foundation paper piecing and our step-by-step guide to making a snowflake quilt block – including a free snowflake template to get you started

Try 6 issues of Love Patchwork & Quilting magazine for £9.99| SAVE 76%

Published: October 28, 2021 at 7:34 pm

Looking to make a snowflakes quilt to cosy up with? We've got the perfect frosty project for you! Lynne Goldsworthy designed this intricate snowflake quilt block pattern featuring an in-the-round arrows design. You're sure to get eye-catching effects from the smallest of fabric scraps in your stash. This impressive design would make lovely festive cushions, table décor for the holiday season or whip up a batch for a flurry of snowflakes to create an heirloom Christmas quilt.

Read on to find out how to make a snowflake quilt block, and download our free snowflake quilt block pattern template.

We can't think of a better excuse to have fun with foundation paper piecing. If you've never tried FPP before, you might find it helpful to have a practise first! Check out our Beginner's Guide to foundation paper piecing.This is part of our collection of quilting patterns – and if you're a fan of paper piecing, you might also like our our fabulous selection of other sunshine and star free foundation paper patterns.

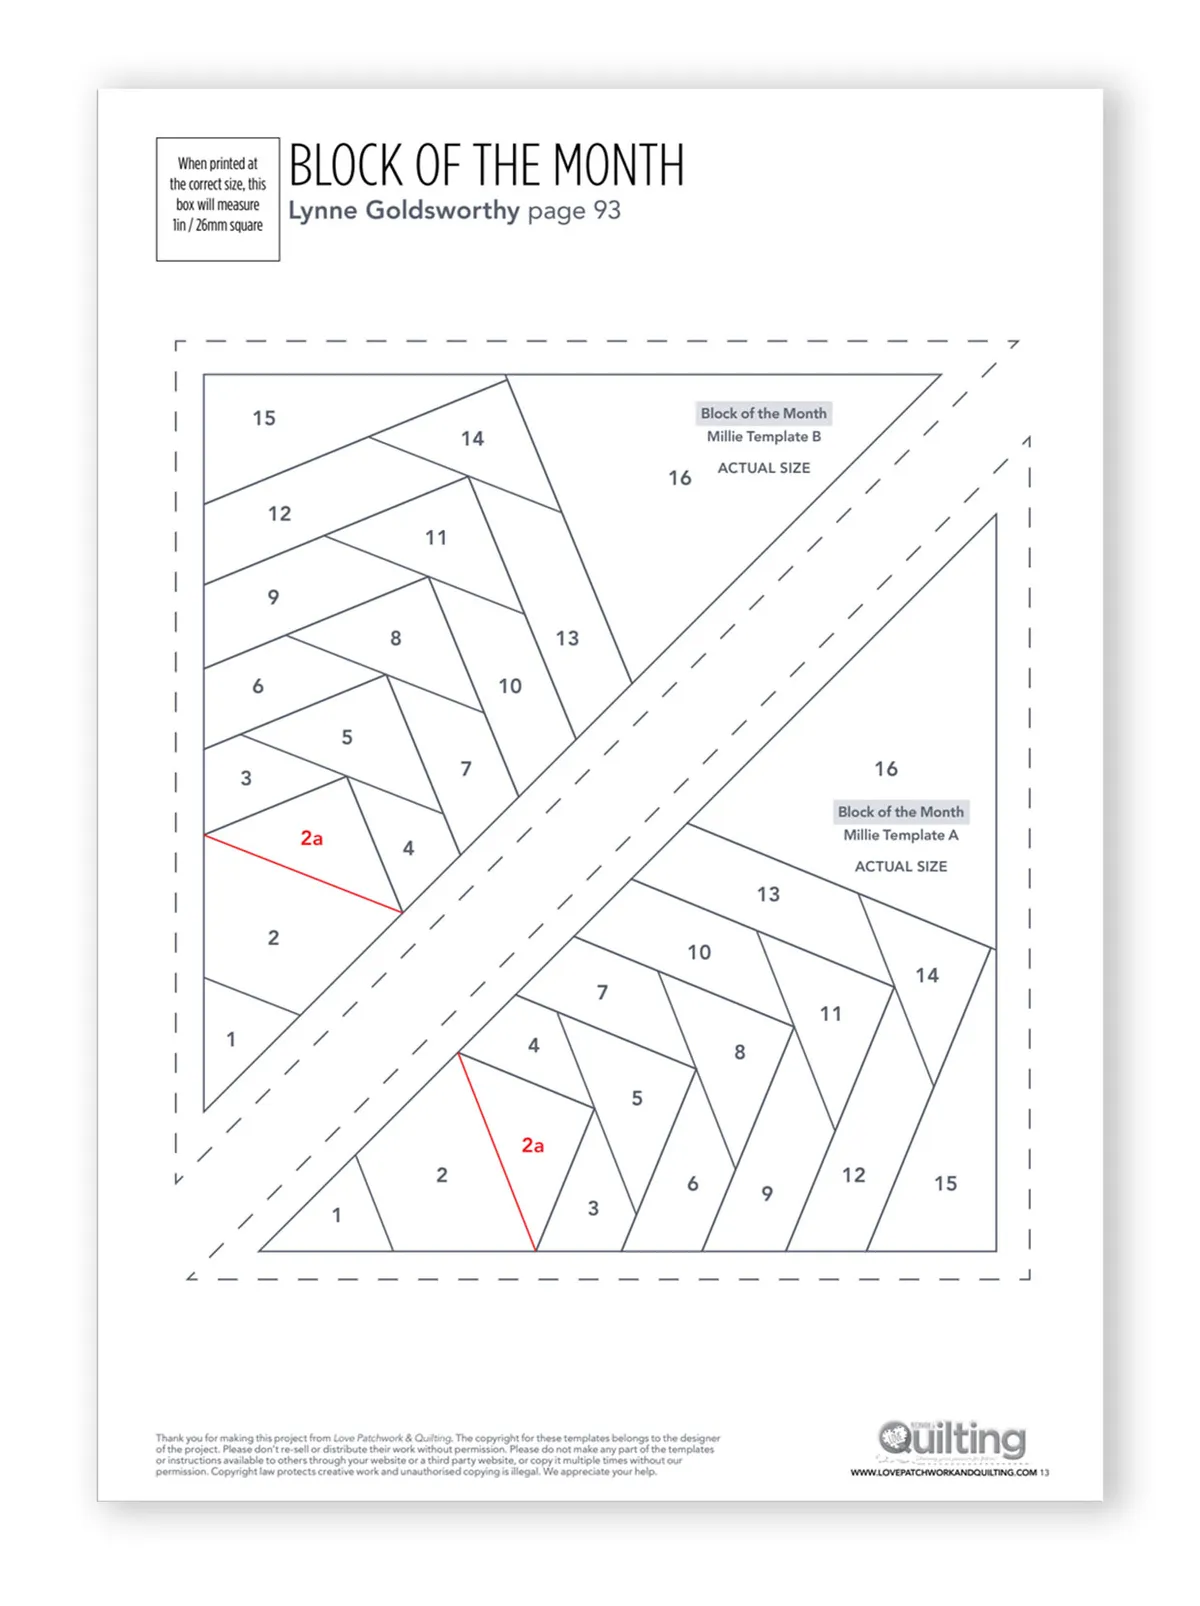
This snowflake quilt block pattern was first known as the Millie block, and was part of Lynne’s Vintage Sweethearts Block of the Month series for Love Patchwork & Quilting magazine. Check out more of Lynne's beautiful work on her website lilysquilts.blogspot.co.uk.

How to sew a snowflake quilt block

Finished size:

12½in square (12in once pieced into project)

Notes:

  • This tutorial will show you how to sew 1 x snowflake quilt block pattern. If you want to make a whole snowflakes quilt, simply sew a batch of these blocks and try alternating with square blocks of solid colour to create a quilt top
  • Seam allowances are ¼in throughout, unless otherwise noted.
  • Press seams open, unless otherwise instructed.
  • Templates include seam allowances, where necessary.
  • RST = right sides together.
  • Wash and press all of your fabrics well before cutting.
  • Shorten your stitch length to 1.5 for foundation paper piecing.
  • HST = half square triangle.
  • If you're new to making quilts, you may need to practise a bit before you try this project, but never fear! We've got a complete guide to quilting for beginners to show you the ropes.
Free Snowflake quilt block pattern

Fabrics used

Free Snowflake quilt block pattern

Free paper piecing snowflake quilt block pattern

Snowflake quilts: How to make the quilt block (step by step)

You will need:

  • Fabric (1 fat quarter of print fabric)
  • Fabric (½ yard white fabric)
  • Template (Download our free snowflake quilt block template)
  • Sewing machine
  • Thread

Cutting out your snowflake quilt block

Step 1

Cut the print fabric as follows:

  • Eight (8) 3in squares (for section 2 on the templates).
  • Sixteen (16) 3½in squares. Subcut in half on the diagonal to yield two half square triangles per square (for sections 5, 8, 11 and 14 on the templates).

Step 2

Cut the white fabric as follows:

  • Eight (8) 2in squares (for section 1 on the templates).
  • Sixteen (16) 1¼in x 2in strips (for sections 3 and 4 on the templates).
  • Sixteen (16) 1¼in x 2½in strips (for sections 6 and 7 on the templates).
  • Sixteen (16) 1¼in x 3in strips (for sections 9 and 10 on the templates).
  • Sixteen (16) 1¼in x 3 ½in strips (for sections 12 and 13 on the templates).
  • Eight (8) 2½in x 5in strips (for section 15 on the templates).
  • Eight (8) 4in x 5in rectangles (for section 16 on the templates).

Piecing the units of the snowflake quilt block

Step 1

The snowflake block is made up of four pairs of units. Each is foundation paper pieced, trimmed to size, the papers removed and the block is then assembled as shown in the layout diagram below.

Snowflake quilt pattern layout
Layout diagram: Snowflake quilt block pattern

Step 2

Foundation paper piece the eight templates using the fabric strips, rectangles and HSTs for the various sections on the templates as indicated in the cutting list. If you’re not sure how to do do this, head to our guide to foundation paper piecing.

For the purposes of the main block, ignore the red line and the red numbering of 2a on the templates. These are only used for the piecing of Lynne’s remix quilt block (not featured in this tutorial).

Step 3

First pin one white 2in square to the back of one of the templates making sure it covers the whole of section 1 plus at least ¼in on each side (Fig 1). The wrong side of the fabric should be facing the back of the template.

Snowflake quilt block pattern Fig 1

Step 4

Pin a print fabric 3in square RST with the white square pinning along the seam line between sections 1 and 2 so that, once the seam is sewn and the print fabric is folded over, it will cover section 2 by at least ¼in on each side (Fig 2).

Snowflake quilt block pattern Fig 2


Step 5

Flip the paper template over so the printed side is up and sew along the line between sections 1 and 2 extending the seam approximately ¼in beyond each (Fig 3).

Snowflake quilt block pattern Fig 3


Step 6

Press the print fabric over so it covers section 2 and extends at least ¼in beyond each side (Fig 4).

Snowflake quilt block pattern Fig 4

Step 7

Trim section 2 to ¼in beyond each seam line between section 2 and sections 3 and 4 (Fig 5).

Snowflake quilt block pattern Fig 5

Step 8

Sew 1¼in x 2in strips to cover sections 3 and 4 in the same way. Once sewn and pressed, trim to ¼in beyond the seam line between sections 3 and 4 and section 5 (Fig 6).

Snowflake quilt block pattern Fig 6

Step 9

Continue piecing the templates in the same way until all sections on all eight templates are pieced.

Step 10

Trim the pieced units to size along the dashed lines and remove papers.

Assembling the block

Step 1

Sew the units together in pairs along the diagonals (Fig 7).

Snowflake quilt block pattern Fig 7-8

Step 2

Sew the pairs of units together to make half of the block (Fig 8).

Step 3

Sew the two halves of the block together (Fig 9). Press the block and check that it is 12½in square.

Snowflake quilt block pattern Fig 9


Like this snowflake quilt idea? Try more snowflake quilts

Lynne’s ‘Remix’ twist on this design (pictured below)

This was featured in issue 22 of Love Patchwork & Quilting (available through their digital edition for Newstand and Google Play) and is available in Lynne’s The Ultimate Quilt Block Collection via Zinio.

Snowflake quilt block pattern

For a larger snowflake quilt design…

we love this modern and minimal snowflake quilt from Modern Handicraft (Etsy, £10.90)  – it will be a real showstopper for any home. it comes with a colouring sheet to help you plan your quilt using your chosen fabrics before you commit to cutting into them.

Snowflake Quilt Pattern

Sew a flurry of snowflake quilt blocks

We also like this collection of 7 snowflake quilt block PDF patterns – also made using foundation paper piecing, from Canuck Quilter Designs on Etsy.

Snowflake quilt blocks


We hope you enjoy making your snowflake quilt – leave a comment below to let us know how you got on!


This website is owned and published by Our Media Ltd. www.ourmedia.co.uk
© Our Media 2023