How to make a spring cushion cover
Sew your way into spring with Jo Avery's spring cushion cover!

Published:
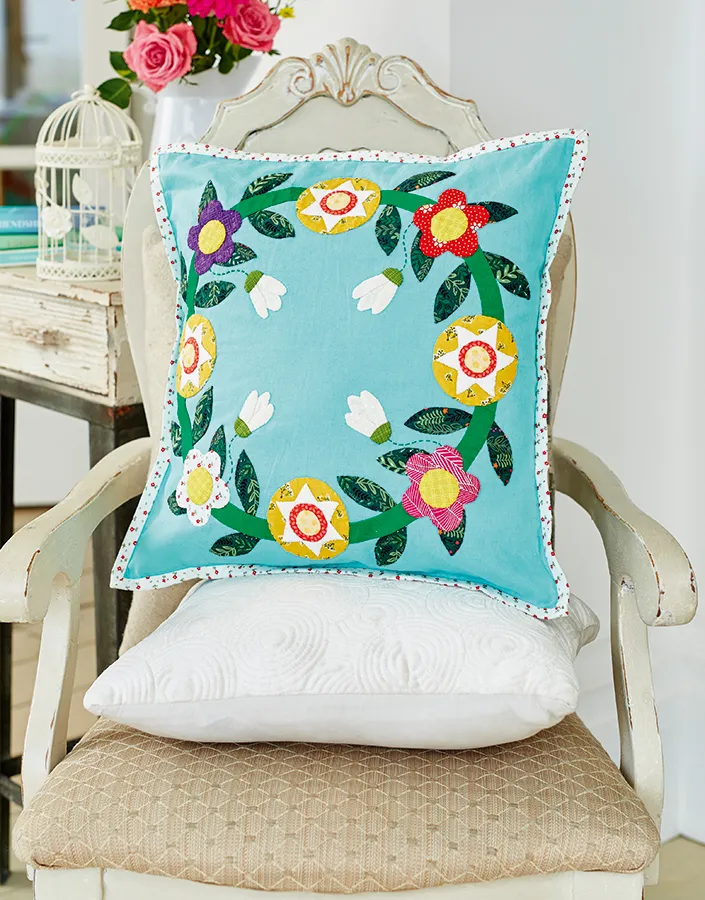
Celebrate the new season with this pretty spring cushion cover! Enjoy some slow sewing as you create this garland of springtime flowers featuring narcissus, primrose and snowdrops. This is the first in a series of four we will be bringing you throughout the year with different applique tips and tricks. You’ll want to display this floral wreath all year round! To give your cushion an extra edge, shake up the symmetrical pattern by using four different fabrics for the flowers.
Jo is going to show you how to turn your favourite fabrics into this spring cushion cover but first, make sure you read through our quilting for beginners guide. Our guide and our how to quilt page are full of tips on how to quilt like a pro.

You will need
- Linen or linen mix fabric for background and backing, ½yd
- Assorted green fabrics, solid and prints, one (1) fat quarter in total
- Assorted white fabrics, solid and prints, 14in square in total
- Assorted yellow and orange fabrics, 8in x 12in in total
- Scraps of bright coloured fabrics for flowers, 3½in square each
- Pencil/removable pen
- A small amount of dark green perle cotton 8
- Binding fabric, 5in x WOF
- Straight-edged tracing wheel (optional)
- Small piece of leather or oilcloth (optional)
- 16in cushion pad
Finished size
16in square.
Notes
We used Essex Linen in Medium Aqua by Robert Kaufman for the background and backing.
Depending on size and shape the pattern pieces have either ¼in or 3/₁₆ in seam allowances. Assume all are ¼in unless stated otherwise.

Step 1
From your background fabric cut as follows:
- One (1) 17in square
- Two (2) 12in x 17in pieces, put these two pieces aside for your backing.
Step 2

Using your paper templates (see Todays Quilter templates issue 7) cut out the following pieces (Fig 1).
- Twenty-four (24) leaves from a green fabric using template A.
- Four (4) stems from a green fabric using template B.
- Four (4) circles from a yellow fabric using template C.
- Four (4) stars from a white fabric using template D.
- Four (4) circles from an orange fabric using template E.
- Four (4) circles from a yellow fabric using template F.
- Four (4) flowers from four (4) different fabrics using template G.
- Four (4) circles (for centre of four (4) snowdrop centres from a white fabric using template H.
- Four (4) snowdrop centres from a white fabric using template H.
- Eight (8) snowdrop outer petals from a white fabric using template I.
- Four (4) snowdrop bases from a green fabric using template J.
Tips for applique preparation
Step 1
There are many ways to tackle needle turn applique, I will be sharing a number of different methods over the course of this year-long project. Let’s start with a clever way to prepare your leaves.
Preparing leaves

Lay your fabric leaf, right side down, on to a piece of leather or similar thick textile such as oilcoth. Draw your seam allowance using a straight-edged tracing wheel (Fig 2). This will give you a pressed edge to make turning fabric under much easier. If you find it hard to judge your seam allowance by eye you can draw the actual size onto your fabric back by using the leaf shape from your pattern.
Preparing circles

Circles are one of the hardest shapes to applique, this method helps you achieve perfect curves especially with tiny circles: Make a paper template using the inner seam allowance line from your circle template (C, E or F). With the wrong side of your matching fabric circle towards you and using a double thread, knot securely. Then sew a small neat running stitch all the way around using a ⅛in seam (Fig 3). Place the paper template in the centre and gently draw up stitches around it, then secure your thread.

Press from both sides (Fig 4). Carefully pop the paper piece out and your circle is ready to stitch down.
Making the cushion
Step 1
First trace your pattern on to your 17in background square using a pencil or removable pen such as a Pilot Frixion pen (which irons away). Fold your fabric square in half twice to mark a centre cross guideline. Trace the quarter circle pattern onto your fabric square one quarter at a time, using the folded lines as a guide. If you can’t see the pattern lines easily through your fabric, try taping to a window, your computer screen with the light turned up, or go over the pattern lines with a thicker pen. The pattern is just a guide and does not need to be too accurate.
Step 2

Begin by appliqueing your leaves using a 3/₁₆in seam. Prepare each leaf. Pin in place then stitch down using a tiny neat slipstitch and matching thread (Fig 5) sweeping the seam allowance under as you go. There is no need to slipstitch the areas that will be covered by subsequent layers of stem or flowers, instead use a running stitch to move between areas.
Step 3

Snip into the seam allowance of each stem ⅛in at regular intervals along the inner curve of each stem piece (Fig 6) before pinning in place and stitching as before using 3/₁₆in seam allowance. Again there is no need to carefully stitch down the areas that will be covered.
Step 4


Once all the leaves and stems are in place (Fig 7) stitch down your four large yellow circles (C), using the preparation tips on page 69 if you wish. Stitch your white stars on to the centre of the yellow circles, snipping ⅛in into the inner corner between each ‘arm’ (Fig 8). Add an orange circle (E) to the centre of the star and a yellow circle (F) to the centre of this. Applique all four narcissus in this way.
Step 5
Stitch down the four different primroses (G) as above and add yellow circles to the centre (E).
Step 6
Lastly, applique the snowdrops using a 3/₁₆in seam on all pieces. Start with the inner petal (H), then add the outer petals either side (I), and finish with the base (J).
Technical Tip
If your white fabric is too ‘see through’, place a smaller piece of the same white fabric (or a lightweight interfacing) between your background and fabric piece

Step 7
Using your dark green perle cotton sew a running stitch along the stem lines joining snowdrop to garland. Press the finished applique to remove any pen lines.
Finishing the cushion
Step 1
Take one of your pieces of cushion backing fabric and turn over a ½in seam twice on one of the 12in sides. Pin and then sew in place to hem. Repeat with the second backing piece. Press.
Step 2

Lay your cushion front, right side down. Lay your two backing pieces on top, right sides up and overlapping (Fig 11). Pin and then sew these layers together very close to their edges (less than ¼in).
Step 3

Prepare the binding by cutting two (2) 2½in strips and then sewing these into one long length. Fold along the full length, wrong sides together and press. Use this to bind the cushion with mitred corners as you would a quilt (Fig 12). Insert cushion pad to finish
We hope you’ve enjoyed making Jo’s spring cushion covers. We have plenty more quilting projects for you to make here on Gathered. Head over to our spring sewing projects and our fabric flower brooch for more free makes.