How to make a starburst quilt

Sew yourself a beautiful new quilt with Jessie Fincham's starburst quilt pattern!

6 issues of Today's Quilter magazine for just £9.99|Save 76%

Published: May 22, 2022 at 9:40 am

In this timeless design, a medley of dainty Liberty prints and crisp white cotton come together quickly and easily for a striking effect. Jessie is going to show you how to sew this beautiful starburst quilt so it's over to her!

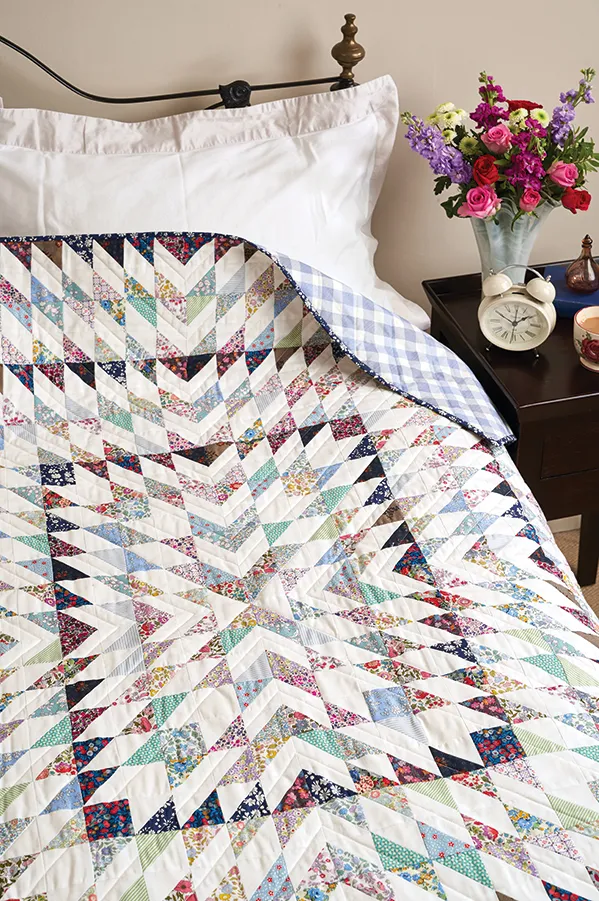
Half-square triangles are the familiar building blocks to so many of our favourite quilt blocks and patterns – always the faithful and versatile tool in our quilting arsenal. The unique setting of the Starburst quilt, radiating from the centre, is what really packs a punch here! A total reproduction of a beautiful antique quilt I spied online after a quilting deep-dive (you know the ones…) dating back to the 1950s. It was so good that I had to recreate it for the readers of Today’s Quilter in a mix of Liberty Tana lawns and pretty cotton florals for a classic country vibe. Be sure to use a good range of light and dark toned fabrics to highlight the secondary pattern. Chain piecing can be your best friend here, just stay organised and don’t get ahead of yourself or you may find yourself with a few triangles in the wrong direction and the seam ripper firmly in grip – trust me, I’ve been there! If you're new to the world of quilting don't worry. We have a beginner's guide to quilting as well as a how to use a sewing machine tutorial.

You will need

  • Light printed fabrics – seventeen (17) 9in x 24in pieces
  • Dark printed fabrics – seven (7) 9in x 24in pieces
  • Background fabric – 2¾yds
  • Backing fabric – 3⅞yds
  • Binding fabric – ½yd

Finished size 52in x 60in Notes

  • Seam allowances are ¼in throughout.
  • Press seams open, unless otherwise instructed.
  • RST = right sides together.
  • WOF = width of fabric.
  • HST = Half-square triangle.

How to make a starburst quilt

Cutting Out

Step 1

From the printed fabrics, cut as follows:

  • Four (4) 6in squares from each of the twenty-four (24) fabrics.
  • Twelve (12) 2½in squares in dark fabrics.
  • Twelve (12) 2½in squares in light fabrics.

Step 2

From the background fabric, cut as follows:

  • Fourteen (14) 6in x WOF strips, subcut to yield ninety-six (96) 6in squares.
  • Twenty-four (24) 2½in squares

Step 3

From the binding fabric, cut six

  • (6) 2½in x WOF strips.

Making the Half Square Triangles

Step 1

Place a 6in printed fabric square and a 6in background fabric square RST.

Step 2

How to make a starburst quilt figure one

Draw a line corner to corner along both diagonals and sew ¼in from the marked lines or as I like to – use a ¼in seam ruler and place exactly in the corners along the diagonal, mark a line on either side of the ruler and repeat for the opposite diagonal then sew on the marked lines (Fig 1).

Step 3

white fabric cut into triangles on a quilting hoop

Cut your square along the vertical and horizontal halfway lines, and through the centres of the diagonals (Fig 2).

Step 4

starburst quilt figure 3

You should now have eight (8) HST units. Press seams open (Fig 3).

Step 5

Square up your HST units to measure 2½in square. Make sure the diagonal seam is exactly 45-degrees and bisects the corners.

Step 6

Repeat steps 4-8 to make seven hundred and sixty-eight (768) HST units in total. Disregard thirty-six (36) HST units – these could be used to make a matching cushion. You need two-hundred-and-sixteen (216) dark HSTs and five hundred and sixteen (516) light HSTs.

Assembling the quilt top

Step 1

Starburst quilt layout diagram
Using the HSTs and squares of background and print, assemble each row of twenty-six (26) units following Fig 4 for placement and rotation. Complete one row at a time, laying out your pieces in order from left to right. Pick up the first two (2), place right sides together and stitch with a ¼in seam. Continue until you reach the end of the row, chain piecing all the units. Snip the segments apart.

Step 2

Continue joining segments using the chain piecing technique until your row is sewn together. Check regularly that your HSTs are in the right place and facing the right way. It is much easier to correct this at this stage, rather than once the rows are assembled!

Step 3

Once you have completed all your rows, press the seams of each in alternating directions. This will ensure your seams nest.

Step 4

Sew your rows together. Join in pairs and press seams open as you go. Sew an additional set of two (2) each time until your quilt top is complete.

Quilting and finishing

Step 1

Cut your backing fabric in two equal lengths, trim off selvedges and sew together with a ½in seam allowance. Press well.

Step 2

Lay your backing fabric, batting and quilt top, on top to create a quilt sandwich. Quilt as desired by hand or machine. Jessie’s quilt has been long-arm quilted by Trudi Wood (@trudi_wood on Instagram) in straight lines to accent the radiating pattern from the centre.

We hope you’ve enjoyed sewing your starburst quilt! For more fun quilting projects check out our  layer cake quilt patterns and best Hexagon Quilt Patterns.