Cutting out
Step 1
From Fabric A cut:
- Two (2) 2in x WOF strips. Subcut into four (4) 2in x 18in pieces.
- Two (2) 21⁄2in x WOF strips. Subcut into two (2) 2½in x 9½in pieces and eight (8) 2½in x 4½in pieces.
- One (1) 7½in square.
- One (1) 2¼in x WOF strip for binding. Subcut into two (2) 2¼in x 21in strips.
Step 2
From Fabric B cut:
- Two (2) 2in x WOF strips. Subcut into four (4) 2in x 18in pieces.
- One (1) 2½in x WOF strips. Subcut into two (2) 2½in x 9½in pieces.
- Three (3) 7½in squares.
Step 3
From Fabric C cut:
- One (1) 2in x WOF strip. Subcut into two (2) 2in x 18in pieces.
- Two (2) 2½in x WOF strip. Subcut into two (2) 2½in x 9½in pieces and seven (7) 2½in x 4½in pieces.
- One (1) 7½in square.
- Two (2) 12½in x WOF strips.
Step 4
From Fabric D cut:
- Three (3) 2½in x WOF strips. Subcut into two (2) 2½in x 9½in pieces, four (4) 2½in x 12½in pieces and five (5) 2½in x 4½in pieces.
Step 5
From Fabric E cut:
- One (1) 2in x WOF strip. Subcut into two (2) 2in x 18in pieces.
- Two (2) 2½in x WOF strips. Subcut into two (2) 2½in x 12½in pieces and five (5) 2½in x 4½in pieces.
- One (1) 7½in square.
Step 6
From Fabric F cut:
- One (1) 2in x WOF strip. Subcut into two (2) 2in x 18in pieces.
- One (1) 2½in x WOF strip. Subcut into eight (8) 2½in x 4½in pieces.
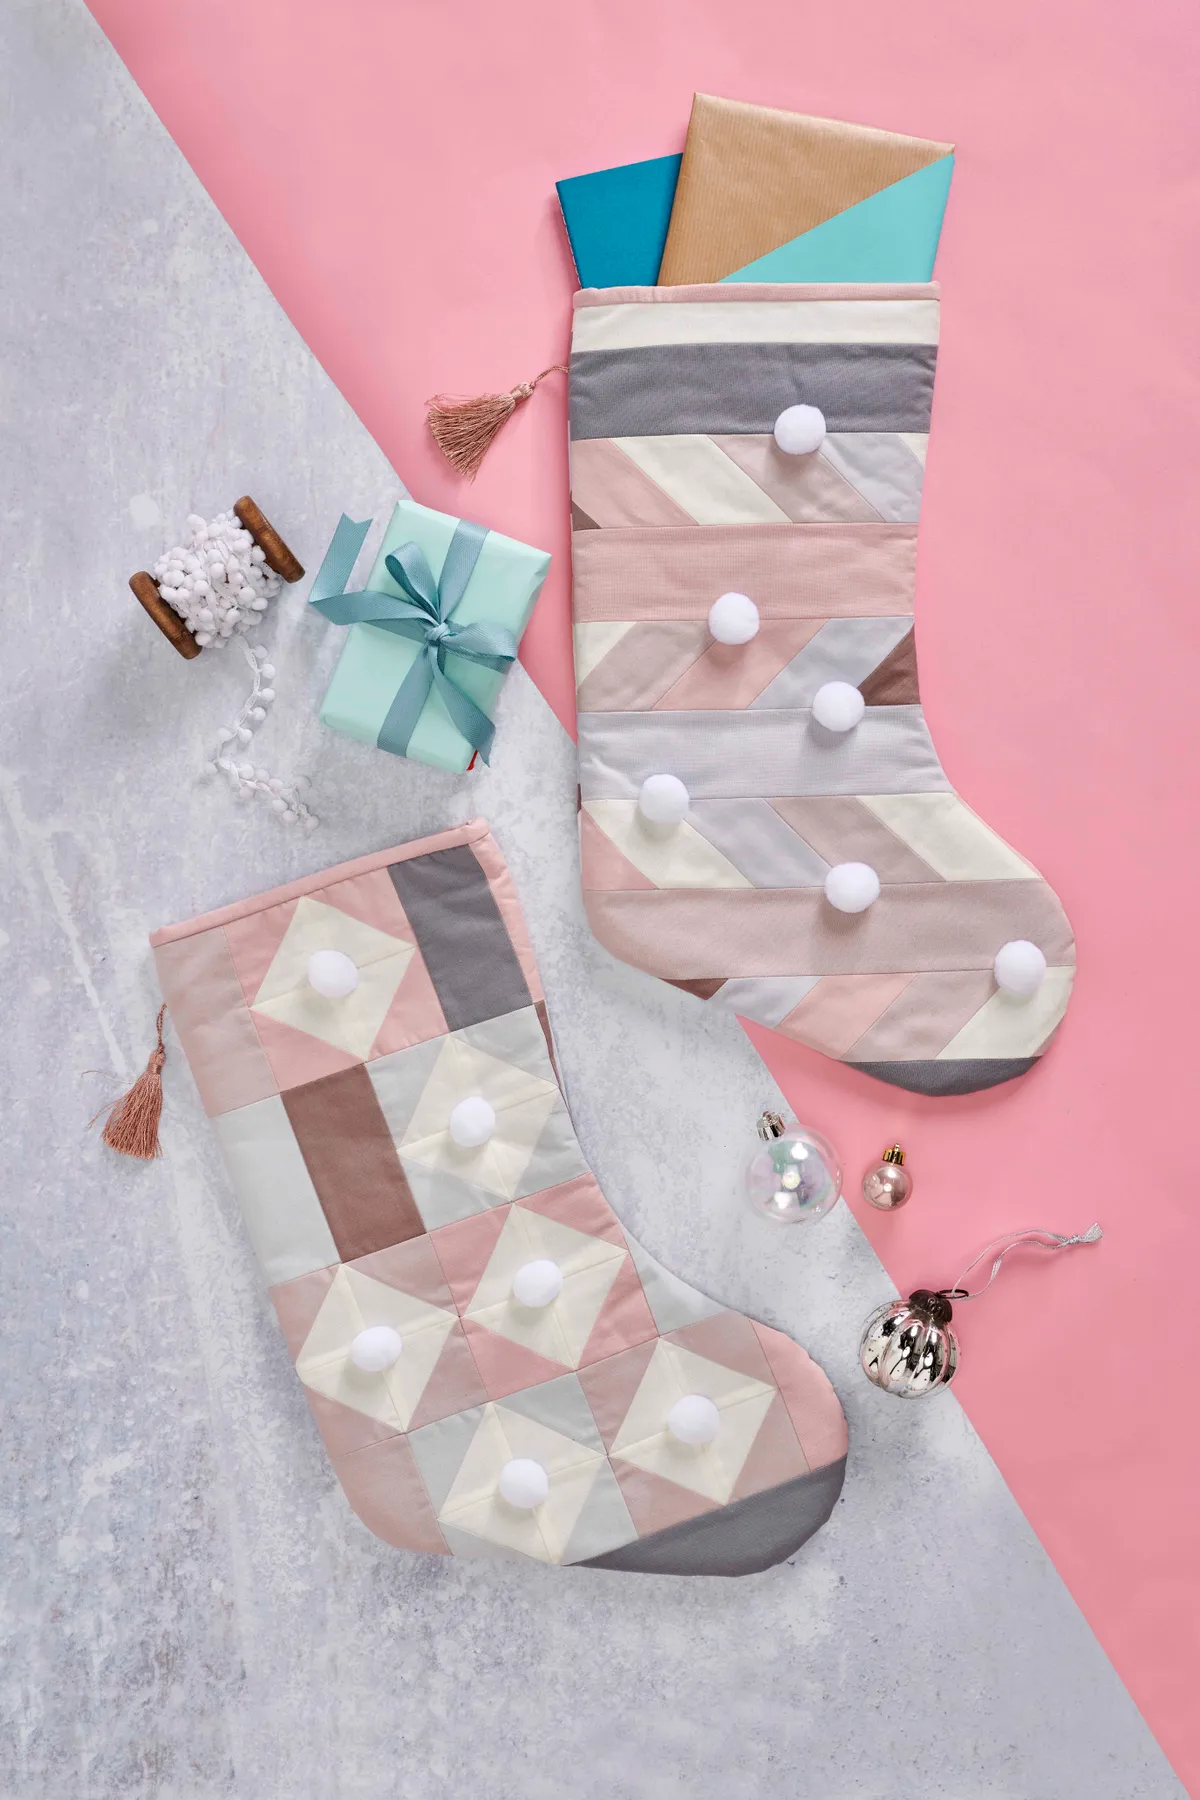
How to make the bias stripe stocking
Step 1
Take the 2in x 18in pieces of Fabrics A, B, C, E and F and group into two sets each with seven strips. Sew together to make two strip sets.

Step 2
Place the two strip sets RST and cut at a 45-degree angle, making sure that the cut ends at the top left corner.

Step 3
Using the cut edge, cut six 21⁄2in wide strips. Go back and cut two more 21⁄2in wide strips from the section you cut away at the beginning. Four of your strips should be slightly longer than the others.

Step 4
Trim the four longer strips you just cut to measure 121⁄2in and the four shorter strips to measure 91⁄2in.

Step 5
Using the 21⁄2in x 91⁄2in rectangles of Fabric B, D, A and C, arrange them into rows with two of the 91⁄2instrips from the previous step and sew together as in the photograph to make the top section of the stocking. Then repeat using the 21⁄2in x 121⁄2in rectangles of Fabric E and D with two of the 121⁄2in strips from the previous step to make the bottom section of the stocking.

Step 6
Align the two sections on the left and sew the sections together. Repeat step 11 to make two more sections and this time align them on the right before sewing together. You will now have two patchwork sides.

Step 7
Using each piece of patchwork as a template, cut two pieces of fusible fleece and fuse to the back of each. Using the stocking template, cut out two lining pieces from one of the Fabric C 121⁄2in x WOF strips.
Step 8
Trace around the stocking template on the patchwork using a water erasable pen, align the straight edge of the back of the stocking. Flip the template over and repeat for the other patchwork.

Step 9
Sew the pom poms to the front of the stocking. Measure 11⁄2in down from the top of the stocking and baste the tassel in place.
Step 10
Place the patchwork stocking pieces RST and sew around the edges leaving the top edge unsewn. Using pinking shears trim the inner curve. Turn the patchwork stocking right sides out. Place the lining fabrics RST and sew around the edges this time using 3⁄8in seam allowance, leaving the top edge unsewn.
Step 11
Place the lining in the patchwork stocking, wrong sides together. Clip or pin the top edges and use a longer stitch length to baste together
Step 12
Using a 2¼in x 21in strip of Fabric A fold in half lengthwise, WST, and press. Sew the binding to the outside of the stocking. Fold the binding over to the inside of the stocking and hand stitch in place.
How to make the Half-square Triangle stocking
Step 1
Using 71⁄2in squares of Fabric B and C, draw diagonal lines from corner to corner on the back of one of the squares. Place the squares RST.

Step 2
Pin in place and sew 1⁄4in away from each line on both sides. Remove the pins and without moving the fabric cut along the diagonal lines and then cut through the middle horizontally and vertically to make eight HSTs.

Step 3
Press the seams to the dark side. Trim the HSTs to 21⁄2in square.

Step 4
Repeat steps 19-21 with 71⁄2in squares of Fabric B and A, then repeat again with 71⁄2in squares of Fabric B and E.
Step 5
Take four HSTs of the same colourway and arrange into a four patch, sew into rows and then sew the rows together. Repeat with the remaining HSTs so you have a total of six diamonds.

Step 6
Using six of the 21⁄2in x 41⁄2in rectangles and two of the diamonds, arrange into two rows and sew together as shown in the phot below. Sew the rows together. Trim to 81⁄2in x 91⁄2in.

Step 7
Using four of the 21⁄2in x 41⁄2in rectangles and four of the diamonds, arrange into two rows and sew together as shown in the photo below. Sew the rows together and sew a 21⁄2in x 121⁄2in rectangle of Fabric D at the bottom.

Step 8
Align the edges on the leftand sew the two sections together to make one patchwork side of the stocking.

Step 9
Using ten of the 21⁄2in x 41⁄2in rectangles, arrange into two rows and sew together as below.

Step 10
Using twelve of the 21⁄2in x 41⁄2in rectangles, arrange into two rows and sew together as below.

Step 11
Align the edges on the right and sew the two sections together. Then sew a 21⁄2in x 121⁄2in Fabric D strip to the bottom to make the other side of the stocking.

Step 12
Finish the stocking as in steps 13–18 of the other stocking.