What is reverse appliqué? Essential guide

Join us in getting to grips with how to do reverse appliqué. In this step by step guide we'll show you 2 different methods: freezer paper appliqué and raw edge appliqué. Then you'll learn how to make appliqué portholes! Let's go

Try 6 issues of Love Patchwork & Quilting magazine for £9.99| SAVE 76%

Published: October 18, 2019 at 6:02 pm

In traditional appliqué, you sew a shape on top of a background to create clever shapes to top off your quilts and sewing projects.

With reverse appliqué, it's topsy turvy! You make an aperture or hole in a top layer fabric to reveal a glimpse of a different fabric, peeking through from beneath.

Our step-by-step appliqué tutorial is perfect for showing off fussy cut prints, or adding a pop of colour to your quilt tops. Our in-house tech expert Sarah Griffiths shows you how...

Freezer paper appliqué

Step 1

Draw your design on the smooth side of a piece of freezer paper. If you’re using a directional design (like letters), you should trace it in reverse for it to show the right way up once completed. Cut out your design from the freezer paper, and discard the middle section, leaving you with the framed outline. Press this in place on the reverse of your background fabric.

How to do reverse applique

Step 2

Carefully trim the fabric away from the centre of the freezer paper, leaving about ¼in of fabric inside the freezer paper outline. For sharp outer points, clip a straight line in the seam allowance, 1-2 threads away from the point. For inner points, trim straight across the point, as pictured.

How to do applique freezer paper method

Step 3

Use a small paintbrush to apply starch to the seam allowance along a small section. Fold the seam down over the freezer paper and press with a hot iron. You may find it useful to use a stiletto or pointed pair of tweezers to hold the seam in place and avoid scorching your fingers. Allow your fabric to lie flat while it cools. Once cool, carefully peel away the freezer paper. Your folds should remain in place nicely, but it’s a good idea to give them a final press to make sure they stay put!
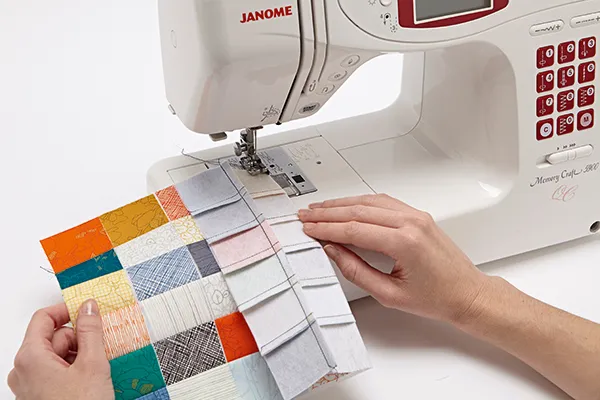
Step by step reverse appliqué tutorial

Step 4

Place your background fabric over your print and pin in place. Make sure you get your print centred exactly where you want it under the background fabric. Also make sure both fabrics are lying nice and flat to avoid any distortion. Once you’re happy with the fabric placement, stitch the two fabrics together along the edge of the background fabric. You can stitch by hand, for an invisible finish. Or attach by machine, with your stitch line about 18in from the edge.

How to do reverse applique step by step

Step 5

Finally, cut away any excess fabric from the reverse. Be careful to cut the print fabric only – without cutting into your background fabric. If you have a pair of appliqué scissors, they’ll come in handy for this last step.

LQP22.tech.step_5.jpg

Raw Edge Reverse Appliqué Step by Step

Step 1

For a super-speedy finish with all the charm of reverse appliqué, try this raw edge technique…

How to do raw edge reverse applique

Step 2

Layer your background fabric over your print fabric, both right side up. Use a machine zigzag stitch to make a closed shape, sewing both fabrics together.

How to sew raw edge reverse applique

Pinch the top layer to separate from the print below, and carefully cut away the fabric within the stitched area. Cut as close to the stitching as you can, without clipping into the seam. Cut away excess print fabric from the reverse, leaving a ¼in seam allowance. And that’s it! Simple, right?

How to sew peekaboo portholes

Step 1

Use these clever appliqué portholes to showcase a cute fussy cut or to add a little peek at some piecing!

For perfectly turned portholes, draw a circle on a piece of scrap fabric, similar in colour to your background fabric. Place this over your background fabric where you want the porthole to be. Sew all the way around your traced line with a machine stitch. Cut out the centre of the circle, leaving a 14in seam allowance. Then cut notches into the seam all the way around the circle, taking extra care not to cut into the stitching.

How to sew applique portholes

Step 2

Push the scrap fabric through the hole, to the reverse of the background fabric.

How to do applique portholes step by step

Step 3

Carefully press the seam, creating your porthole. The photo below shows the reverse of our porthole.

Applique portholes tutorial step by step

Step 4

Place this porthole over your print fabric, pin and stitch in place by hand or machine. Here we used a machine buttonhole stitch to secure the layers together. Once you’re finished sewing together, trim excess fabric from the back, leaving a 14in seam allowance.

How to sew applique portholes tutorial

Test out your new skills! Make an appliqué mini quilt

Put your new-found skills to the test with our oh-so sweet mini quilt

How to make an applique quilt mini quilt

You will need…

  • Background fabric 26in square
  • Fussy cut print, at least one (1) fat quarter (see notes below)
  • Five (5) print fabrics, ¼yd each
  • Scrap fabric, two (2) 5in squares (for porthole facing)
  • Batting 28in square
  • Backing fabric 28in square
  • Binding fabric three (3) 2½in x 42in strips
  • Freezer paper 16in square
  • Embroidery thread (optional)
  • Download our Free applique pattern to make this project

Notes

  • Finished size: 24in square
  • Seams are ¼in throughout, unless otherwise noted.
  • WOF = width of fabric.
  • For fussy cut fabric, you may need more fabric to cut the motifs you want.
  • We used Packmates Sorbet fabric by Michael Miller (see EQS for stockists)

Reverse appliqué instructions

Step 1

From each of three print fabrics, cut two (2) 1¾in x WOF strips. From one remaining print fabric cut two (2) 2in x WOF strips, and from last print fabric cut two (2) 2½in x WOF strips.

Step 2

Sew one of each strip together along the long edges, with the 212in strip at the top, followed by the 2in strip and then three 1¾in strips. Your strip set should be approximately 7¾in x 42in. Repeat to make a second strip set.

Step 3

Download and use Free triangle appliqué pattern to cut eight (8) identical triangles. Make sure the pointed end of each triangle aligns with the 2½in strip. Sew the triangles together in pairs, then sew the pairs together to form a circular block, carefully matching seams.

Step 4

Download and use our Free flower appliqué pattern on your freezer paper four times to make an eight pointed flower. Use the freezer paper method (above) to create a flower in the bottom left corner of your background fabric with the pieced circular block underneath.

Now make the portholes…

Step 4

To complete our quilt top, we added two 3in diameter portholes in the bottom right corner and a 5in diameter raw edge circle in the top corner, with fussy cut prints underneath.

Quilting and finishing

Step 6

Make a quilt sandwich with your backing, batting and quilt top. Quilt as desired – we used coordinating embroidery thread to quilt circles. Trim to 24in square.

Step 17

Sew your binding strips end to end and use to bind your quilt. We used two colours for a scrappy binding.