Our team independently selects products featured in our editorial content. Some articles may contain affiliate links and we may earn a small commission through them. For more information, please see our Affiliates FAQ
How to turn an embroidery hoop into craft storage
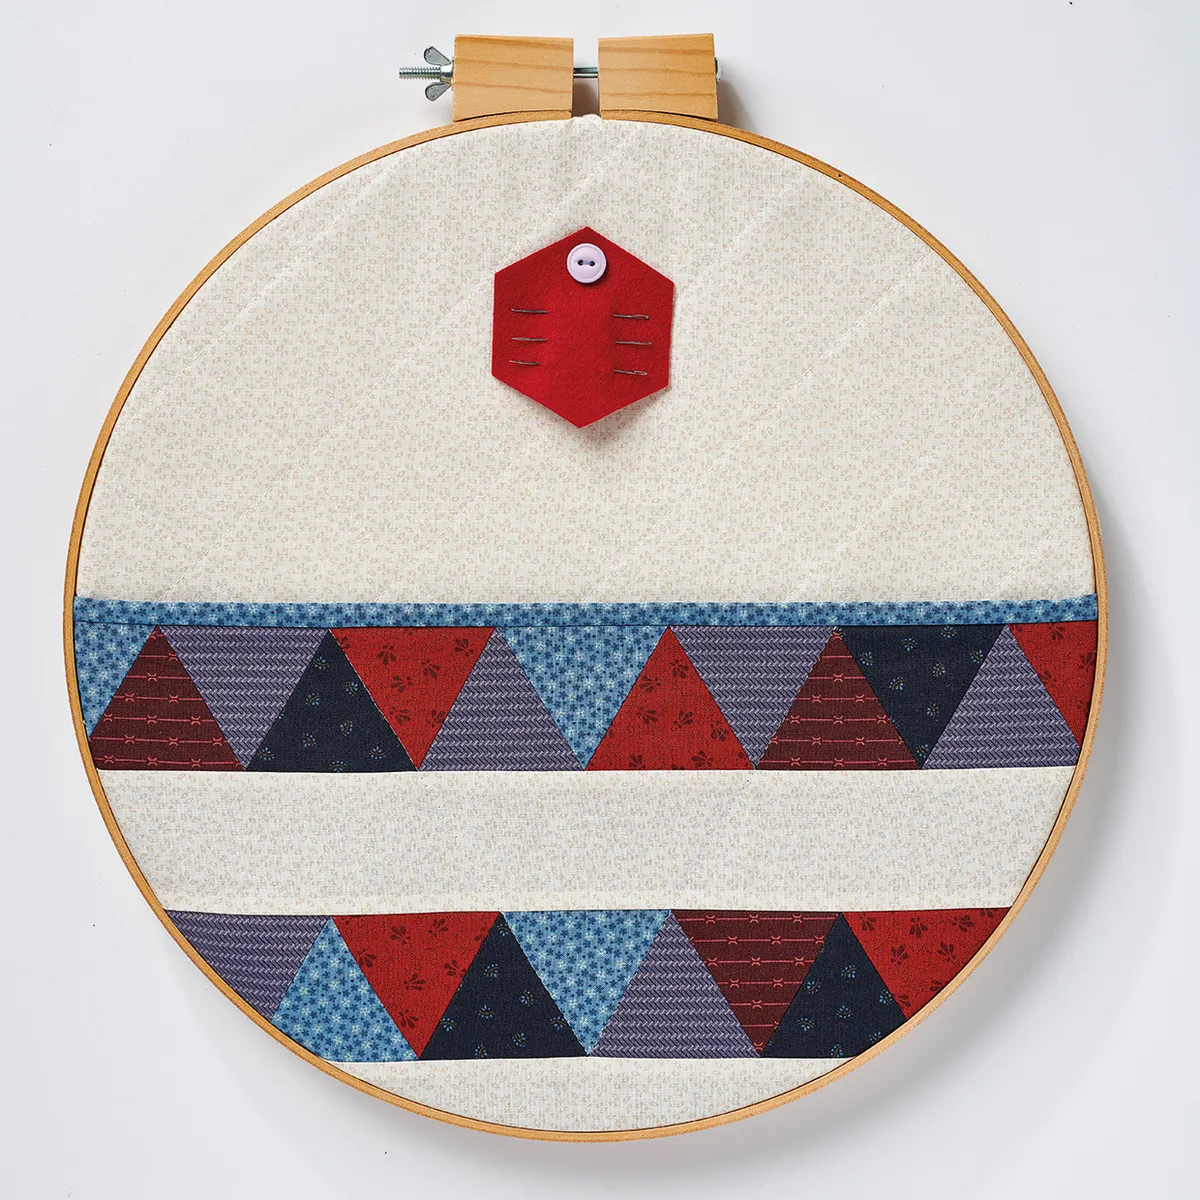
Keep your favourite notions close with this nifty hanging embroidery hoop storage using a handful of Jelly Roll strips or fabric scraps!
Tidy desk, tidy mind... as the new year approaches, raid your sewing stash for a few basics and turn them into this nifty idea for stashing away all your essential notions. Never be stuck for where to find your embroidery scissors or tape measure again! “I find I never have enough storage for my sewing notions and easily misplace them in my messy work space!," says designer Laura Pritchard. I designed this simple pocketed hoop to be hung next to my machine to keep my most used tools together in easy reach. What I love about it is that I can easily unhook it from the nail on the wall and take it wherever I’m going – to the sofa or in the car – for on-the-go storage. Divide your pocket as you see fit and add a ribbon to hang it from.”
Fabric (For the background, pockets & lining (See fabric requirements))
Embroidery hoop (18 in square)
Felt (16 in square for the back plus a 2½in felt scrap)
Button (Small)
Triangle and hexagon mini quilt block rulers ((Optional))
Sewing machine
Thread
Cutting out
Step 1
From the 2½in strips, cut a total of thirty-two (32) 60 degree triangles (we used a specialist ruler for this but you don’t have to). Leave a seam allowance each time, and rotate each triangles by 180-degrees from the next cut to avoid wastage (Fig 1). Set aside one (1) 2½inx18in length for binding.
From the background fabric cut one (1) 18in square and two (2) 2½in x 18in strips.
Step 2
From the background fabric cut one (1) 18in square and two (2) 2½in x 18in strips.
Making the hanging storage
Step 1
Sew the triangles together in two (2) rows of sixteen (16) triangles each with alternate triangles rotated. When stitching them together, line up the triangles, right sides together, as shown (Fig 2), with the blunt corner next to a pointed corner (keeping blunt corners at the top and bottom throughout will avoid bias edges ending up on the outer edges of the rows).
Figure 2
Sew the triangles into pairs, then join the pairs into rows (Fig 3). Press seams open or to one side.
Figure 3
Step 2
Alternate the pieced rows with the 2½in x 18in background strips (Fig 4). Sew together along the long sides and trim the excess triangles at the side edges to make an 8½in x 18in pocket piece. Press seams as desired to complete the pocket front.
Step 3
Layer the pocket lining, right side down, and pocket front, right side up, and pin together. Bind the top edge with the 21/2in x 18in binding strip.
Step 4
Layer the 18in background square, right side up, on top of the batting and quilt as desired. We quilted ours with a simple crosshatch pattern.
Step 5
Place the pocket on top of the quilted background square, with bottom and side edges aligned (Fig 5). Stitch together along the side and bottom edges. Decide how you’d like to divide the pocket and stitch the lines. We divided ours into three (3) using a ‘V’ shape following the edges of the pieced triangles.
Step 6
Cut out a hexagon from the felt scrap using the hexagon mini block ruler. Hand-stitch it to the background with the button to create a needle catcher.
Step 7
Draw around the inner part of the embroidery hoop onto the felt square. Cut out the circle with scissors.
Step 8
Centre the whole piece over the inner embroidery hoop and place the outer hoop over the top. Pull fabric taught and tighten the screw (Fig 6). Trim off the excess fabric and batting on the wrong side, leaving approximately 2in all the way around.
Step 9
Push the excess fabric inside the hoop and slip stitch the felt circle to the back to contain the raw edges, just catching the fold of the fabric from the front.
Step 10
Hang on the wall in easy reach of your sewing machine and fill it with your favourite notions.
Laura has been sewing since she was a child and quilting for most of her adult life. Her work has been published in several quilting and craft magazines including Love Patchwork and Quilting, Mollie Makes and Simply Sewing. She is a technical pro and until recently worked as the Deputy Editor for Today’s Quilter magazine, where she worked since the magazine launched in 2015. She loves teaching and often runs workshops at The Festival of Quilts. She first launched her quilting career selling pet quilts on Etsy and notonthehighstreet.com, inspired by her own pampered cats. Away from the sewing machine, Laura is a book addict and interiors obsessor. She regularly posts photos on Instagram @laurapritchardquilts about her works-in-progress, finished quilts and her life in Bristol.
This website is owned and published by Our Media Ltd. www.ourmedia.co.uk