A beginner’s guide to Sgraffito
Sgraffito is a hugely enjoyable craft and one that can yield different results every time. It’s fun to do, and you don’t need much to get started. Ready? Read on for our beginner’s guide to sgraffito.

Published:
Learn the basics of sgraffito with our beginner’s guide to sgraffito. Follow along with our step-by-step tutorial, learn sgraffito techniques and how to do sgraffito. We’ve also got a round-up of all the equipment you need to get started and provide handy links to products we recommend. Sgraffito is a fantastic art technique that can be used to create art with real impact, toppers for cards or just for spicing up your sketchbook.
Do you like this article, a beginner’s guide to Sgraffito? Why not check out some of our other beginner’s guides, right here on Gathered. If you’re into painting, why not try your hand at paint pouring and our beginner’s guide to acrylic paint pouring or how about watercolour painting for beginners? And this beginner’s guide on how to use oil pastels is extremely useful as it’s applicable to sgraffito.
We love seeing what you make, so don’t forget to share your craft projects with us on Instagram, Facebook, or Twitter, too!
What is Sgraffito?
So – what is sgraffito in art? It’s also called Scratch Art, and you might remember it from school, and it’s a brilliantly fun technique to introduce to little ones. Sgraffito is a form of decorative art, where you scratch through a surface to reveal another layer of colour (or pattern). The name “sgraffito” originates from the Italian word graffiare, which literally means “to scratch” – so it’s no surprise that sgraffito as an art form, originated in Italy.
Sgraffito played a significant role during the Italian Renaissance, particularly for its use in decorating building exteriors and palace facades. Its origins potentially date back as far as the 15th Century – that’s 600 years ago!
Sgraffito is a popular technique still used in painting, pottery or glass making, but for the purposes of this article, a beginner’s guide to sgraffito, we’ll be talking about sgraffito used in 2D art, rather than glass or ceramics. So, get your sketchbooks ready – it’s time to get arty!
Sgraffito supplies
Oil pastels

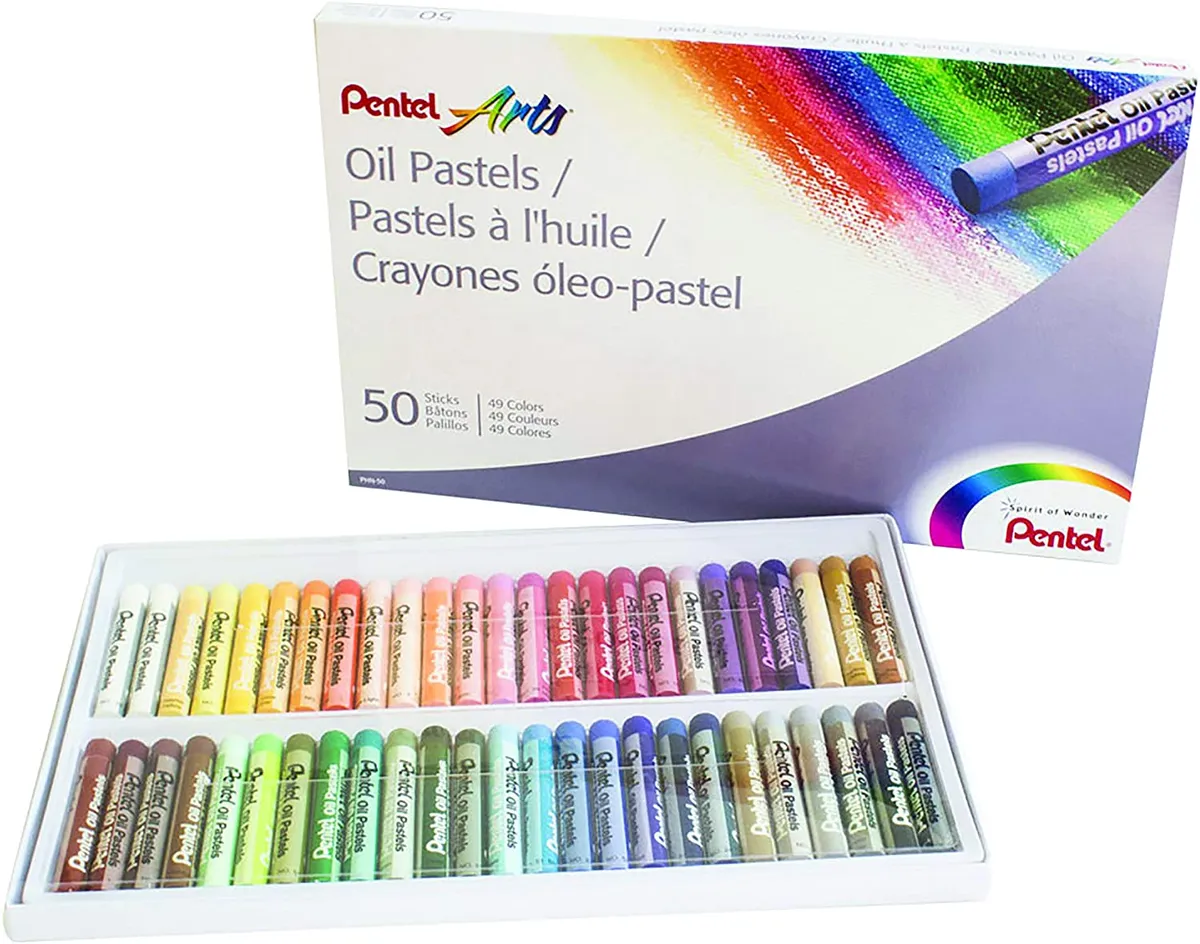
Buy now: £6.99, Amazon
Oil pastels form the base of your sgraffito art, and can be picked up from all good art or stationery shops. This set from Pentel, available on Amazon, has over 15,000 positive reviews and has 50 different colours in the pack, making this a good option with a good price point if you’re just starting out. Using oil pastels can be messy, so try to keep the paper wrappers on each of the sticks if you can, but if the wrappers come off, loop some paper to keep your fingers from getting stained. Check out our brilliant beginner’s guide to using oil pastels for an easy step-by-step tutorial on how to draw a fantastic woodland scene, written by expert Matt Breen.
Sturdy paper or card

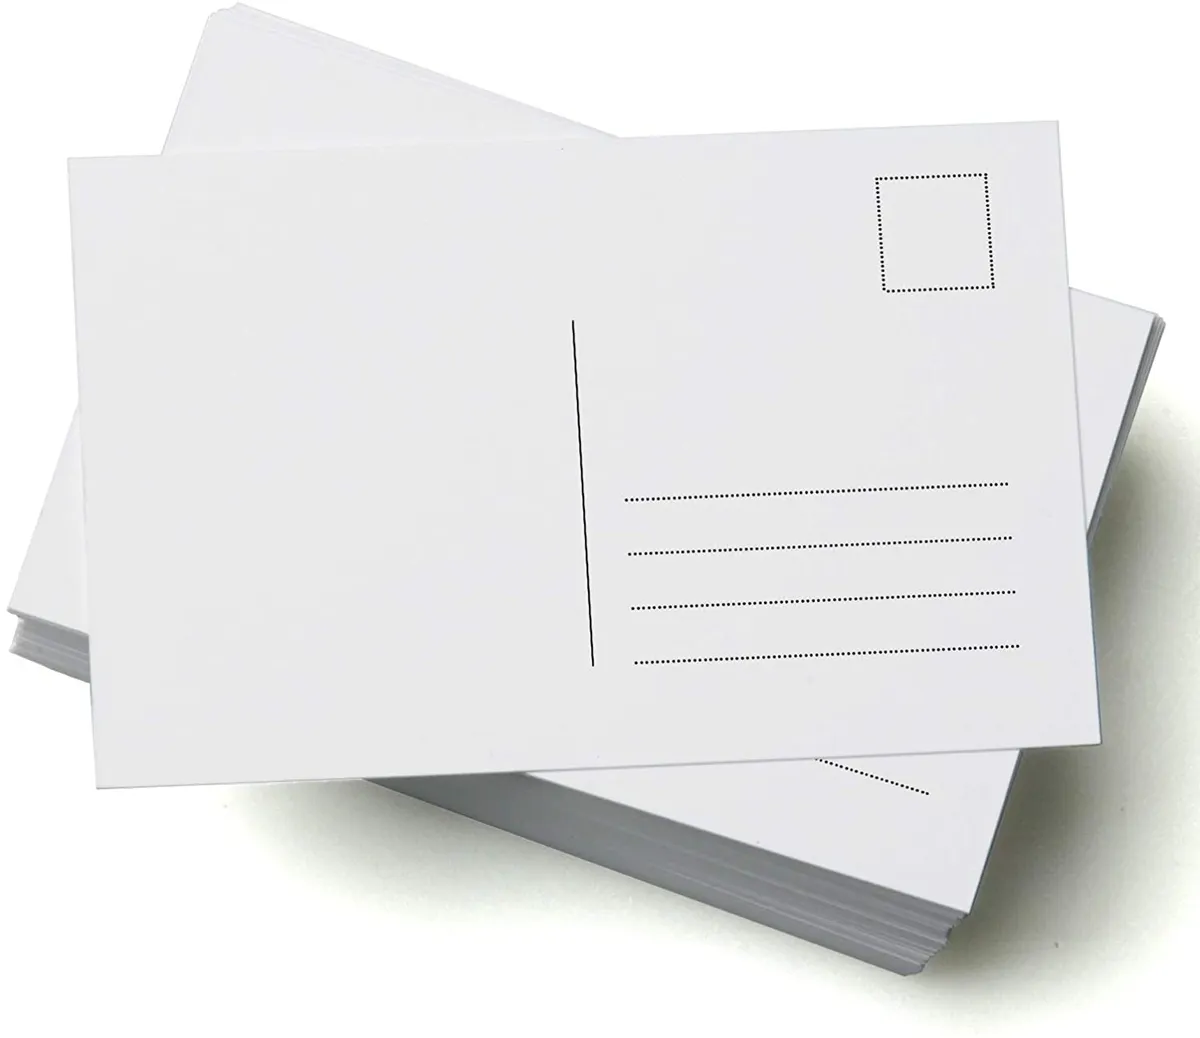
Buy now: £3.99, Amazon
Using sturdy paper or card will help when you come to scratching away your design as it won’t buckle or rip easily. Why not get creative and use something like these 350gsm blank postcards? The smaller size has the added bonus that it will take less time to cover the card with oil pastels, so if you’re looking to just try out the technique – this is a good option.
Indian ink

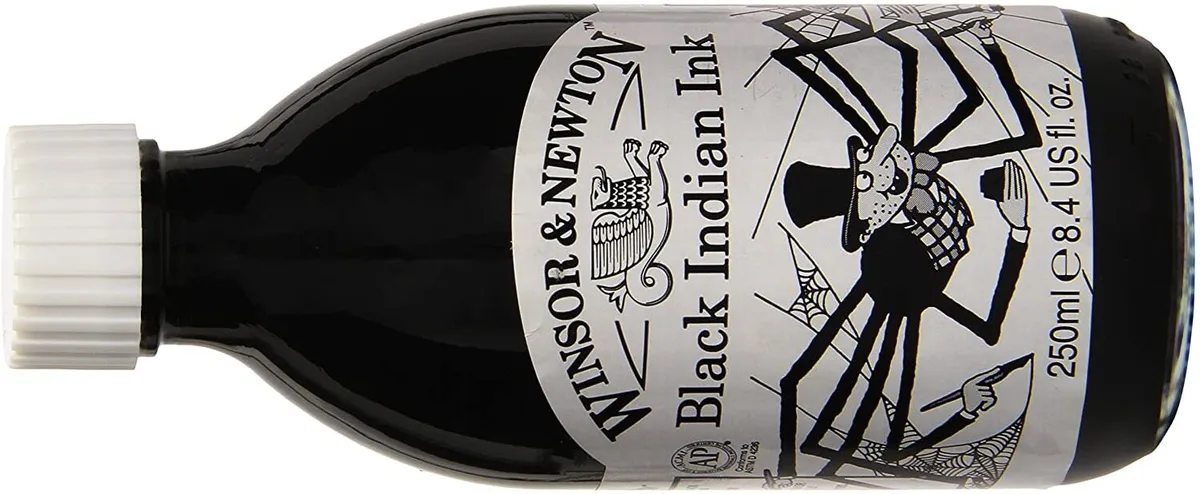
Buy now: £17.50, Amazon
In sgraffito, Indian ink is applied over the top of your oil pastel (or wax crayon) and is scratched away to reveal the colour underneath. Indian ink provides a good even finish, it’s thick and is easy to apply using a brush or a sponge. If you’re planning to make a lot of sgraffito art, or can feel yourself getting into it – then it’s worth opting for a slightly bigger bottle of Indian ink. If you’re keen to get into ink drawing, check out our guide, Ink Drawing for Beginners, written by expert Sarah Orme.
Brush or foam brush

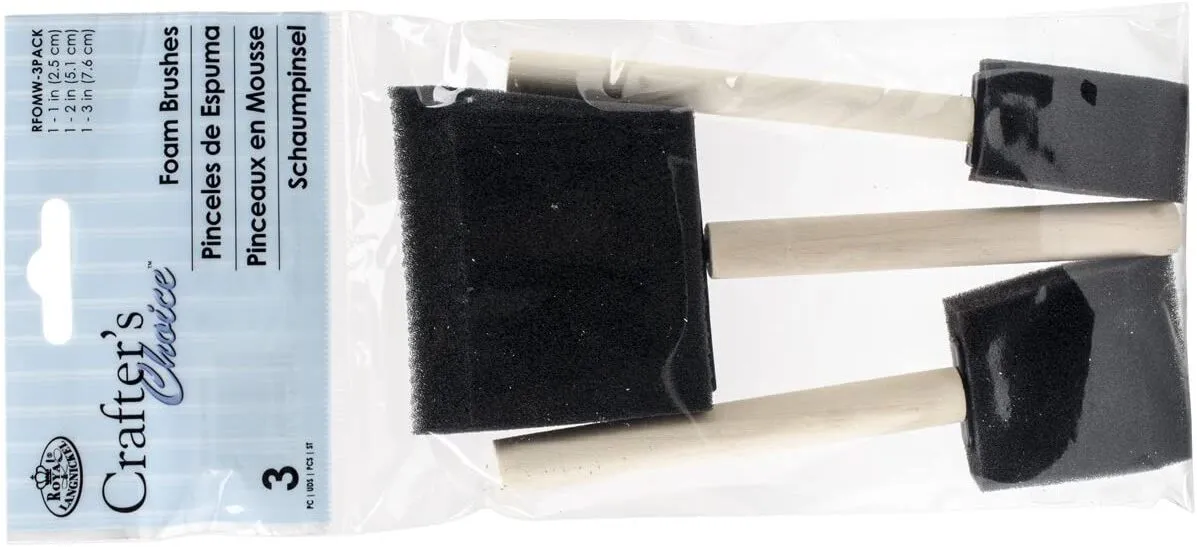
Buy now: £2.93, Amazon
Using a foam brush to apply your ink can yield super-smooth results. They’re cheap to pick up from most craft stores, or you can make them yourself at home by cutting up a kitchen sponge into squares. And of course, a normal brush works, too. If you opt for a normal brush, opt for one that has a wide, flat tip for even application of the ink.
Tools for scraping

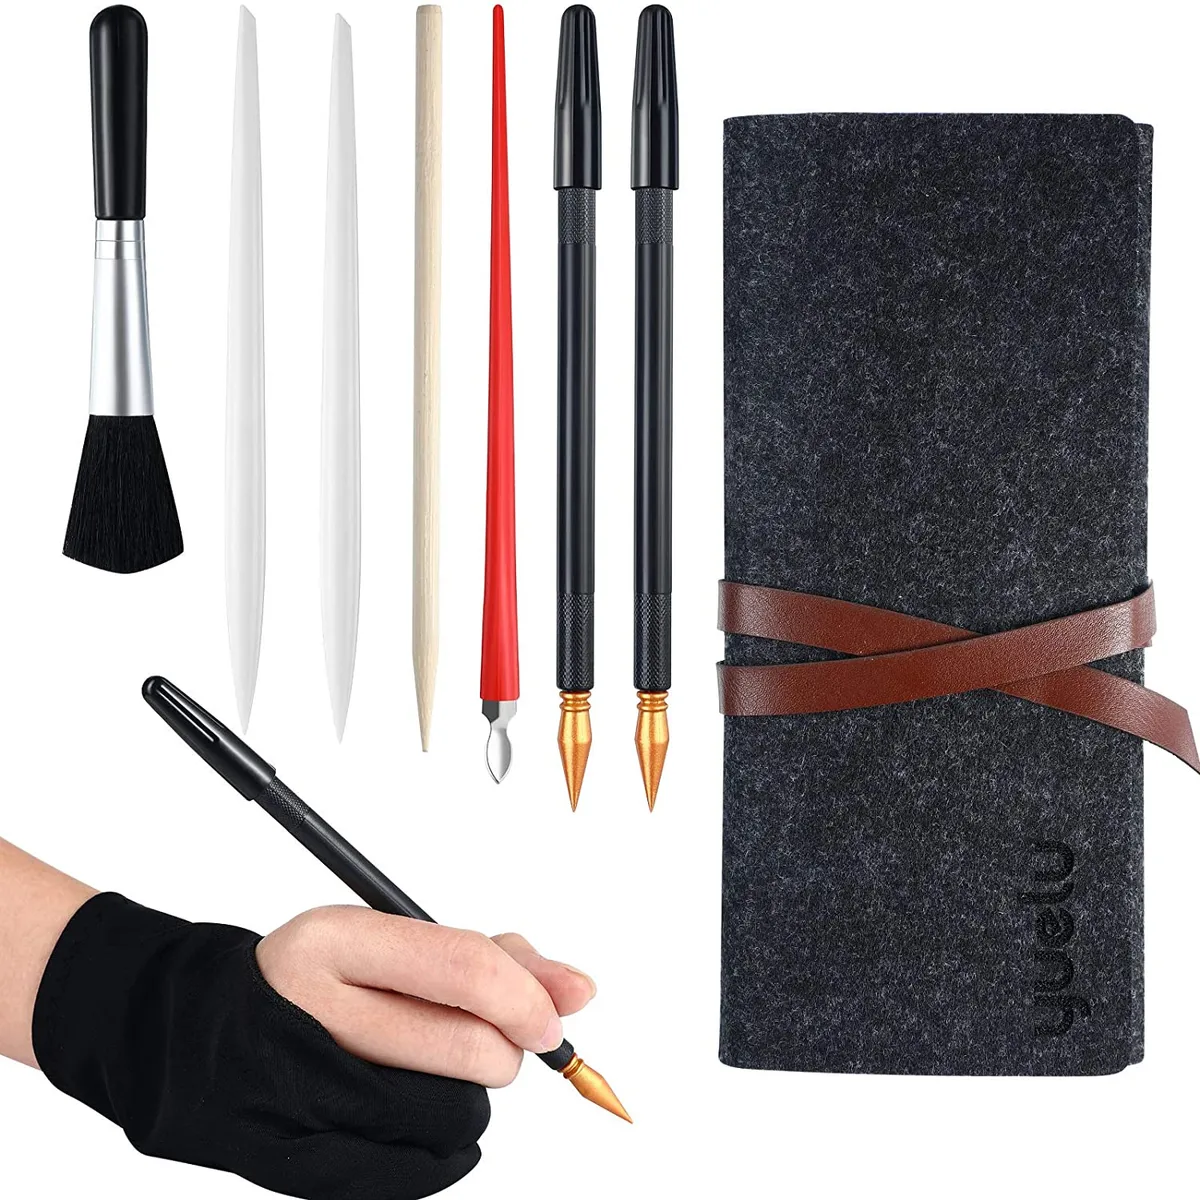
Buy now: £7.99, Amazon
You can use a wide variety of tools for your scratch art, and different tools will yield different results. Experiment by using pen lids, cocktail sticks, forks and dip pens. Alternatively, a set like this one will contain a nice selection of tools in a neat pouch to keep them protected. It also comes with a useful brush for brushing away the bits of dried, scratched off ink (and trust me – the scratched off ink gets everywhere!), as well as an artist’s glove.
Simple tools for scraping

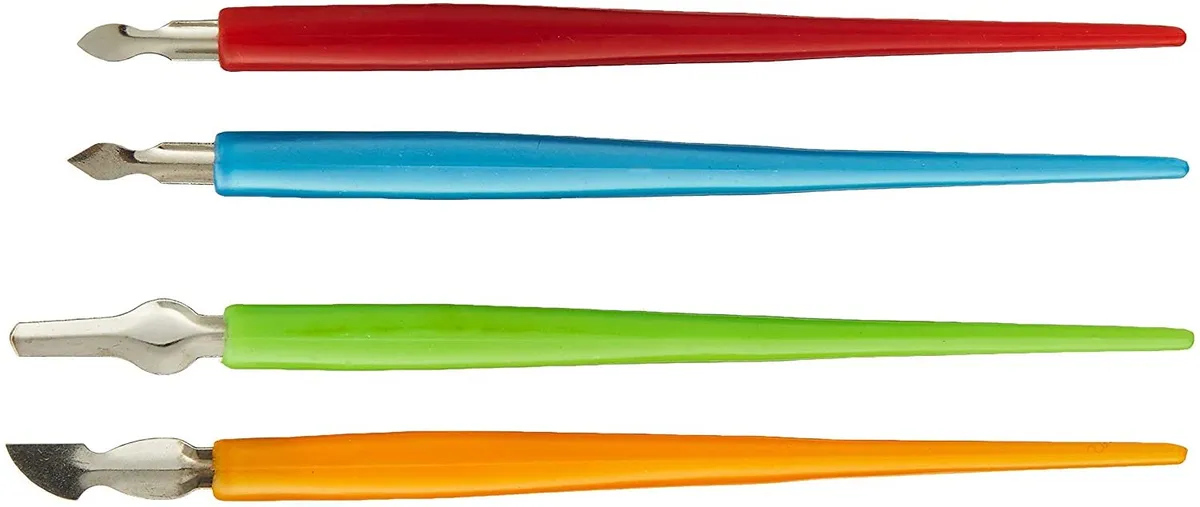
Buy now: £3.95, Amazon
Want to keep it simple? A selection of tools like in this set will do the job and includes four different nibs to experiment with. You’ll soon get a taste for which type of nib is your favourite and won’t break the bank in the process.
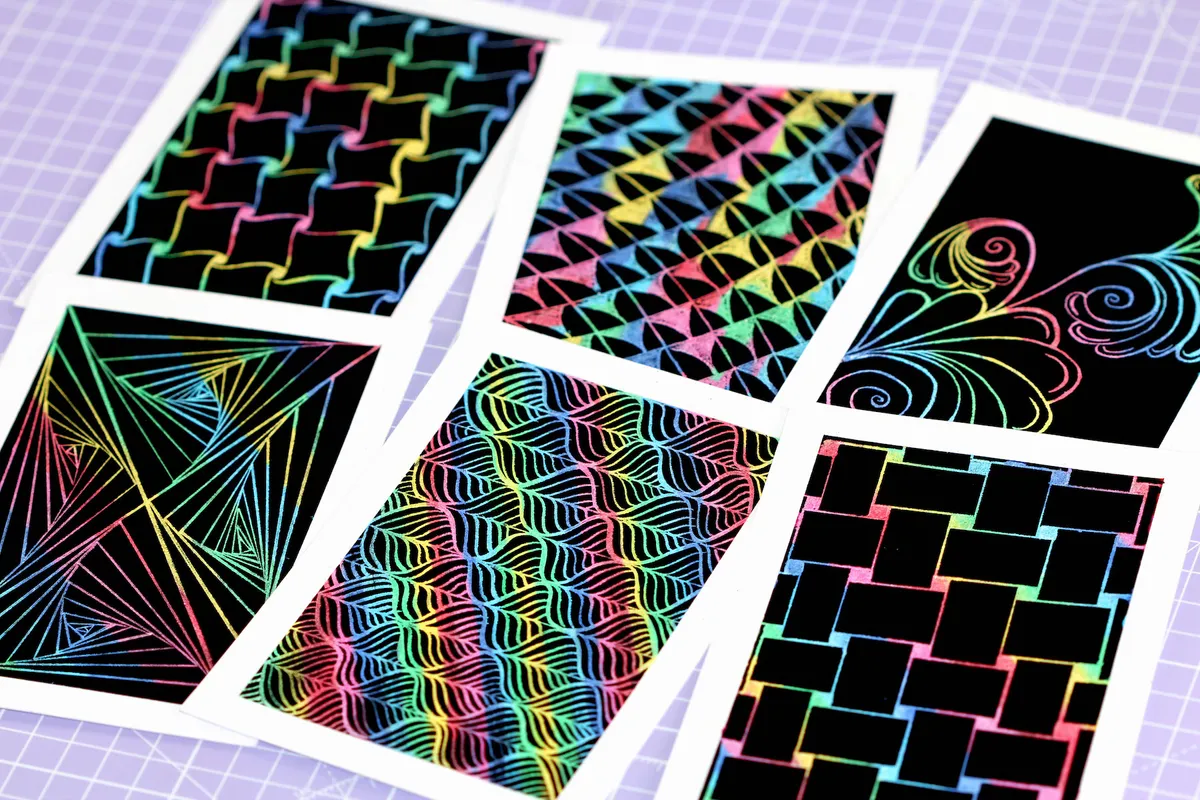
How to do Sgraffito
Ready to get stuck in? Let’s learn how to do sgraffito, and learn these six easy zentangle patterns in the process.
You will need
- White card
- Oil pastels (or wax crayons)
- India ink
- Low-tack masking tape or washi tape
- Tools to scratch with
- Paintbrush or foam brush
Step 1
First, take a piece of sturdy paper or card (or a sketchbook with high gsm value will work well) and if you want a border around your artwork, add some low-tack masking tape or washi tape around the edge.

Step 2
Next, begin to cover the surface using oil pastels. If you don’t have any oil pastels – wax crayons work brilliantly as an alternative! Try to stick to bright, fairly light colours as this will yield the most contrast with the top, black layer.

Step 3
Keep going. Use your oil pastels to create abstract designs, or, do what we’re doing and create a series of diagonal lines in a rainbow pattern.

Step 4
Cover all of your paper with oil pastel, making sure not to leave any white paper. If you want white – be sure to use white oil pastel rather than leaving the paper “bare”. Covering all the paper with oil pastel, ensures that you don’t scrape away the paper underneath when it’s time to scratch the top layer away.

Step 5
This next part always feels quite destructive, somehow! Take some India ink, we’re using black in the traditional way for maximum contrast, and paint over your oil pastel design. Using a thick brush, or a foam brush will make this part easy. Cutting up a kitchen sponge into a smaller piece and using that, is also a really great way to get a nice, even distribution of the ink. Alternatively, use a wide, flat brush like we are.

Step 6
Keep going until there is no colour remaining. If you find that you can still see some colour through the ink, simply apply another layer of ink until you reach the desired opacity.

Step 7
Let the ink dry thoroughly. I made several sheets and left them overnight.

Step 8
Peel off the masking tape around the edge (or you could wait to do this at the end, it’s down to personal preference).

Step 9
Now for the best part! Grab something sharp and start to scratch away the ink, revealing the bright colours of the oil pastel underneath. Begin by pressing fairly lightly, until you get used to the pressure needed – different types of ink will vary the amount of pressure needed. For this tutorial, we’re using a scraper tool to scratch away the top surface.
If you would like to create the same easy zentangle pattern as us, grab a ruler and scratch some evenly spaced vertical lines.

Step 10
Scratch some wavy lines in between each of the vertical lines. Alternate the direction of the wavy lines, so that the crests of the lines touch each other.

Step 11
Continue drawing wavy lines to the edge of the card.

Step 12
In each of the semicircle shapes, add a series of parallel lines that follow the line of the top curve.

Step 13
Repeat for each of the sections to create this easy zentangle pattern! Keep scratching away at the ink until you’re happy with the final design – and if you go wrong? Don’t worry – just cover up the mistakes with ink and you’re good.

Sgraffito Techniques: Learn these easy zentangle patterns!
Using different tools to scrape away the overlaying ink can yield different results. Sgraffito techniques are very similar to other techniques used in art, and include hatching, cross-hatching, stippling, contouring and doodling. Here are a few quick zentangle tutorials that you can try to create beautiful zentangle patterns with your sgraffito:
Square Weave
Step 1

Scratch a series of small, evenly spaced squares into your sgraffito board.
Step 2

Join up the squares with vertical lines, alternating between inside and outside lines.
Step 3

To add the “weave”, scratch horizontal lines alternating every other large square, as shown.
Step 4

Complete the pattern by adding alternate horizontal lines.
Twisted Weave
Step 1

Scratch a series of evenly spaced circles onto your sgraffito board.
Step 2

Next, starting on the left side of each circle, scratch a vertical line down to the right side of the circle immediately below.
Step 3

Now scratch a line from the bottom of each circle, to the top of the circle immediately to the right.
Step 4

Colour in the circles to complete your twisted weave zentangle pattern.
Flying Geese
Step 1

Scratch a large, curved cross-hatch into your DIY sgraffito board.
Step 2

In each of the segments, scratch a triangle. Make sure each triangle is pointing in the same direction to create the flying geese effect.
Step 3

Scratch away the interior of the triangles.
Step 4

Repeat until all the triangles are coloured in to complete your easy zentangle pattern.
Freehand Swirls
Step 1

Start by scratching a spiral in the bottom right-hand corner.
Step 2

Add some extra “puffs” radiating from the bottom of the spiral.
Step 3

Scratch a second spiral extending from the first spiral, and add some puffs like before. Add a third, smaller spiral in the top left corner.
Step 4

Add a fourth spiral at the bottom. Finish by adding a highlight (small curve) to the top of each of the puffs.
Optical Illusion
Step 1

Start by scratching a cross into your sgraffito board.
Step 2

Next, scratch a triangle inside one of the quadrants, offsetting it slightly, as shown.
Step 3

Scratch a series of increasingly smaller triangles, offsetting each one to create the first part of the optical illusion.
Step 4

Repeat the pattern of offset triangles in each of the other quadrants to complete your optical illusion zentangle pattern.

We hope you’ve enjoyed our beginner’s guide to sgraffito and that we’ve inspired you to try it out for yourself. For more brilliant craft tutorials, why not check out our how to use oil pastels for beginners or our beginner’s guide to acrylic paint pouring.