All products were chosen independently by our editorial team. This review contains affiliate links and we may receive a commission for purchases made. Please read our affiliates FAQ page to find out more.

Beginner’s guide to silk painting

Dive into the beautiful craft of silk painting and learn how to make your own silk painted scarf in this easy to follow, step-by-step tutorial.

Try our magazines – get 6 issues from just £9.99!

Published: September 12, 2023 at 12:54 pm

Silk painting is an ancient art form, first developed in China when it was reserved for the Emperors. Today, it makes a fun and relaxing hobby. Hand painting scarves can create beautiful, wearable works of art and thoughtful gifts for friends and family.

Silk painting can also be used to create focal elements in card making, wall hangings, pillowcases, bags, pocket squares, neckerchiefs, and other decorative projects.

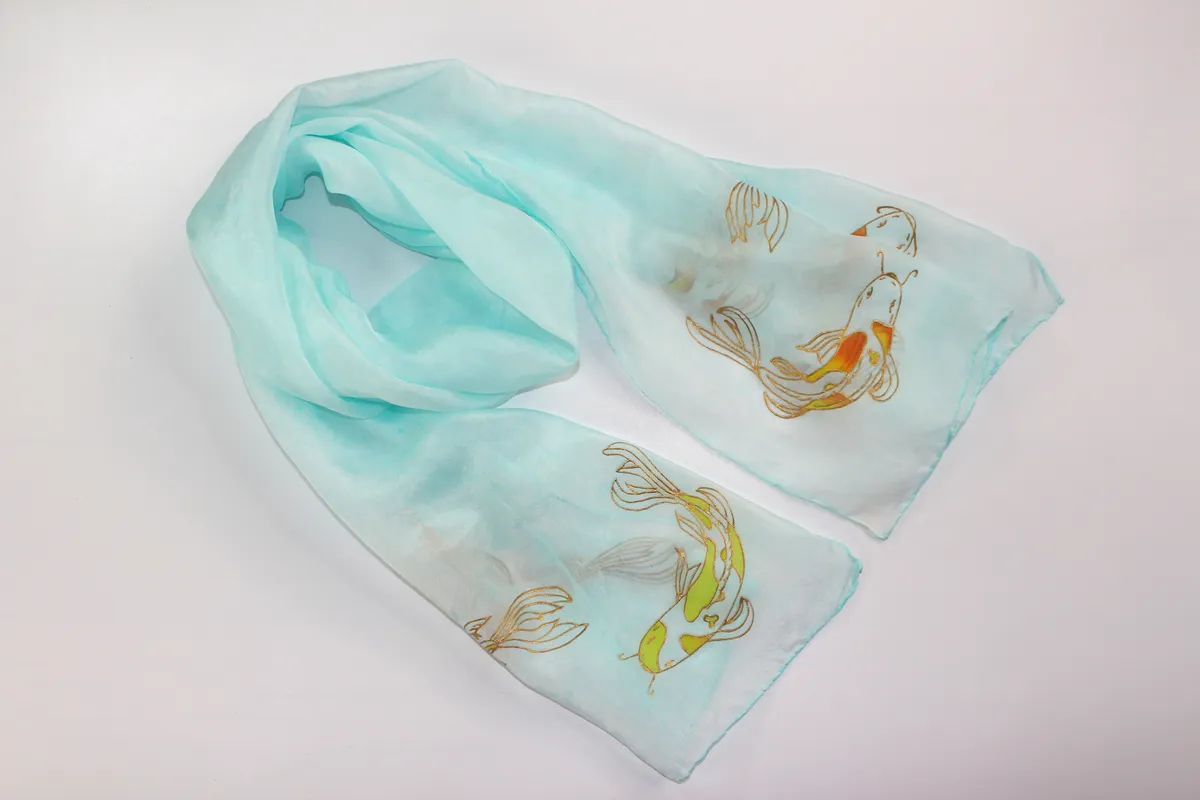
In this beginner's guide to silk painting, we show you how to make your own silk-painted scarf. First, you'll learn how to dye the silk and create a mottled texture. Then you'll learn how to use gutta to draw your outlines, and paint your design using silk paint.

We'll show you how to fix the colour so that it won't fade, and even give you a free silk painting template, so you can make your own koi carp silk painted scarf. We also share expert tips and tricks so that you can get the most out of the hobby.

This tutorial shows you how to do silk painting

Do you like this article, a beginner’s guide to silk painting? Why not check out some of our other beginner’s guides, right here on Gathered. If you’re into painting, why not try your hand at glass painting with our beginner’s guide to glass painting, where we show you how to make a sweet wildflower glass (there’s a free template for you to download), or how about learning how to paint a stunning watercolour galaxy?

If you’re looking to boost your craft stash, we’ve got you covered. We’ve rounded up the best watercolour paints and best acrylic paints, or if digital art is more your thing, we share our expert opinion on the best drawing tablets for beginners.

We love seeing what you make, so don’t forget to share your craft projects with us on Instagram, Facebook, or Twitter, too!

How to do silk painting - KREUL 81845 – Painting On Silk – Starter Set, image 2
Buy a KREUL silk painting kit

What is silk painting?

Silk painting is the traditional art of painting on silk. It dates back to at least the 2nd Century, but may be much older, as silk has been cultivated for more than 3,500 years.

The silk is stretched on a frame or embroidery hoop, then using a resist (called a gutta outliner), the outline of a design is drawn onto the silk. Once dry, the design is rendered using silk paint, before being ironed to ‘set’ the paint and gutta.

Buy a silk painting kit!

Silk painting supplies - Pebeo Setasilk Collection Set, image 2

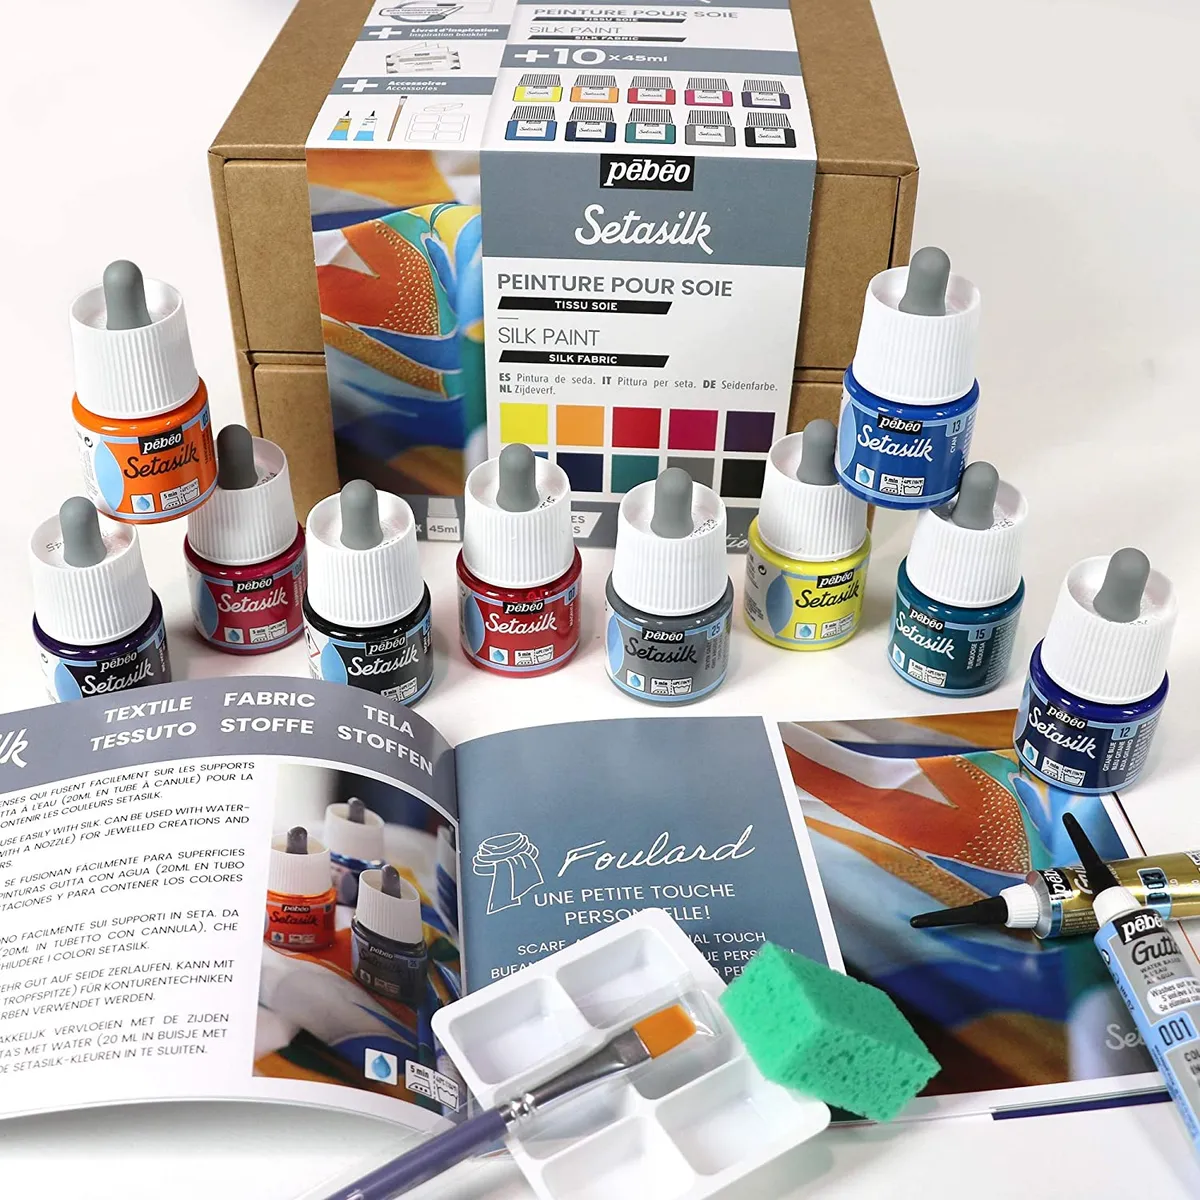
This silk painting kit has everything you need to get started, including ten 45ml pipette bottles of silk paint in yellow, tangerine, magenta, raspberry, iris, violet, cyan, gitane blue, turquoise, silver, grey and ebony. It also comes with two 20ml tubes of water-based gutta in colourless and gold, as well as a palette, brush, sponge and 50-page booklet with creative ideas for projects and workshops.

The gold gutta is made with the traditional formula, while the colourless gutta is specially formulated to be removed with water. It also comes in a brilliant desk-top drawer set made from sturdy kraft card, so it looks great on your craft desk! These inks are all mixable, and each bottle is fitted with a pipette to ensure you only use what you need.

The first thing to do is to draw out a design onto your silk. You can trace a design or draw your own freehand.
The first thing to do is to draw out a design onto your silk. You can trace a design or draw your own free hand © Kreul Javana Silk Paints

Where to buy silk painting supplies

As silk painting supplies are fairly specialist art materials, they’re not necessarily available in all craft stores. We’ve put together this list of suppliers who stock silk painting materials:

Next, go over the lines with some Gutta. This is a type of barrier paint that comes in a tube with a fine nozzle. Once dry, it will stop the different colours of silk paint from bleeding into each other.
Next, go over the lines with some Gutta. This is a type of barrier paint that comes in a tube with a fine nozzle. Once dry, it will stop the different colours of silk paint from bleeding into each other © Kreul Javana Silk Paints

Top tips for silk painting

  • Stretch your silk and keep it taught while painting.
  • If you’ve found a silk painting design that you like, because the silk is see-through, you can trace the design directly onto your silk.
  • By ‘fixing’ each layer of colour in your silken masterpiece, you can use different techniques and colours on top of each other.
  • Experiment by using inks in spray bottles, and spritzing the fabric to get watercolour effects on your material.
  • Sprinkle salt onto freshly soaked silk to get a mottled effect.
  • Wear gloves! Silk paint will stain everything it touches (don’t say we didn’t warn you).
  • If you don't have an air-vanishing pen to draw your design, use a soft pencil. 4B is ideal. The pencil will gradually fade as you wash your silk.
  • Keep a wad of tissue handy to absorb excess paint and gutta while you are working.
This tutorial shows you how to do silk painting
Learn how to create this gorgeous silk-painted scarf in this tutorial!
  • When using the gutta, make sure that you fully enclose your shapes. Otherwise, when you come to paint the silk, the paint will bleed outside the lines.
  • Check that your shapes are fully enclosed (no gaps) by turning the silk over. It's easier to spot gaps from the other side.
  • Use a cocktail stick to drag the gutta around on the silk, and smooth out air bubbles (which we don't want).
  • Once your masterpiece is complete and dry, iron for 5 minutes to fix your artwork.
  • If you don't iron it, or if you don't iron it for long enough, the gutta will peel away when wet. This is useful to know if you're using the gutta in a similar way to the way you would use masking fluid in watercolour art. Learn more about how to use masking fluid in our tutorial, how to paint watercolour pebbles.
  • Create a marbled effect by dabbing different colours of silk paint onto the silk. The colours will naturally spread out on the silk and blend together where they meet.
  • Once dry, silk paint tends to be quite light. You can build up the brightness of the colours by adding more layers of colour.
Once the Gutta outlines are dry, paint your designs using silk paint.
Once the Gutta outlines are dry, paint your designs using silk paint © Kreul Javana Silk Paints
Fix your design by ironing on a low heat. Use a tea towel between the silk and the iron so that you're not ironing directly onto the silk.
Fix your design by ironing on a low heat. Use a tea towel between the silk and the iron so that you're not ironing directly onto the silk. © Kreul Javana Silk Paints

How to do silk painting

You will need

This tutorial shows you how to do silk painting

How to dye silk

If you want to try silk painting and want instant, easy results, we think you’ll like this. By using the scrunching technique, you can achieve beautiful, mottled results in just a few minutes. Experiment with different colours and ink concentrations, and you’ll soon be confident whipping up your own mottled scarf in no time.

If you like this, then be sure to check out our guide on how to tie-dye a t-shirt!

Step 1

First, set up your workspace. Silk painting can get messy, so if you can try to work on a plastic tray to keep all the drips and splashes (relatively) contained. In this project, we’re going to dye the silk a beautiful aqua colour.

You’ll need to wear gloves for this project – silk paint will stain!

How to do silk painting – step 1b

Step 2

PEBEO makes silk scarves especially for painting, so it’s worth picking one of these up if you can. Take it out of the packet, and iron it on a low heat if you wish. We’ll be ironing it again later on, so it’s not strictly necessary to do it at this stage. The silk folds up very small, but once out of the packet it looks much larger! This is the 40 x 150cm scarf.

How to do silk painting – step 2

Step 3

Take a small glass bowl, and half-fill it with cold water. I’m using ordinary tap water. Take your silk paint and add a few drops into the water.

How to do silk painting – step 3
How to do silk painting – step 3b

Step 4

Keep adding drops into the water until you’re happy with the colour. To see whether the colour is dark enough, take a paintbrush, dip it into the water and test it on a piece of paper.

How to do silk painting – step 4

Step 5

I decided to add a few more drops to make the colour a bit darker.

How to do silk painting – step 5

Step 6

Once you’re happy with the colour, submerge your silk in the bowl.

How to do silk painting – step 6

Step 7

Make sure it’s wetted all the way through and leave to soak. I left this project for around two hours (while I had dinner), but 5-10 minutes would usually be enough to get a good coverage.

How to do silk painting – step 7b
How to do silk painting – step 7c

Step 8

Remove the silk from the bowl and gently wring out the water.

How to do silk painting – step 7e
How to do silk painting – step 8

Step 9

If you just want to dye the silk, then stop here. Lay the silk out flat and leave it to dry.

How to do silk painting – step 9

Creating a mottled background

Step 1

While your silk is still wet, spread it out on a flat surface like a tray.

How to do silk painting - step 10

Step 2

Pinch the silk to create wrinkles or ‘waves’ and leave it in this position.

How to do silk painting - step 11

Step 3

Sprinkle some salt onto the silk. We’re using coarse-grained sea salt, but you can also use ordinary table salt.

How to do silk painting - step 12

Step 4

Leave your silk-and-salt combo to dry on a tray. If you don’t have a tray, lay some cling film down on a surface and leave it to dry on that. The silk paint will stain the surface it’s left on, so just be aware of that if you feel tempted to leave it in the bath – you will end up with a blue tub!

How to do silk painting - step 13

Step 5

Now dry, dust off the salt to reveal a mottled effect to your silk!

How to do silk painting - step 14a
How to do silk painting - step 14b

Fix the colour

Step 1

Before painting the silk further, we need to ‘fix’ what we’ve done so far. To do this, iron the silk on a low heat (most domestic irons have a 'silk' setting) for around three minutes.

Hand wash the silk in a bowl of warm, soapy water. Use a non-biological detergent and gently move the silk around in the water.

How to do silk painting - step 15a How to do silk painting - step 15b How to do silk painting - step 15c

Step 2

Pat the silk dry, then iron on a low heat while the silk is still wet.

How to do silk painting - step 16a How to do silk painting - step 16c

How to stretch the silk

Step 1

The easiest way to stretch your silk ready for painting is to use an embroidery hoop. Place the inner (smaller) hoop underneath your silk, and the outer (larger) hoop on top. Tighten the hoop to pull your silk taut.

How to do silk painting - step 17

Trace your silk painting design

Step 1

If you want to create your own koi carp scarf silk painting, download your free templates:

Otherwise, find another design that you like - or you can draw your own freehand onto the silk.

How to do silk painting - step 18

Step 2

Using a pencil or an air-vanishing marker pen, trace the outline of the koi onto the silk. If you're using an air-vanishing pen, the ink will completely fade within two days, or you can wash it out instantly with water.

If you use a pencil you can achieve a finer line, however, it will not disappear completely from your silk. When the project is finished, the pencil line will be (slightly) visible on the rear of your silk.

How to do silk painting - step 19

Painting a design onto silk

Step 1

With your silk on the frame, use a gutta outliner to go over the lines of your fish.

You'll need to squeeze the tube as you draw, so it's a good idea to keep a sheet of scrap paper or kitchen paper nearby to clean the nib every now and then.

Make sure that for any area you intend to paint, there are no gaps in the outlines or the colour will bleed out.

NB: At this point, I noticed that the wood on the embroidery hoop was pulling slightly on the silk, so I covered the embroidery hoop in cling film to stop it from snagging and potentially laddering.

How to do silk painting - step 20a

Step 2

Continue in this way until you have outlined as many fish as you want on your scarf. I've gone for three fish on either end of the scarf, six in total.

How to do silk painting - step 21

Step 3

Squeeze a few drops of silk paint into a palette. Using a paintbrush, dip it into the paint and start painting the silk. Start by using dabbing motions until you get used to how the paint spreads then it touches the silk.

Keep a roll of tissue nearby to absorb the excess ink from the brush.

How to do silk painting - step 22

Step 4

You can use the colours individually, or a few at a time to create a marbled look. To do this, take it in turns to dab the different colours onto the silk. The paint will spread and naturally blend together where the colours meet.

How to do silk painting - step 23

Step 5

Once you've finished painting, set the silk aside to dry naturally. If you want to speed up the process you can use a hair dryer.

How to do silk painting - step 24

Step 6

Iron the silk on the reverse of the pattern to set the colour.

If you want to remove the gutta, wash your silk again in warm, non-bio soapy water, then rinse. The gutta will peel away quite easily and cleanly leaving just the painted areas.

How to do silk painting - step 25

Step 7

Congratulations! You've made your own DIY silk-painted scarf.

How to do silk painting - step 26

Silk painting kits and supplies

If you’re a beginner, water-based silk paints are often the easiest to work with. They’re generally fairly thin and can be set by ironing with a hot iron. There are other types of silk dyes on the market that produce a more vivid colour but require either steam or a chemical fixative to fix the colour.

We’ve picked out the best silk painting supplies to help you along in your new hobby!

Javana Silk Painting Starter Kit

Silk painting supplies – KREUL 81845 – Painting On Silk – Starter Set, image 1

These highly pigments silk paints are water-based, so they’re ideal for beginners, and will paint onto silk, cotton, viscose, linen and some types of blended fabric. The colours are mixable, so you can create secondary and tertiary colours from the five colours supplied. The kit also comes with a brush, pins to mount your silk, two tubes of gutta, and templates.

Silkcraft Silk Painting printed gutta outlines

Silk painting supplies – Silkcraft Silk painting printed gutta outlines, image 2

Create adorable silk-painted woodland animals with these handy gutta outlines. The designs measure 10 x 15cm, so are ideal for creating small, framed works of art. Or, once you have finished painting your outline, simply mount onto a folded A4 piece of card to create a lovely handmade card.

Pebeo Setasilk Initiation set

Silk painting supplies – Pebeo Setasilk Initiation Set, image 2

This is a great option if you already have brushes and gutta and just want to try out the craft before committing. It comes in 20ml bottles of yellow, magenta, violet, cyan, chestnut and ebony, and is great value for money.

Nevskaya Palitra Silk Paint Set

Silk painting supplies – Nevskaya Palitra Silk Paint Set

These silk paints can be used on a variety of fabrics, and includes nine 50ml jars in lemon, red, orange, black, violet, deep blue, light blue, deep green and light green. The bright colours are highly pigmented and have a high coverage, but this set does not come with a gutta, so if you want to use the outline technique you’ll need to buy that separately.

Pebeo Setailk set

Silk painting supplies – Pebeo setasilk set, image 1

This collection of water-based colours is vivid and intense, and will easily paint on all types of silk. There are ten different colours, each with a handy pipette for decanting exactly the right amount of ink.

Silkcraft Silk painting printed gutta outlines: Wildlife

Silk painting supplies – Silkcraft Silk painting printed gutta outlines, animals

These Silkcraft books come with lots of brilliant designs to create your own silken masterpieces. These botanical florals are timeless and make lovely card toppers or scarf embellishments. There are five different designs, and you could also use them in other crafts, like stained-glass painting, or batik.

Pebeo Setasilk Gutta: Pearl White

Silk painting supplies – Pebeo Setasilk Gutta, pearl white, image 1

Gutta comes in a wide range of different colours, and the colour of the gutta used can affect the overall design of the silk painting. For a more subtle effect, try using a lighter colour, like this pearl white. Or, for a design that more closely echoes that of stained glass, go for something bolder like black, silver or gold.

Coarse Sea Salt

Silk painting supplies – La Baleine Salt, coarse sea salt

Sprinkle salt onto wet silk to create a mottled effect. Experiment with different-sized grains and amounts for different effects. You can use ordinary table salt, or sea salt as we’ve used in this tutorial.

55 x 55cm silk scarf

Silk painting supplies – 55 x 55cm silk scarf

You’ll need something to paint on, and this silk scarf from PEBEO is a very affordable way to practise your new craft, before working up to something larger. Use it as a canvas to test out different techniques and keep note of which techniques you like best before moving onto a final piece.

40 x 150cm silk scarf

Silk painting supplies – 40 x 150 silk shawl

This is the size of scarf we used in this tutorial!

Embroidery hoops

Silk painting supplies – embroidery hoops

Embroidery hoops are an easy way to stretch your silk during painting, but also to frame your work afterwards. You can pick them up from most craft stores, and often come in packs of different sizes, like this one which ranges from 13cm to 20cm in diameter.


What will you create? © Kreul Javana Silk Paints

Make stunning accessories with silk painting

Silk painting is an ancient art which can be used to make beautiful scarves. Once you’ve learnt the basic techniques, you’ll be able to get creative and make your own unique silk paintings.

Silk-painted scarves make wonderful gifts for friends and family – or just use your new skills to make your own beautiful fabric art.

Master the art of batik

We hope you’ve enjoyed our beginner’s guide to silk painting. For more brilliant textile craft tutorials, check out our beginner’s guide to batik art.