How to make a moon phase garland

Shoot for the stars with Sophie Gibbon's moon phase garland tutorial.

Try 6 issues of your choice of craft magazine from just £9.99

Published: November 20, 2022 at 8:46 am

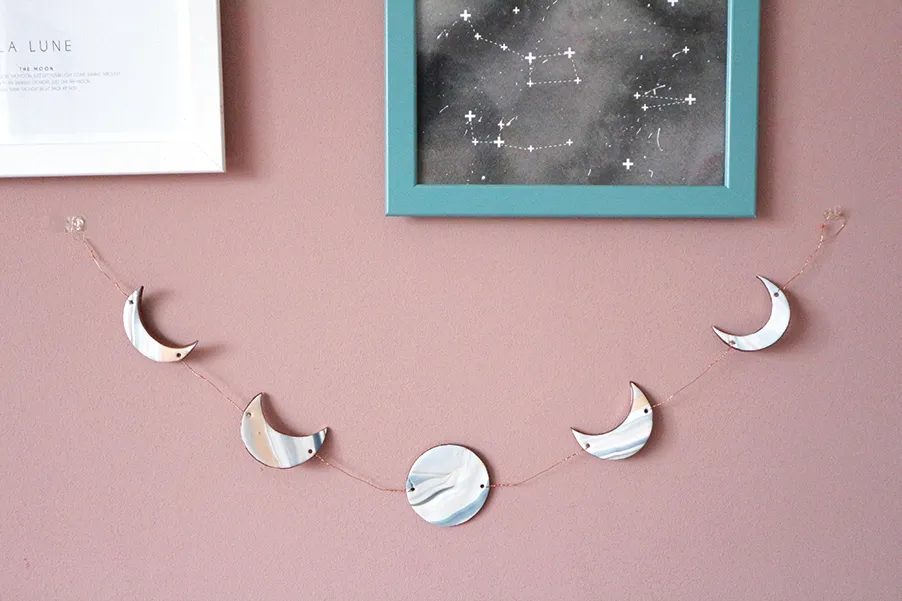
If you're a Great Pottery Throwdown fan then you're going to love Sophie Gibbons' project. She shows you how to turn plain polymer clay into a beautiful moon phase garland in just six easy steps! It's a super simple tutorial and is ideal for beginners who want to get into the world of clay.

This celestial hanging will go in any room and would make a great gift for a crafty pal. You can easily adapt Sophie's tutorial to suit your home decor. Try lots of different coloured polymer clay combinations to make funky, pretty or rainbow moons. If you enjoy making this moon phase garland then check out our round up of the best polymer clay kits. We also have plenty of clay DIYs here on Gathered like our how to make fridge magnets from clay, how to make a ring holder out of clay, and our air dry clay ideas for adults and kids.

You will need

  • Polymer clay
    • 57g blocks of white, grey, black and pale pink
  • Round cookie cutter, 5cm (2") diameter
  • Fondant rolling pin
  • 2mm piping nozzle
  • Greaseproof paper
  • Copper marker pen
  • Copper wire
  • Baking tray

How to make a moon phase garland

You will need:

  • Polymer clay
  • Round cookie cutter
  • Fondant rolling pin
  • Piping nozzle
  • greaseproof paper
  • Copper marker pen
  • Copper wire
  • Baking tray

Step 1

How to make a moon phase garland Step 1

Roll a block of white clay into a cylinder and repeat with half a block of the grey and pink. Place them side by side and add small pieces of black clay on top, as shown. Squeeze the cylinders together and roll into another cylinder. Fold into an S shape and roll into another cylinder. Repeat again, or until you’re happy with the marbling. Avoid rolling too much as you may lose the effect.

Step 2

How to make a moon phase garland Step 2

Roll the piece out flat with a rolling pin and cut five circles with the cutter. On four of them, use the cutter to create crescents, making two wide ones and two narrow ones.

Step 3

How to make a moon phase garland Step 3

Pierce a small hole in the top and bottom of each piece using the piping nozzle


Step 4

How to make a moon phase garland Step 4

Place the shapes on a baking tray covered with greaseproof paper and bake at 130ºC/266ºF for 30 minutes.

Step 5

How to make a moon phase garland Step 5

Once the shapes have cooled, colour the edges with the copper marker pen.

Step 6

How to make a moon phase garland Step 6

Cut six 12cm (4¾") lengths of copper wire. Thread them through the holes on the shapes to join them and twist each end around itself until securely fastened. On the top and bottom pieces, create a loop and twist securely. This will allow you to hang the garland either vertically or horizontally.

We hope you’ve enjoyed making your moon phase garland. We have plenty more clay projects here on Gathered for you including our how to make an air dry clay vase and DIY coasters.