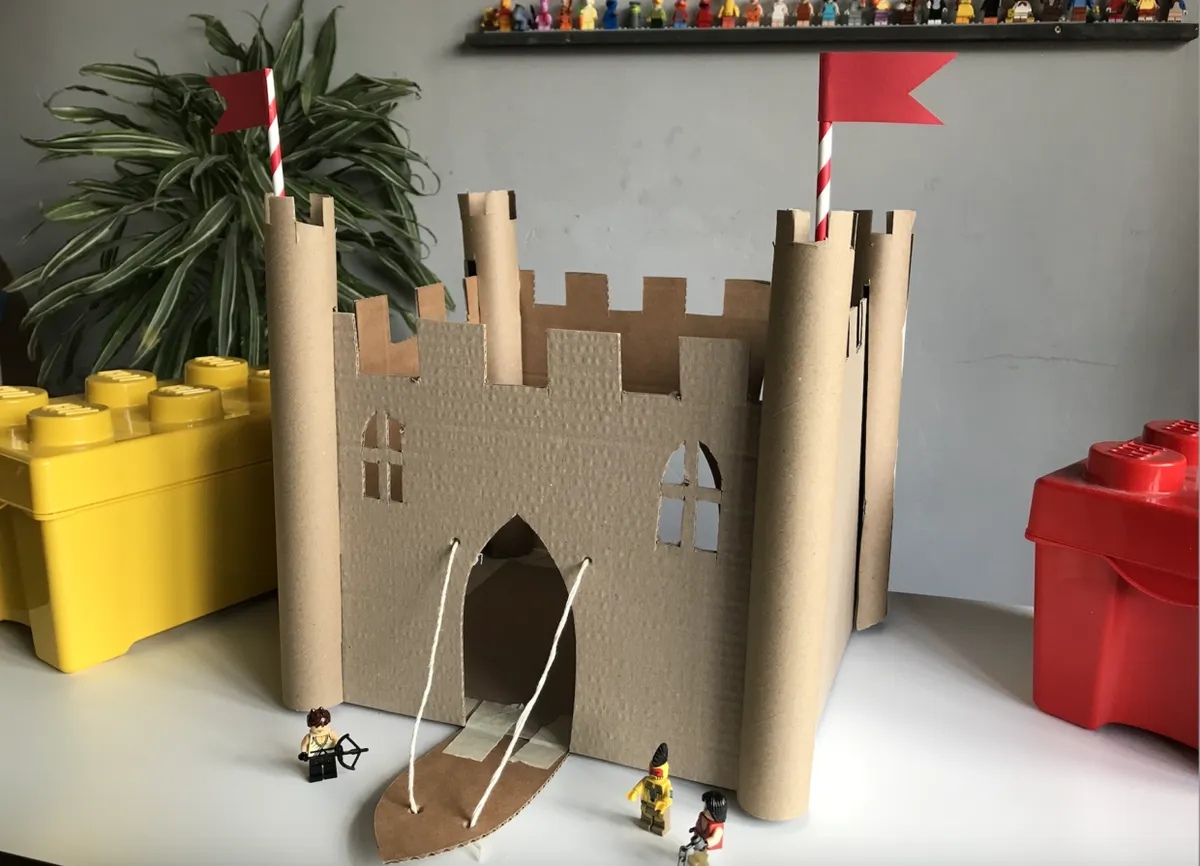
How to make the main castle – sheets of cardboard method
Step 1
To make the four walls of your castle, cut five pieces from your sheets of cardboard:
- Two x side wall pieces (25cm high x 28cm wide)
- Two x main wall pieces (25cm high x 32cm wide)
- One x base piece (32 x 28cm)
Step 2
Take the four wall pieces, and cut away a series of small squares from along the top edge of each piece – to make battlements.

Step 3
Take the front piece of your castle and cut out a door shape from the front. Keep the door piece to one side – you’ll need it in the next step.

Step 4
Cut two windows, either side of the door. It’s easiest to do this with a craft knife but you can do it with a sharp pair of scissors too – it’s just a bit more fiddly if you want to cut small windows.

Step 5
Lying them flat, next to each other, use masking tape to stick the bottom edges of the four walls to the four edges of your base piece of cardboard. 
Now raise the walls upwards so they are at a 90 degree angle from the base piece. They should meet in the 4 corners. Stick more lengths of masking tape along the inside of each corner join. You have a castle shape!If you 
If you need to reinforce the corners, you can add a small piece of masking tape to the outer side of the corners too. This will be covered up in later steps.
Step 6
Use a pencil to poke 2 holes either side of the door, near the top of the door. Poke 2 more holes in the front of the door.

Step 7
Take a piece of rope and tie several knots in one end. Thread this through one of the door holes, so the knot is on the front of the door, with the rope poking through to behind the door. Repeat with another piece of string and the other hole in the door.
Step 8
Take the two pieces of rope and thread them into the holes in the front of the castle (from front to back) either side of the door.
Leave enough rope that the door can hang flat in front of the castle, then tie three knots in the loose end of the rope, inside the castle to secure it behind the hole. Trim away any loose ends inside the castle.

Step 9
Lie the door so it is front-facing downwards, in front of the castle, with its bottom edge lining up with the bottom of the door aperture you cut in the the front of the castle. Use masking tape to tape along this join and make a hinge.

How to make the main castle – cardboard box method
Step 1
If you are using a cardboard box, the method is mostly similar but you make the hinge for the drawbridge in a slightly different way.
To start, cut the 4 flaps away from the top of the box. This cut edge will be the top of your castle.
Step 2
Cut a series of squares away from the top edges of the box to make the battlements. You can use scissors or a craft knife for this.
Step 3
Cut around the outer sides of a door shape from the front of the box using a craft knife or scissors. Leave the bottom edge of the door uncut – this will form the bottom hinge of the drawbridge.
Step 4
Cut two window shapes, either side of the door.
Step 5
Use a pencil to poke 2 holes either side of the door, near the top of the door. Poke 2 more holes in the front of the door.
Step 6
Take a piece of rope and tie several knots in one end. Thread this through one of the door holes, so the knot is on the front of the door with the rope poking through to behind the door. Repeat with another piece of string and the other hole in the door.
Step 7
Take the two pieces of rope and thread them into the holes in the front of the castle, either side of the door. Leaving enough rope that the door can lie flat in front of the castle.
Tie three knots in the other end of the rope, inside the castle. Trim away any loose ends inside the castle and you have a drawbridge.
How to make the turrets
Step 1
To make the turrets you’ll need some tubes of cardboard. I have used two 1m-long wrapping paper tubes. Cut the tubes in half so you have four tubes.

Place each tube standing upwards next to the castle edge, and make a small mark where the top of the castle wall falls. Ideally you want the tube to be about 5cm higher than the top of the castle wall.
[pullquote quote="You can also do this step with kitchen roll tubes, or smaller toilet roll tubes - they just won’t be the full height of the castle and can just pop on each top corner." /]
Step 2
Take your 4 tubes and cut a long thin slit all down the front of the tube. This should start from the bottom edge upwards, and end at the mark you made in step 1. It should be about 2 mm wide.

Step 3
Rotate the tube by 90 degrees and cut a second slit, again on the front of the tube (your first slit should now be on the side of the tube). This slit must be the same size and shape as the first.
Repeat for the other three tubes.
Step 4
Cut a series of small square shaped notches away from the top of each tube – this will give the effect of battlements.
Step 5
Slot the tubes on to each corner of the castle. The slits you cut should slip over the castle walls and the turret will stay in place. If you need to, add a little masking tape on the inside to secure the turrets in place.

Step 6
Cut a simple flag shape from a brightly-coloured scrap of card or paper. Stick a straw to the back of the flag with PVA glue. Now repeat to make a second flag.
Step 7
Stick the flags to the inside of the front two turrets using masking tape.

Your castle is finished! You can raise and lower the drawbridge and have fun bringing your favourite toys to play in it.