All products were chosen independently by our editorial team. This review contains affiliate links and we may receive a commission for purchases made. Please read our affiliates FAQ page to find out more.

How to make wax melts with esssential oils

Fill your home with your favourite scents! This quick and easy craft project makes great gifts to friends, family or yourself! Read on to discover how to make your own soy wax melts with our video guide and step by step instructions

Try our magazines – get 6 issues from just £9.99!

Published: May 6, 2021 at 4:35 am

We're all in need of a little self-care from time to time (and let's face it, it's been a bit of a stressful year). So we are bringing you the ultimate in therapeutic craft projects – this step by step guide to how to make your own wax melts! If you haven't discovered them yet, get ready for a treat.

In good news, wax melts are easy to make at home, and there are some amazing wax melt kits here in the UK to get you started. We actually used a kit in this post – scroll to the bottom of this tutorial to find details of the kit we used, and a few of our other favourite kits.

DIY wax melts have surged in popularity, partly as they are so versatile and easy to adapt for gifts and to suit your style. By making your own, you can easily adjust the colour, scent, shape and even add extra touches (from glitter to lavender buds). We think they'd look beautiful made using shell silicone moulds or fruit shape moulds!

If you enjoy this tutorial, you might also enjoy our guide to How to make a rag rug, or check out our quiz: Creative Hobbies for Adults – which craft is right for you? You can slo use up your soy wax flakes with our How to make beeswax wraps tutorial, and use your essential oils in our How to make soap at home and how to make bath bombs projects.

What are wax melts?

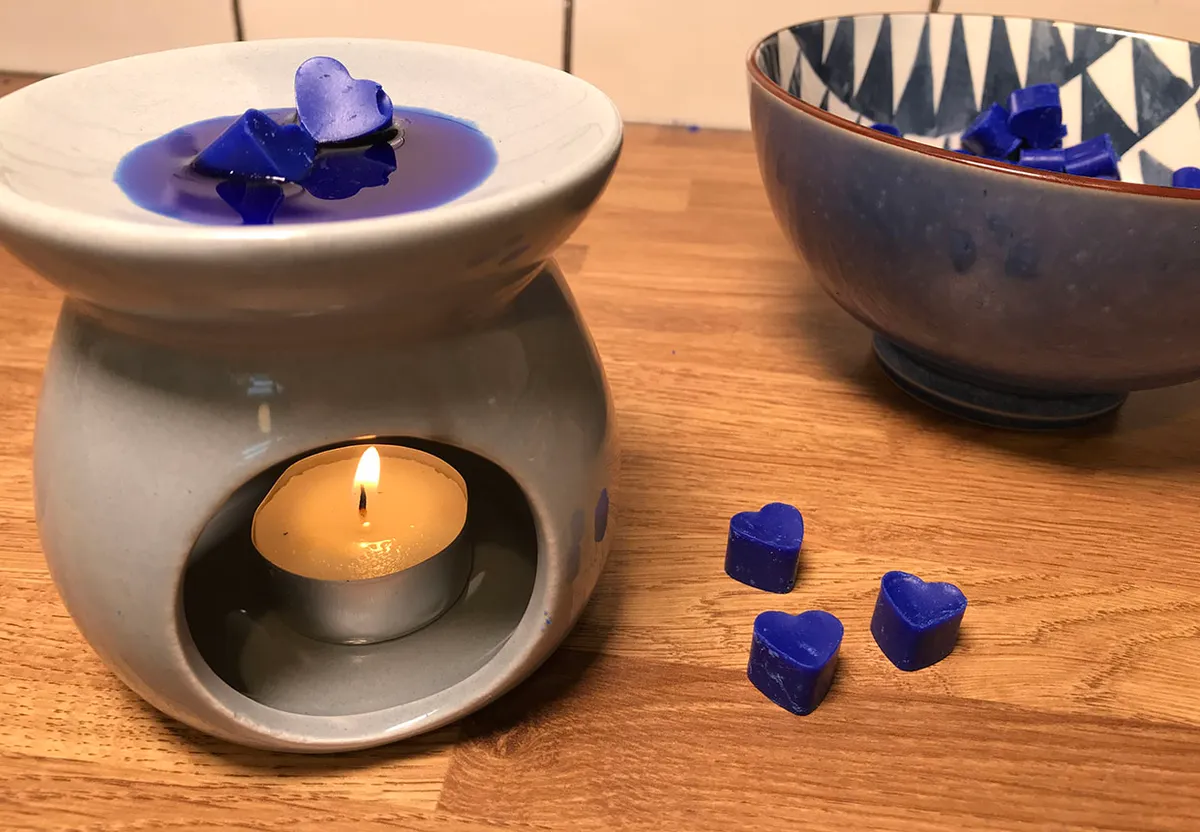
Wax melts are small shapes (usually cubes, bars or sweet little shapes like hearts) made from coloured wax. You place them in the top of an oil burner and heat. As they warm up and melt, the fragrance inside is unlocked and they fill your room with lovely aromas.

We're personally big fans of using lavender essential oil for it's soothing qualities, but there are also all sorts of ways to add a fun twist. The kit we are using in this post came with a selection of different sweet shop flavours, from candy floss to pear drops!

Fancy giving it a go? Read on for our full, easy-to-follow tutorial for how to make soy wax melts.

How to make wax melts safely

We need to add a little disclaimer here – burning anything in your home obviously comes with natural safety issues! This tutorial is for how to make soy wax melts. Not all waxes are created equal, nor do they melt in the same way or react in the same way at different temperatures. This means not all types of wax are suitable for wax melts. We recommend that if you are following this tutorial, you also use soy wax as we have done. The same advice goes for the type of scent you add – stick to either essential oils or specially-made fragrance oils that come with a wax melts kit.

How to make wax melts with essential oils

You will need:

  • Soy wax flakes (100g)
  • Saucepan (Or you can use a microwave)
  • Heatproof glass bowl (Or you can use a microwave)
  • Thermometer
  • Pipette (For adding the oil) ((optional))
  • Silicone mould (An ice cube tray works too)
  • Wooden stick or spoon ((for stirring))
  • Fragrance or Essential oil (10g – to add scent)
  • Eco soy dye (1g to add colour)
  • Glitter ((optional if you want to add shimmer))
  • Oil burner
  • Wax melts kit

Step 1

First up you’ll need to melt the wax! There are two methods for this – we have heated ours in a microwave in 30 second bursts (stirring after each burst) – after around 2 minutes your wax will be completely molten. We put our wax into a small plastic jug for this.

Another popular method is to add some water to a saucepan and heat it up on a hob until it’s simmering, then rest a heatproof bowl in the top of the saucepan, add the wax to the bowl and stir until it’s all melted.

How to make wax melts step 2 How to make wax melts step 3 How to make wax melts step 4 

Step 2

Once your wax is completely melted, use your thermometer to check the temperature. It’s always worth checking to see if there are any specific temperature guidelines on the wax you are using but we heated ours until it got to between 68°C and 70°C.

How to make wax melts step 5

Step 3

Take the bowl off the heat and rest it on a heat-proof surface. Now it’s time to add your colour and scent. Stir 1g of eco soy dye and 10g of Essential oil or fragrance oil into the melted wax. Stir it all together and keep stirring for about 2 minutes.

[pullquote quote="While we created this post to show you how to make wax melts with essential oils, this technique also works with fragrance oils (these often come with DIY wax melt making kits)." /]

How to make wax melts step 6

How much oil should you use in your wax melts?

There is no one set answer to this as basically it depends on how strong you want your handmade wax melts to smell once they are heated. You may even want to experiment a bit with different amounts. The maximum amount you should use is 10% oil to wax ratio – so for 100g of wax you would add 10g of oil. You want to lock the fragrance into the wax melts so it’s only released on melting. If you’re feeling cautious, you could start with 5% (or 5g) of oil and test it out, before you commit to adding more for your next batch.

Step 4

Test the temperature again and once it’s 60°C, it’s time to pour your wax into the silicone mould. Once you stir, your wax can cool quite quickly – don’t let it cool too much or it will become too firm to pour into the moulds.

How to make wax melts step 7

Once your wax is the right temperature, pour it into your shape mould. We’ve put the link to the kit we used, along with a few other handy starter kits, below.

How to make wax melts step 9

[pullquote quote="Before you pour into the moulds, this is the stage where you can add a little extra detail. To add a bit of sparkle, add a little glitter to the moulds, or for a natural touch scatter a few lavender buds into the moulds before you pour." /]

Step 5

Leave your wax melts to set for 2 hours, then remove them from the moulds.

How to make wax melts step 8Ta da! This is our favourite part (apart from the melting).

Once they are out of the moulds, you can use them immediately but for best results, leave them to set fully for 24 to 48 hours. This ensures the best, fullest aroma when you get to the next stage – melting them!

How to make wax melts step 10

Step 6

To use your wax melts, pop one or two into the top of an oil burner, light a candle underneath and enjoy the fragrance that is released as the wax warms up and melts.

How to make wax melts step 11
How to make wax melts step 12

We hope you enjoyed our DIY wax melts tutorial! For more fun craft projects, head over to our round-up of 35 easy crafts to do at home or try our top 10 t shirt yarn projects.

How long do wax melts last?

Wax melts are known for keeping their scent longer than candles, as they don’t burn but instead release their aroma slowly. How long the scent lasts for depends very much on the size of the melt and the amount of fragrance it contains. Typically with one cube-shaped wax melt should last you from 5–10 hours. The ones we have made here are a bit smaller and lasted 2 hours each.

5 of the best wax melt kits UK

1. Home and Hygge Soy Wax Melting Kit

Hazel and Blue’s Soy Wax Melts Making Kit lets you make eco frindly, sustainable wax melts which are as pretty to look at as they are relaxing to burn. This beautiful kit comes with a blend of darjeeling and jasmine and dried flowers – it’s vegan with 100% recyclable packaging and natural ingredients.

Soy wax melts kit uk

2. Starter Wax Melt Making Kit

Pick your favourite from 6 different flavour options (from lavender to chamomile or fresh cotton) for this easter starter DIY wax melts kit. Each kit contains everything you need and full instructions.

Wax melts kit UK

3. Petal Wax Melts Kit with burner

Treat yourself to making your own beautiful confetti wax melts with these calming kits from Shropshire Petals on Etsy. Choose between two different scents and a myriad of different petal options.

Wax melts kit with burner

4. Fizzy Whizz sweetshop scents and glitter wax melts kit

If you like the idea of making wax melts as gifts, and cooking up a batch, this bumper kit will set you up to make fun wax melts with candy aromas and a sparkly finish. Each kit contains 5 scents – Strawberry bon bon, Cola cubes, Lollypop Candy floss, Pear drops and Eco soy wax, plus 3 pots of glitter and all the essential supplies and instructions you need.

Wax Melts Kit Fizzy Whiz

5. Wax Melt Starter Kit (ready-made)

Love the sound of this tutorial but not sure you’re ready to play around with making your own melts? This complete kit from Kitchen Scents will get you set up to try out ready-made wax melts before you dive into making your own. It comes with everything from the wax burner to 10 rapeseed wax melts of your chosen scent and 6 rapeseed wax tealights in a small recyclable glassine bag. All vegan, cruelty-free and eco-friendly.

Original Soy Wax Melts Starter Kit