Step 1
How to add your macrame cord to your S-hooks
Step 1
Hang the pole or pipe securely from a doorway, picture rail or clothing rail with S-hooks.
Cut a 2m (78¾") length of rope and tie both ends of it to the pole.
Measure out three sections at the centre of the rope length, one 30cm (11⅞"), one in the middle measuring 60cm (23⅝") and then another 30cm (11⅞") section.
Mark the positions of the three sections by tying short lengths of rope on the pole.
You should have at least 40cm (15¾") excess on either end.
Step 2
Making your first row of knots
Step 2
Cut 40 3m (118⅛") lengths of rope – you’ll use 20 of them on each of the 30cm (11⅞") sections, sections one and three.
Using lark’s head knots, attach 20 lengths to section one and 20 lengths to section three.
Looking for more modern macrame?
Find your next project with our collection of the best macrame patterns. It includes some beautiful modern makes including camera straps and plant holders.
Step 3
Now it’s time to make your second row of knots


Step 3
Cut two 5m (195⅞") lengths of rope. Fold each one so one side measures 1m (39⅜") and the other measures 4m (157½").
Use a lark’s head knot to tie the lengths either side of the marker between sections one and two, ensuring the two shorter ends of these two lengths are facing each other so they fall in the centre.
Repeat this step for the other section marker, then work 10 half square knots with each of these newly tied lengths.
Step 4
Cut 40 3m (118⅛") lengths of rope. Fold each one in half and attach to section two with lark’s head knots.
Step 5
Let’s make the square knot section of your wedding backdrop

Step 5
Working from left to right for every row, complete one row of square knots on section two.
Step 6

At the start of row two, leave the first two strands free before starting the next row. You’ll naturally have two strands left at the end of this row.
Keep working down in rows, decreasing by two strands at each end until you have 20 rows of square knots.
Step 7

Now repeat Step 6 for sections one and three – the first row will have 10 square knots decreasing down for 10 rows.
When you reach the bottom of each section you’ll have four strands left.
Step 8
Finish off the half square knot section


Step 8
Working from the outside of each section in towards the centre to form a triangle, complete two diagonal rows of clove hitch knots in all three sections.
When you reach the end, use the four strands in the centre of each triangle to make a series of half square knots to your desired length. Tie the ends together using a wrap knot.
Step 9

Now finish off the half square knots which separate the sections, working them to your desired length. Secure the ends with a wrap knot as per Step 8.
Step 10
Add the plaits and twists to make it look extra hippie!


Step 10
Cut three 2m (78¾") strands of rope. Fold each length in half, then attach the strands into the spaces in the centre of section two using lark’s head knots.
Divide into two sets of three and make two plaits just over 50cm (19¾") long.
Cross the plaited strands and push the ends into the gaps of sections one and three at the point where the rows of clove hitch knots meet. Knot at the rear to secure and trim.
Step 11

Cut four 5m (195⅞") strands of rope and attach two strands to either end of the piece with a lark’s head knot. The fold ratio is 1m (39⅜") to 4m (157½") again, with the 1m (39⅜") lengths on the inside.
Make around 1m (39⅜") of half square knots with each rope length. Making sure both sides are the same length, bring the ends to the centre and push through the gap in section two where the rows of clove half hitch knots meet. Tie at the rear to secure, then trim.
Step 12

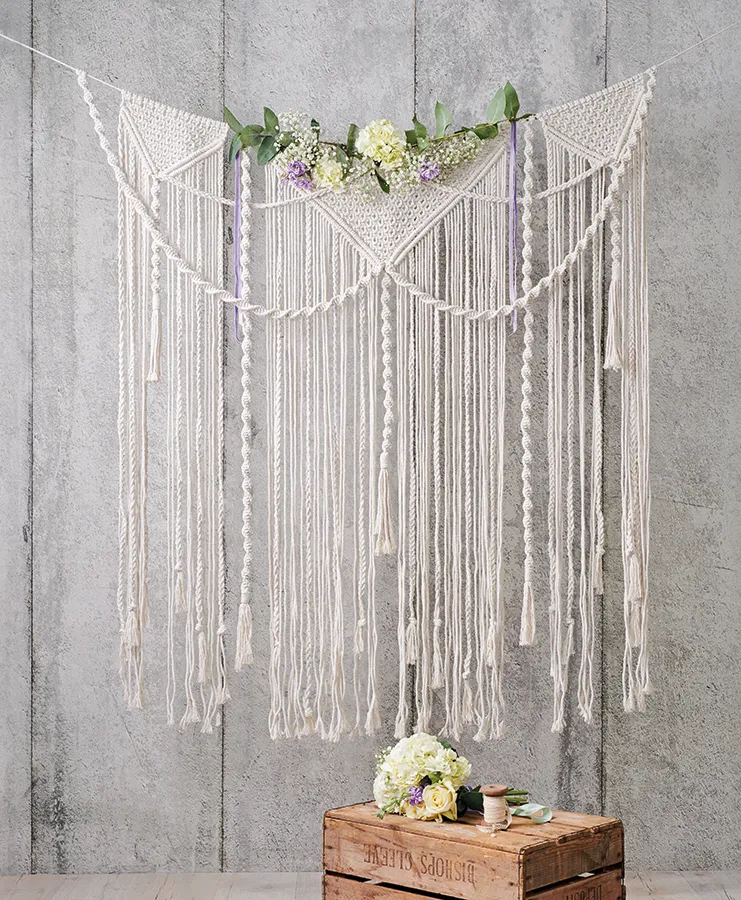
Add evenly spaced plaits to all the sections for additional texture, using the main image as a guide and making sure they’re identical on both sides.
Add six plaits to both sections one and three, and eight plaits to section two.