DIY plastic bottle wreath

Choose to reuse! Celebrate planet Earth with Christine Leech’s recycled plastic bottle wreath.

Try 6 issues of your choice of craft magazine from just £9.99

Published: August 12, 2021 at 7:47 am

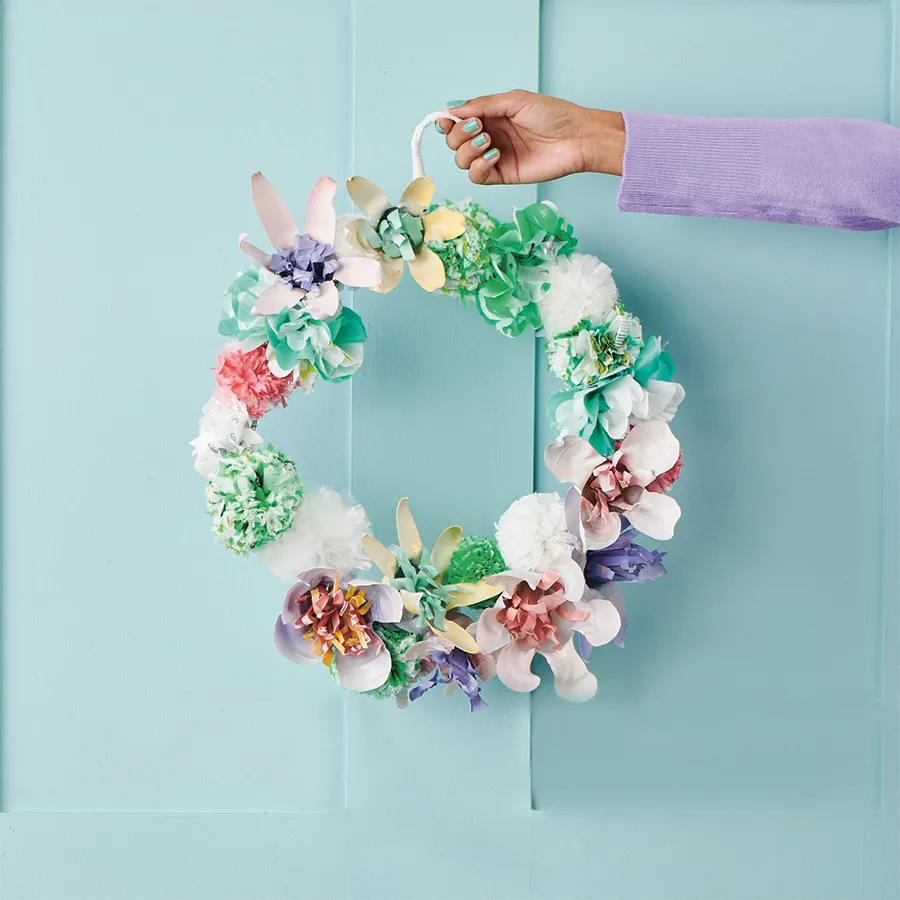
Single-use plastic? Not on our watch. It’s time for the contents of your recycling box, and that bag of bags you’ve stuffed under the kitchen sink, to come into their own. Christine Leech shows you how to make this pretty plastic bottle wreath that will look fabulous hanging in your garden. Empty bottles become wild and beautiful flowers and plastic bags become fluffy pom poms or carnation-style blooms. It’s the new life they deserve, and it’s a whole lot kinder than landfill. Plus it's waterproof so it can hang out in your garden all year round.

We just love sharing sustainable crafts with you so here's a few more for when you've finished your plastic bottle wreath. Next knit up a reusable dishcloth and crochet some reusable make up pads. But first, it's over to Christine for her plastic bottle wreath tutorial.

Materials

  • Plastic bags
  • Plastic bottles, 250ml and 500ml
  • Two wire coat hangers
  • Small and medium pom pom makers
  • Small candle
  • Spray paints in pastel colours
  • Glue gun
  • Florist wire
  • Pliers

Plastic bottle flower wreath tutorial

You will need:

  • Plastic bags
  • Plastic bottles
  • Coat hangers
  • Pom Pom makers
  • Candle
  • Spray paints
  • glue gun
  • Florist wire
  • Pliers

Make the plastic bottle wreath's pom poms

Step 1

For each pom pom, use approximately three or four single-use supermarket shopping bags. If the bags are bigger or smaller, you may need a different quantity. You’ll need to cut them into strips so you can create pom poms in the same way you would with yarn and pom pom makers – it’s quicker if you have continuous strips of plastic to work with. Make sure you have a flat surface to work on. You can learn more about how to make a pom pom here on Gathered.

Step 2

Take one of the plastic bags and cut the bottom away so it can lie as a flat rectangle – don’t cut down the sides as you’ll want the bag to remain a tube shape. Starting at one edge of the tube, cut along the width of the bag, stopping 2cm (3⁄4") from the edge. Leave a 4cm (15/8") gap, then continue cutting a fringe along that one side in this way, making each cut approximately 4cm (15/8") apart.

Step 3

Plastic bottle wreath Step 3

Carefully rotate the bag so the fringe stays in order, then make another set of cuts from the other side halfway between the first, as shown. Again, cut along to the other side, stopping 2cm (3⁄4") from the edge. This will create a continuous zigzag strip. Finally, cut away the handles. These can be used in the pom poms too so they won’t be wasted.

Step 4

Follow Steps 2-3 to cut up a few bags until you have a good amount of plastic yarn to work with. You’ll then use this yarn and the small and medium pom pom makers to make pom poms as you usually would with yarn. As you’ll be trimming the pom poms down, it doesn’t matter too much if the plastic strips are different sizes as it’ll end up looking fairly neat.

Step 5

Plastic bottle wreath Step 5

Wrap the plastic yarn around the pom pom maker until both sides are similarly full. Cut the pom pom open, then cut a 30cm (117/8") length of florist wire with pliers. To hold all the plastic in place, wrap the florist wire twice around the middle of the pom pom, then remove the maker. Pull the wire tight and twist to secure. Make a selection of approximately 12 different-sized pom poms for the wreath in this way.

Plastic bottle wreath Step 5a

Making the plastic bottle wreath flowers

Step 1

Plastic bottle wreath Step 6
Plastic bottle wreath Step 6a

To make one flower, take a bottle and remove the lid and any labels. Cut away the very bottom, then cut down to roughly the middle. Next, cut around the bottle. You should end up with the neck part of the bottle as one piece and the bottom half of the bottle as a curled sheet of plastic. Set the plastic sheet aside for now. Taking the neck half, cut slits around the bottle – the number of slits will determine how many petals the flower has. Five is a good number to aim for. Cut the slits down to roughly where the bottle neck begins, then cut matching curves or points into the end of each petal, as shown.

Step 2

Plastic bottle wreath Step 7

To shape the petals, you’ll need to be in a well-ventilated room. Taking the neck of the bottle in one hand and one petal in the other, hold over a small candle approximately 10cm (4") away from the flame. The plastic of the petal will start to soften and bend. It’s worth spending some time experimenting with the ways that different plastics melt – some melt really quickly and shrivel up, while others take longer and can be moulded more. If you bend and hold the petal with your fingers as it cools, you can determine the spread of the petals more, pulling them out to create an open flower, or inwards to create a more closed bud. For safety, don’t hold the bottle too close to the flame at any point, and don’t directly touch the hot melted plastic.

Step 3

Plastic bottle wreath Step 8

Plastic bottle wreath Step 8aFor the stamen, you need the plastic sheet from the bottle set aside in Step 6. Cut a narrow fringe along one edge, then cut the tips of each fringe into a curve or slant to give added interest. Next, carefully hold the plastic over the candle flame – you just want the tips of the fringe to melt and change shape. Roll up the fringe to create the middle of the flower. Once rolled, you may want to hold the outside over the flame once more to make the fringed ends curl up even further. Repeat Steps 6-8 to make seven flowers.

Step 4

Plastic bottle wreath Step 9

Use a selection of spray paints to add colour to the flowers. If you spray the outside of the bottles the flowers will be very shiny, if you spray the insides, they’ll be more matt. Following the manufacturer’s instructions, first spray a base colour over the whole flower, then spray a contrasting colour over the tips of the petals or just in the centre to add interest. Spray the stamens of each flower a different colour. Insert the stamens into the bottle necks and fix in place with a glue gun.

Making the plastic bag flowers

Step 1

Cut three plastic bags into similar sized rectangles. Stack the six rectangles on top of each other and neaten the pile. Concertina fold the pile of plastic layers along the length, then cut the folded concertina in half along the width so you have two smaller concertinas to work with.

Step 2

Plastic bottle wreath Step 11

Take one of the concertinas – placing a heavy book onto the second one to stop it unfolding – and secure it around the middle with a length of florist wire. If the folded plastic is quite thick, pinch the plastic in the middle so you can twist the wire tightly. Trim the ends into curves and carefully separate out the layers to create petals. Repeat with the second concertina, then repeat Steps 10 and 11 once more so you have four flowers.

Assembling the plastic bottle wreath

Step 1

Take two coat hangers and bend them both into a circle shapes. Ideally you want one coat hanger that’s slightly smaller than the other. If yours are both the same size, cut and reshape one so it’s smaller. Place the two circles together so they join at the top and leave a gap of about 5cm (2") between them at the bottom. Bind the coat hangers together at the top using florist wire.

Step 2

Plastic bottle wreath Step 14Referring to the main image as a guide, lay all the pom poms and flowers out around the wreath until you’re happy with the design. Start at one point on the wreath and use the wire on each pom pom to wire it into place on the coat hanger wreath base. Twist the wire around the frame to secure and cut away any excess with pliers.

Step 3

Plastic bottle wreath Step 15Insert the bottle flowers into the frame and secure with wire and a glue gun. The lips of the screw top necks should help hold them in place. Work your way around the wreath, building up the design as you go. You may find you need to make more of the smaller pom poms to fill in any gaps. Finish the wreath by wrapping small strips of plastic around the coat hanger hooks to cover them.

Your plastic bottle wreath is complete! We hope you enjoyed this eco-friendly craft. For more fun upcycling projects check out our Christmas card recycling tutorial and our visible mending DIY. Our recycled craft ideas for adults are also full of sustainable projects for you to make.